Join WhatsApp Icon JEE WhatsApp Group
NCERT Solutions for Class 6 Science

Chapter 9: Methods of Separation in Everyday Life

Download Solutions PDF
Daily JEE Updates, Tips & Important Alerts
Join 30,000+ students and stay updated with JEE notifications and preparation insights.
Join Now!
Free PDF
Complete NCERT Solution PDF for Chapter 9: Methods of Separation in Everyday Life

NCERT Solutions For Class 6 Science Chapter 9 Methods of Separation in Everyday Life helps students understand various techniques used to separate different substances in daily activities. The page provides detailed NCERT Solutions that explain textbook questions from the Class 6 Science syllabus with simple examples. NCERT Solutions For Class 6 Science help students learn important methods such as filtration, handpicking, sieving, evaporation, and other separation techniques. The chapter connects scientific methods with real-life situations like separating grains, salt, and impurities. These solutions help students develop problem-solving skills and understand the practical applications of Science. Students can use the chapter PDF for revision, homework, and exam preparation. The easy explanations make complex separation processes simple and improve students’ conceptual understanding.

Download Solutions PDF

Intext Questions

Activity 9.1

Activity 9.1: Let us explore

  • Take a handful of roasted peanuts and rub them between your palms. What happens?
  • Is it possible to separate the removed skin and the peanuts?
  • Now, try blowing it. What do you observe?

Solution

Step 1 : Rubbing the roasted peanuts

Hold a handful of roasted peanuts between your two palms and rub them gently, as if you were warming your hands.

  • The thin, reddish-brown outer cover (called skin or husk) becomes loose.
  • After a few seconds you will see many tiny flakes of dry skin peeling off while the whitish kernels (the edible part) remain intact.

Step 2 : Thinking about separation

We now have a mixture of two components:

  • Light, paper-like peanut skins
  • Heavier peanut kernels

Because the two components differ in mass and therefore in how easily air can move them, it should be possible to separate them.

Step 3 : Blowing air (winnowing)

Keep your cupped hands slightly open over a tray or a sheet of paper and blow air gently from your mouth (or wave a stiff sheet of cardboard like a fan).

  • The light, dry skins are carried away by the moving air; they fall at a distance or fly completely out of the tray.
  • The heavier kernels hardly move and stay where they are.

Why does this work?

  • The force of the moving air produces a larger acceleration on objects with less mass; hence the skins are swept away.
  • Kernels have much more mass, so the same air force cannot lift or push them far.

This simple method of using wind or moving air to separate a lighter component from a heavier one is called winnowing. Farmers use exactly the same idea to separate husk from grains after threshing.

Conclusion

  1. Rubbing loosens the peanut skins.
  2. Yes, the skins can be separated from the peanuts because the two parts have different masses.
  3. Blowing air removes the lighter skins while the heavy peanuts stay back — a practical example of winnowing.

Answer

By rubbing, the thin skins come off the peanuts. Yes, the two parts can be separated: on blowing, the light skins are carried away while the heavier peanuts remain behind (winnowing).

2 Which of these components—removed peanut skins or peanuts are blown away?

Solution

Step 1 : Identify the two components in the mixture
The mixture that a street-vendor obtains after roasting and rubbing peanuts contains

  • Peanuts (the edible nut inside the shell)  – these are the useful part we want to keep.
  • Peanut skins (the thin reddish-brown covers that come off after rubbing)  – these are the unwanted part, i.e. the husks.

Step 2 : Recall the principle of winnowing
Winnowing separates a lighter component from a heavier component with the help of wind or moving air.

  • Lighter component  ⇒ is carried away (blown away) by the wind.
  • Heavier component  ⇒ falls down almost vertically and is collected near the person doing the winnowing.

Step 3 : Compare the relative masses of the two components
Each peanut (with the edible seed) is much heavier than an equal-sized piece of its dry skin because most of the mass in a peanut resides in the cotyledons (the nut). In other words,
$$\text{mass of one whole peanut} \;\gt\; \text{mass of one skin piece}$$
Therefore the skins are the lighter component.

Step 4 : Apply the principle
During winnowing a gentle breeze or the draught produced by shaking the tray carries away the lighter skins, whereas the heavier peanuts fall back into the tray.

Conclusion
The removed peanut skins are blown away by the wind, while the peanuts stay behind.

Answer

The removed peanut skins are blown away.

3 How do you think farmers separate so many grains from husk?

Solution

Step 1 – Understanding the mixture
After harvesting, the ears of cereal plants (for example, wheat or rice) still contain

  • the useful grain, which is heavy and edible, and
  • the unwanted husk / chaff, which is very light.
To get clean grain the farmer has to remove this light husk.

Step 2 – Loosening the grain from the stalk (Threshing)
The first operation is called threshing. Farmers beat the harvested stalks on a hard surface or run a threshing machine so that the grain seeds come out of the ears. After threshing we obtain a loose mixture of

  • grain + small pieces of husk + bits of stalk.
Now we must separate the grain from the lighter husk.

Step 3 – Using wind to separate light and heavy particles (Winnowing)
Farmers use the method of winnowing, which works because the two components have different weights (mass) for roughly the same size, i.e. different densities.

Let
$$m_g$$ be the mass of one grain,   $$m_h$$ be the mass of one husk particle, with $$m_g \gt\!\! m_h$$.
The heavier grain therefore has a larger weight $$W_g = m_g g$$ than the husk weight $$W_h = m_h g$$ (where $$g$$ is acceleration due to gravity). Because of this difference:

  • gravity pulls the heavier grain down almost vertically,
  • a horizontal wind can easily carry the very light husk away.

Actual procedure in the field

  1. The farmer stands on a slightly raised platform or on a stool, holding a shallow, flat basket containing the threshed mixture.
  2. He slowly pours the mixture down from a height of about 1 – 1.5 m while a gentle natural breeze (or an electric fan) blows across.
  3. Because $$W_g \gt W_h$$, the grains fall almost straight to the ground and form a heap just below the basket, whereas the husk, being lighter, is pushed several metres away by the wind and forms a separate, light pile.
Diagrams you can draw:
  • A farmer standing on a stool, tipping a basket so the mixture falls in a curved path. Show heavier grains landing near his feet and light husk drifting farther.

Step 4 – Collecting the products
The farmer now simply sweeps up the heap of grains for storage and disposes of the husk (often as cattle fodder or fuel).

Why winnowing works
The method employs the difference in density (or effective weight) of the two components. Because no new substance is formed, this is a physical separation technique.

Conclusion
Thus, farmers separate large quantities of grain from the husk first by threshing and then by winnowing, letting wind or a fan carry away the lighter husk while the heavier grains fall down to be collected.

Answer

They use the traditional method of threshing followed by winnowing: after loosening the seeds from the stalk by threshing, the farmer pours the grain-and-husk mixture from a height so that wind (or a fan) blows the light husk away while the heavy grains fall straight down and are collected.

4 A small amount of puffed rice is mixed with chana dal. Can you think of separating the mixture by any method other than handpicking?

Solution

Step 1 – Observe the two components
Puffed rice grains are very light; chana dal grains are much heavier and smaller. The property that differs the most is their density (mass per unit volume):
$$\rho = \dfrac{\text{mass}}{\text{volume}}.$$
Puffed rice has a very low $$\rho$$, chana dal a much higher $$\rho$$.

Step 2 – Choose a method that works on density/weight difference
The traditional technique that separates a lighter component from a heavier one by the action of wind is winnowing. It is quicker and cleaner than hand-picking.

Step 3 – Set up the winnowing process

  1. Stand on a stool or hold the mixture above a tray kept on the ground.
  2. Switch on a table fan (or make use of a gentle natural breeze) so that air flows horizontally across the falling grains.
  3. Slowly pour the mixture down in a thin stream.

Step 4 – What happens while the mixture falls
The falling grains experience two main forces:

  • Gravitational force $$F_g$$, the same on both kinds of grains per unit mass.
  • Force of the moving air $$F_a$$, which acts sideways; it is much more effective on the very light puffed rice than on the dense chana dal.

Because $$F_a \gt\!\! F_g$$ for puffed rice (in comparison to its weight) it gets blown away and lands farther. For chana dal, $$F_g$$ dominates, so it falls almost vertically.

Step 5 – Collect the separated components

  1. Place one container directly below the falling stream to catch the chana dal.
  2. Place another wider container a little farther down-wind to collect the blown-off puffed rice.

Conclusion
By exploiting the large difference in density, the mixture can be winnowed; this is a faster and easier method than handpicking and gives two clean, separate fractions: light puffed rice and heavy chana dal.

Answer

Use winnowing: pour the mixture in a gentle breeze or in front of a fan; the light puffed rice is carried farther by the air, while the heavier chana dal falls almost straight down, so the two can be collected in separate containers.

5

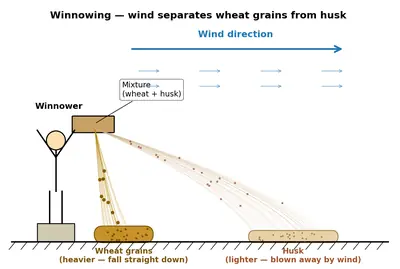
What do you infer from Fig. 9.4? Do both the components, wheat grains and husk, fall at the same place? Which of the two components get blown away? Can the wind separate the two components?
Fig. 9.4
Fig. 9.4

Solution

Step 1 : Observe what is happening in Fig. 9.4
In the picture a farmer pours a mixture of wheat grains and husk from a shallow pan held high in the air. At the same time a gentle breeze is blowing from the farmer towards the open field.

Step 2 : Identify the forces acting on each component

  • Gravitational pull acts vertically downwards on every particle with a force $$F_g = m g$$.
  • The horizontal wind exerts a sideways drag force $$F_w$$ whose size depends on the particle’s mass, size and shape. Light pieces experience a larger acceleration for the same $$F_w$$ because $$F = m a \Rightarrow a = F_w / m$$.

Step 3 : Compare the two components

PropertyWheat grainHusk
Typical masslarger, $$m_g$$smaller, $$m_h$$
Densityhighlow
Effect of gravitystrong (falls almost vertically)moderate
Effect of windsmall sideways shiftlarge sideways shift

Step 4 : Predict the landing positions

Because $$m_g \gt m_h$$, wheat grains obtain a very small sideways acceleration $$a_g = F_w / m_g$$, so they drop in a heap just below the pan. Husk pieces, being much lighter, acquire a larger acceleration $$a_h = F_w / m_h$$ and are carried some distance away before reaching the ground.

Step 5 : State the inference

  • The two components do not fall at the same place.
  • The lighter component—the husk—gets blown away by the wind and forms a separate pile farther from the farmer.
  • Yes, the wind is sufficient to separate the lighter husk from the heavier grains; this method of using moving air to separate substances of different weights is called winnowing.

Answer

The heavier wheat grains fall almost straight down in one heap, while the lighter husk is blown sideways by the wind and falls farther away; therefore the two components land at different places. The husk is the part that gets blown away. Hence, a current of wind can indeed separate wheat grains from husk (winnowing).

6 Valli is unable to separate husk from rice in a closed room. How can you help her?

Solution

What goes wrong inside a closed room?
Inside the room there is practically no moving air. Because the rice grains and the husk are almost the same size, ordinary sieving cannot separate them; we must use their difference in weight – rice is heavy, husk is light.

The right principle: winnowing
In winnowing the mixture is dropped in a stream of air. The light husk is carried away by the air-current while the heavy grains fall almost vertically.

How to help Valli step by step

  1. Give her two shallow plates or pans and keep an electric fan ready.
  2. Switch on the fan so that it blows steadily across the working area.
  3. Ask her to stand in front of the fan and slowly pour the rice-husk mixture from the higher pan into the lower one held a little below.
  4. While the grains fall, the air-current pushes the lighter husk sideways; it collects in a separate heap, leaving clean rice in the lower pan.
  5. Finally sweep away the husk and store the separated rice.

This is exactly the winnowing method; only the natural wind is replaced by the fan so it can be done even indoors.

Answer

Separate the mixture by winnowing: stand before a running fan (or go outdoors in gentle wind) and let the rice–husk mixture fall from one pan to another; the moving air blows the lighter husk away while the heavier rice grains drop straight down.

7 Carefully observe a sieve. Are all the holes of the sieve the same size? Will sieving work if the holes of the sieve are larger than the substances? Is there any difference in the size between the particles that pass through the sieve and the particles that remain on the sieve?

Solution

Step 1 : Look closely at the sieve
A sieve is usually made of a metal or plastic mesh fixed in a circular frame. All the tiny openings (called holes or pores) are produced by the same machine or by weaving wires of the same thickness. Therefore each opening has practically the same diameter. In everyday language we say “all the holes are of the same size”.

Step 2 : Why must the holes be of one fixed size?
Assume the diameter of every hole is $$d\;\text{mm}$$. When we pour a mixture on the sieve, any particle with its own diameter $$\lt d$$ can fall through, whereas a particle with diameter $$\gt d$$ will be stopped. If the holes were of many different sizes, some big holes would let large unwanted pieces pass, and separation would not be clean. Hence, identical holes make sieving reliable.

Step 3 : What if the holes are larger than both substances?
Suppose the holes have diameter $$d$$ and the two types of particles in the mixture have diameters $$d_1$$ and $$d_2$$ such that
$$d_1 \lt d \quad\text{and}\quad d_2 \lt d$$.
Both kinds of particles are now smaller than the openings, so both will fall through together. No separation will take place. Therefore, for sieving to work, the openings must be smaller than the particles we want to retain and larger than those we want to collect below.

Step 4 : Comparing the size of particles above and below the sieve
After proper sieving:

  • Particles that pass through have diameter $$\lt d$$ (they are the finer or smaller particles).
  • Particles that remain on the sieve have diameter $$\gt d$$ (they are the coarser or larger particles).
Hence there is an obvious difference: the material collected below is finer, while the material left above is coarser.

Step 5 : Conclusion in simple words

  • Yes, the holes of a sieve are made all the same size.
  • If the holes are bigger than every substance in the mixture, sieving will not work because everything will pass through.
  • The particles that go through are always smaller than the particles that stay back on the sieve.

Answer

(i) In an ordinary sieve all the holes are of exactly the same size.

(ii) No. If the openings are larger than the materials being separated, everything will fall through and sieving will fail.

(iii) Yes. Particles that pass through are smaller than the holes, while the particles that stay on the sieve are larger.

8 Have you ever observed sieves being used at construction sites to separate pebbles and stones from the sand?

Solution

Observation to recall

When a building is being constructed, labourers often pour a heap of freshly-dug earth or river sand on a slanting iron mesh called a sieve.

  • The sieve has many tiny holes of equal size (its mesh size).
  • Workers shake or tilt the sieve.

What happens?

  1. The fine sand grains are small enough to pass through the holes. They fall down and form a clean pile of sand beneath the sieve.

  2. Larger particles such as pebbles, small stones, pieces of dry mud and sometimes bits of bricks are too big to go through the holes. These remain on top of the mesh and are later thrown away.

Which method of separation is this?

The process is called sieving. It separates solid particles of different sizes by allowing only the smaller particles to fall through the perforations.

Why is it useful at a construction site?

  • Pebbles and stones weaken plaster and concrete if they mix with fine sand.
  • A uniform grain size of sand gives a smooth finish to walls and stronger mortar.

Answer to the textbook question

Yes. At construction sites large iron or nylon sieves are routinely used to separate unwanted pebbles and stones from sand before the sand is mixed with cement or used for plastering.

Answer

Yes. Workers pass sand through a large mesh sieve so that fine sand falls through while bigger pebbles and stones stay behind, thereby separating them.

9

What is Sabarmati Ashram famous for?

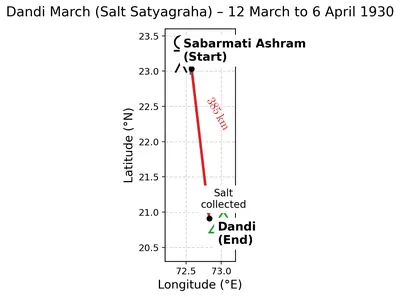
Draw a poster showing Dandi March and discuss why it was organised.

Figure
Figure

Solution

Step 1 : Recalling the historical facts
Sabarmati Ashram lies on the banks of the Sabarmati River near Ahmedabad, Gujarat. It was founded by Mahatma Gandhi on 17 June 1917. From 1917 to 1930 it served as:

  • Gandhiji’s residence and the place where he experimented with truth, non-violence (ahimsa) and simple living.
  • The headquarters for many movements such as the Non-Co-operation Movement (1920-22) and the Khadi and Swadeshi programmes.
  • The starting point of the historic Dandi (Salt) March on 12 March 1930.

Because of these reasons the Ashram is famous all over the world as a symbol of India’s freedom struggle and Gandhiji’s ideals.

Step 2 : How to draw a poster of the Dandi March

  1. Draw a broad horizontal river-bank line to show the Sabarmati River. Mark a small hut labelled “Sabarmati Ashram”.
  2. From the hut, sketch a winding road that moves diagonally across the sheet towards the opposite corner and ends at the sea labelled “Arabian Sea – Dandi Village”.
  3. Along the road draw a group of marchers (about 78 people) with Gandhiji leading in front, holding a walking stick, wearing simple homespun clothes.
  4. Add slogans in neat bubbles such as “We refuse the unjust Salt Tax”, “Satyagraha – Our weapon”.
  5. Shade the background lightly with the date band “12 March – 6 April 1930” on top.
  6. Colour only key elements (Indian tricolour, sea-water, and Gandhiji’s walking stick) to keep the focus on the message.

Step 3 : Why was the Dandi March organised?
The British Government had imposed a heavy salt tax; Indians were not allowed to make or sell their own salt although salt is naturally available on India’s sea coast.

  • Mahatma Gandhi chose salt because it was used by every Indian, rich or poor. Attacking the salt law would unite the whole country.
  • On 31 January 1930 Gandhiji wrote to the Viceroy demanding abolition of the salt tax. Receiving no positive reply, he launched the Civil Disobedience Movement.
  • The Dandi March (12 March – 6 April 1930): Gandhiji and 78 volunteers walked about 385 km from Sabarmati Ashram to the coastal village of Dandi. On 6 April he picked up a lump of natural salt, symbolically breaking the law.
  • This peaceful yet dramatic act inspired millions across India to break colonial laws and intensified the freedom struggle.

Therefore, Sabarmati Ashram is remembered mainly for being Gandhiji’s base and for giving the world the famous Dandi March – a milestone in India’s journey to independence.

Answer

Sabarmati Ashram is famous as Mahatma Gandhi’s residence and, above all, as the place from which he began the historic Dandi (Salt) March in 1930.

The Dandi March poster should show Gandhiji and 78 followers walking from Sabarmati Ashram to the seacoast at Dandi, with slogans against the unjust salt tax. The march was organised to launch the Civil Disobedience Movement by peacefully breaking the British salt law and uniting Indians in the freedom struggle.

10 Find out about some water bodies in India that contain common salt. One such source is Sambhar Lake in Rajasthan.

Solution

Step 1 – Recall what “common salt” is
In science we use the name “common salt” for the chemical substance $$\mathrm{NaCl}$$ (sodium chloride). Any natural water that tastes salty contains a noticeable amount of this substance. We therefore have to search for Indian lakes, lagoons or marshes whose water is naturally saline (salty).

Step 2 – Identify the different kinds of salty water bodies

  • Coastal lagoons / estuaries – They lie very close to the sea and receive sea‐water through narrow openings. Hence they are partly salty (brackish).
  • Salt lakes (inland) – These lakes lie away from the sea but have no outlet for water to flow out. Water can leave only by evaporation, so $$\mathrm{NaCl}$$ gets concentrated and the lake gradually becomes salty.
  • Seasonal salt marshes – Flat land that fills with seawater or rainwater for a few months and then dries up, leaving layers of salt.

Step 3 – List well-known Indian examples

S. No.Name of water bodyState / U.T.TypeWhy it is salty
1Sambhar LakeRajasthanInland salt lakeNo outlet; intense evaporation concentrates $$\mathrm{NaCl}$$.
2Chilika LakeOdishaCoastal lagoonSea water enters through a narrow mouth; mixture becomes brackish.
3Pulicat LakeTamil Nadu & Andhra PradeshCoastal lagoonConnected to the Bay of Bengal, so part of the water is salty.
4Great Rann of Kutch (including Kharaghoda area)GujaratSeasonal salt marshDuring monsoon, sea water floods the flat land; when it dries, a salty crust remains.
5Pangong TsoLadakh (UT)High-altitude salt lakeEndorheic (land-locked); evaporation leaves behind dissolved salts, including $$\mathrm{NaCl}$$.

Step 4 – How people use the salt
In places such as Sambhar Lake and the Rann of Kutch, shallow ponds called “salt pans” are made. Water from the lake or marsh is let in and allowed to evaporate under the sun. Finally, solid crystals of common salt are raked out, collected, and later purified for eating or for industrial use.

Final observation
Thus, besides the sea itself, India has several inland and coastal water bodies whose waters contain common salt in appreciable amounts, with Sambhar Lake being the best-known inland source.

Answer

  • Sambhar Lake (Rajasthan)
  • Chilika Lake (Odisha)
  • Pulicat Lake (Tamil Nadu–Andhra Pradesh)
  • Great Rann of Kutch (Gujarat)
  • Pangong Tso (Ladakh)

11 Have you ever observed white patches on the dark coloured clothes you wear during hot summers? How are these patches formed?

Solution

Step 1 : Sweating on hot days
When the weather is hot, our body cools itself by producing sweat. Sweat is a solution, that is, a mixture made of two parts:

  • Solvent – water
  • Solutes – dissolved salts such as common salt $$\mathrm{NaCl}$$ and small amounts of other minerals.

Step 2 : Sweat soaks into the cloth
The sweat comes out through the pores of our skin and spreads on the inner surface of the shirt, T-shirt or kurta. At this moment the cloth looks only wet; no white marks are seen yet.

Step 3 : Evaporation takes place
Because the surrounding air is hot, the water present in the sweat gains heat energy. One by one, water molecules leave the liquid surface and mix with the air; this process is called evaporation.

Step 4 : What remains after evaporation?
The dissolved salts cannot evaporate; they are non-volatile solids. As more and more water molecules move away, the solution becomes more concentrated until, finally, all the water is gone and only the salts are left behind on the fibres of the cloth.

Step 5 : Appearance of white patches
These left-behind salts form tiny colourless crystals. Against a dark background the cluster of colourless (almost white) crystals looks like white patches or rings. Thus the marks we see are nothing but dried-up salts from our own sweat.

Step 6 : Name of the separation method involved
The change from a liquid solution (sweat) to solid crystals (salts) by removal of the solvent water is exactly the same principle as the separation technique called evaporation. In laboratories, evaporation is used to separate a soluble solid from its solution; here Nature performs the same method on our clothes!

Answer

The white patches are crystals of salts (mainly common salt) left behind when the water of our sweat evaporates from the cloth; the separation occurs by the process of evaporation.

Activity 9.2

Activity 9.2: Let us observe and create

  • Take a bowl or any container and fill it half with water.
  • Add 2–3 teaspoons of salt into it and stir till the salt dissolves to form a solution.
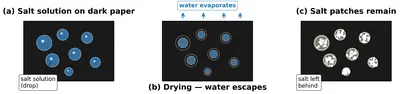
  • Take a small piece of black or dark coloured thick paper and spread a few drops of the salt solution on it (Fig. 9.7a).
  • You can also create any art of your choice with this salt solution.
  • Allow it to dry and then observe it (Fig. 9.7b and Fig. 9.7c).

Do you observe some patches on the paper? What do you think is left on the paper? You can feel the presence of salt by touching the paper. Where has the water disappeared? Recall the chapter 'A Journey through States of Water'.

Fig. 9.7
Fig. 9.7

Solution

Step 1 : Preparing the salt solution

  • Water is taken in a bowl till it is about half–full.
  • 2–3 teaspoons of common salt (chemical name — sodium chloride, written as $$\mathrm{NaCl}$$) are added and stirred.
  • On stirring, every particle of salt breaks up into tiny ions and spreads uniformly among the water particles. A clear solution is formed because salt is completely soluble in water.

Step 2 : Spreading the solution on paper

  • A few drops of this salt solution are brushed or dripped on a dark-coloured piece of thick paper so that the marks are easily visible later.
  • Because the drops are colourless, at this stage the paper looks merely wet.

Step 3 : Leaving it to dry

  • The paper is kept undisturbed for some time.
  • Slowly the wet look disappears and light-coloured patches begin to show up.

Observation

  • After complete drying, irregular whitish patches or tiny sparkling grains are clearly seen on the dark background.
  • On gently rubbing the patch with a fingertip one can feel a rough, granular substance.

What is left on the paper?

The grains are nothing but the salt $$\mathrm{NaCl}$$ that had been dissolved in the water. When the water went away, the salt remained behind in its solid form.

Where has the water gone?

  • While the paper was drying, the water gained heat from the surroundings and changed from the liquid state to the gaseous state (water vapour).
  • This change of a liquid into vapour below its boiling point is called evaporation.
  • The water vapour mixed with the air in the room and therefore is no longer visible on the paper.

Concept linked with the chapter "A Journey through States of Water"

The activity is a simple demonstration of the change of state of matter (liquid $$\rightarrow$$ gas) and of the separation method called evaporation, which is used to obtain a solid (salt) from its solution by allowing the liquid (water) to evaporate.

Answer

Yes, whitish patches of solid salt are left on the paper; the water has evaporated into the air as water vapour.

Activity 9.3

Activity 9.3: Let us investigate

This activity may be demonstrated by the teacher.

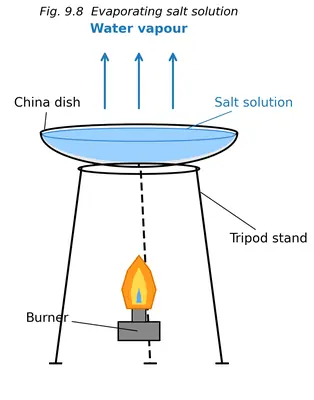
  • Take some salt solution (prepared in Activity 9.2) in a china dish. If a china dish is not available, another suitable vessel may be used.
  • Heat and let the water boil away as shown in Fig. 9.8.
  • Allow the china dish to cool down.
  • What do you observe? What is left in the china dish?
Fig. 9.8
Fig. 9.8

Solution

Step 1 : Recap – What is in the china dish?
In Activity 9.2 we prepared a salt solution, that is, common salt (table salt) was dissolved completely in water. So the liquid we now pour into the china dish contains:

  • Water (the solvent).
  • Salt, $$\mathrm{NaCl}$$, fully dissolved in that water (the solute).

Step 2 : Heating the salt solution
When the teacher gently heats the china dish, the temperature of the liquid rises. As soon as the temperature reaches the boiling point of water, $$100\,{}^{\circ}\text{C}$$ at normal pressure, water starts changing into steam (water vapour) and escapes into the air.

No salt particles leave with the steam because the salt is a non-volatile solid; only the volatile component (water) evaporates.

Step 3 : What change actually happens?
Chemically we can write the physical change as

$$\text{Salt solution}\; (\mathrm{NaCl(aq)}) \;\xrightarrow[\text{heat}]{}\; \mathrm{NaCl(s)} + \text{water vapour}$$

Here “(aq)” means “dissolved in water” and “(s)” means “solid”.

Step 4 : Cooling and observation
After all the water has boiled away, the teacher switches off the burner and allows the hot china dish to cool. When it is safe to look inside, we observe:

  • The liquid has disappeared; the dish is dry.
  • A white, crystalline solid coats the bottom and sometimes the sides of the dish.

Step 5 : Identifying the residue
The white solid is the same common salt that was originally dissolved in the water. Its taste (if permitted to taste a tiny pinch), colour, and crystalline nature confirm this.

Step 6 : Conclusion – What did we learn?

  1. Heating allows the evaporation of the solvent (water).
  2. The non-volatile solute (salt) does not evaporate and is left behind as a solid residue.
  3. Therefore, evaporation is a useful method to separate a dissolved solid from its solution, a technique we use in real life to obtain common salt from sea water in salt pans.

Answer

After the water boils away and the dish cools, only white crystals of common salt remain in the china dish; all the water has evaporated.

14 Is there any method through which I can get back both salt and water?

Solution

Background idea
When common salt (sodium chloride) is dissolved in water the two components form a solution.  The particles of salt are too small to be removed by filtration or by decantation, and ordinary evaporation gives the salt back but loses the water as invisible vapour.  To recover both substances we must first change water into vapour and then cool that vapour back into liquid water.  The combined use of evaporation + condensation in one continuous set-up is called simple distillation.

Apparatus you can see in the school laboratory

  • A round-bottom (or flat-bottom) flask fitted with a one-holed rubber cork.
  • A thermometer inserted through the cork so that its bulb stays just above the liquid.
  • A delivery tube leading from the cork into a Liebig condenser (a glass tube surrounded by a water-jacket).
  • Two rubber tubes to let cold water in and out of the condenser jacket.
  • A beaker or conical flask to collect the distillate (the condensed liquid).
  • A tripod stand, wire-gauze and Bunsen burner (or spirit lamp) for heating.

Step-by-step method

  1. Pour the salt solution into the distillation flask till it is half-full and fix the cork & thermometer.
  2. Arrange the condenser so that the delivery tube slopes gently downward into the receiving beaker; connect the water-inlet at the lower end of the jacket and the water-outlet at the upper end (this keeps the jacket full of cold water).
  3. Light the burner and gently heat the flask.  Very soon the solution begins to boil at about $$100\,\mathrm{^{\circ}C}$$.  Only water turns into vapour; the salt has a much higher boiling point and remains behind.
  4. The hot vapour passes into the condenser.  Because cold water constantly flows around the inner tube, the vapour loses heat, condenses and drips out as clear distilled water.
  5. Continue heating until you have collected the desired amount of water.  Finally switch off the burner and allow the apparatus to cool.  Crystalline salt can now be scraped out of the flask.

What each step achieves

OperationPhysical change usedComponent obtained
Heating/boilingEvaporation (liquid → vapour)Leaves salt behind
Cooling in condenserCondensation (vapour → liquid)Collects pure water

Result

Because the salt never vaporises, it stays in the original flask.  Because the water vapour is cooled and collected, we finally obtain both separate and usable: dry common salt and liquid water.

Name of the method: Simple distillation (sometimes just called ‘distillation’).

Answer

Yes. By separating the salt solution through simple distillation—heating the solution to turn only water into vapour and then condensing that vapour in a condenser—we collect pure water in one container while dry salt remains in the boiling flask. Thus both salt and water are recovered.

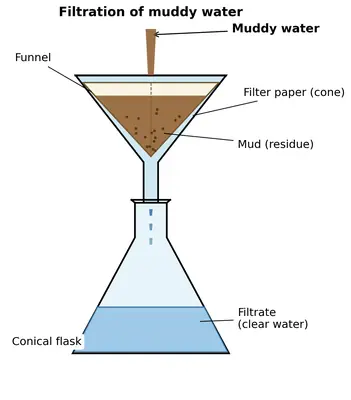
15 Observe the figure. Does it answer the question? Can you name the process involved?

Solution

Given question from Chapter 9 “Methods of Separation in Everyday Life”
“Observe the figure. Does it answer the question? Can you name the process involved?”

A textbook drawing shows a mixture of muddy water being poured through a filter-paper cone kept in a funnel. Clear water collects in a beaker, while the mud remains on the filter paper.


Step 1 Look carefully at what is happening in the picture

  • The funnel is lined by a folded filter paper (a porous barrier).
  • A suspension of soil in water (muddy water) is poured into the funnel.
  • Only the liquid phase comes out of the stem and drips into the beaker.
  • The solid mud particles stay behind on the filter paper.

Therefore two portions are obtained:

  • Filtrate (the clear water that passes through).
  • Residue (the mud left on the filter paper).

Step 2 Identify the principle

A porous barrier (filter paper) has tiny pores that allow only the liquid to pass while blocking bigger solid particles. This is exactly the principle of filtration.


Step 3 Answer both parts of the asked question

  1. Does the figure answer the question?
    The picture itself shows the complete method of separating an insoluble solid from a liquid, so yes, it answers the question “How can we separate such a mixture?”
  2. Name of the process involved
    The process is filtration.

Thus the diagram illustrates filtration, and it already conveys how the separation is achieved.

Answer

Yes. The diagram itself explains the separation, and the process being used is filtration.

16 In the chapter 'Materials Around Us', you have studied that oil does not mix with water and forms a separate layer when left undisturbed for some time. Which method of separation would you use to separate oil and water?

Solution

Step 1 – Recall the property of the mixture
Oil and water do not dissolve in each other; they form two separate layers because the density of oil is smaller: $$\rho_{\text{oil}} < \rho_{\text{water}}$$. Hence oil floats on water.

Step 2 – Choose an appropriate separation process
When two immiscible liquids settle into distinct layers, the simplest way to separate the upper layer is decantation.

Step 3 – Describe the procedure

  1. Let the oil–water mixture stand undisturbed until a clear boundary between the two layers is visible.
  2. Hold the container steadily and tilt it slowly.
  3. Cautiously pour (decant) the top oil layer into another vessel, leaving the water layer behind.

(In laboratories a separating funnel can be used for the same purpose, but the basic principle is still decantation of immiscible liquids.)

Conclusion
The method used to separate oil from water is decantation.

Answer

Decantation — carefully pour off the upper oil layer after the mixture has settled.

Activity 9.4

Activity 9.4: Let us experiment

  • Try to fold the filter paper yourself and make a cone as shown in Fig. 9.10.
  • Place it inside a funnel kept on a conical flask and pour muddy water into it (Fig. 9.11).
  • What do you observe? Do the mud particles pass through the filter paper?
  • The water coming from the funnel will be collected in the conical flask.
  • You will get mud as a residue on the filter paper and clear water as filtrate in the conical flask.
Fig. 9.10
Fig. 9.10

Solution

Step 1 : Folding the filter paper
• Take a circular filter paper.
• Fold it once to get a semicircle.
• Fold the semicircle once more to get a quarter-circle.
• Open one layer so that you obtain a cone with three layers on one side and one layer on the other side (as shown in the textbook Fig. 9.10). This cone will fit exactly in the funnel.

Step 2 : Setting up the apparatus
• Fix the funnel in a stand so that its stem touches the inside wall of a clean conical flask.
• Moisten the filter paper cone with a little clean water so that it sticks to the glass of the funnel and there are no air gaps.
• Place the cone in the funnel. The tip of the cone must not project beyond the stem of the funnel; otherwise it will drip outside the flask.

Step 3 : Pouring the muddy water
• Stir the muddy water so that the mud is well mixed.
• With a glass rod, guide the liquid gently along the rod into the filter cone. This prevents splashing and tearing of the filter paper.
• Pour only up to about two-thirds of the height of the filter paper cone. Do not overfill.

Step 4 : Observations during filtration
• At first the liquid level in the cone rises; after a few seconds, clear drops begin to fall from the stem of the funnel.
• These drops collect in the conical flask as a colourless, transparent liquid.
• Inside the cone, the mud particles gradually form a brown layer. The layer becomes thicker, but no particles are seen crossing into the filtrate.

Step 5 : Answering the questions
(a) What do you observe?
  ➔ Water collected in the flask is clear; the filter paper holds back the mud.
(b) Do the mud particles pass through the filter paper?
  ➔ No. The pores of the filter paper are big enough for water molecules to go through, but too small for the much larger mud particles.
(c) What do we obtain?
  ➔ Mud remains on the filter paper as the residue, and clear water collected in the conical flask is the filtrate.

Step 6 : Why does filtration work?
• A filter paper is a special kind of paper with microscopic holes.
• When muddy water stands on the paper, gravity pulls the liquid down. Only particles smaller than the holes can pass.
• Water molecules are much smaller than the holes, so they go through.
• Mud particles are aggregates of soil and are far larger, so they remain trapped.

Conclusion
Filtration is a physical method of separation that separates an insoluble solid (mud) from a liquid (water) by passing the mixture through a porous barrier (filter paper). The liquid obtained is called the filtrate, and the solid left behind is called the residue.

Answer

No, the mud particles do not pass through the filter paper. They stay on it as the residue, while clear water (the filtrate) collects in the conical flask.

18 How many layers of cloth do I need to use to get clear water?

Solution

Step 1 – Recall the activity from the textbook
In the chapter you were asked to clean muddy water by pouring it through a hand-kerchief that had been folded several times. The folded cloth acted like a simple filter paper.

Step 2 – Why does folding help?
When the cloth is folded, many layers are formed. Each layer has tiny pores (holes) between the threads. The more layers there are, the smaller the effective pores become, so mud particles stay on top while water passes through.

Step 3 – Testing with different numbers of layers

No. of layers triedObservation of water coming out
1 layerWater still looks quite muddy.
2 layersSome improvement but water is not clear.
3 layersFewer particles, water is only slightly cloudy.
4–5 layersWater appears clear to the eye; most mud particles remain on the cloth.

Step 4 – Conclusion
A minimum of four layers of cloth is required to obtain water that looks clear. Folding the cloth once more (making it five layers) gives an even safer result, so the textbook suggests using 4 – 5 layers.

Answer

Use the cloth folded into about 4 – 5 layers; with this many layers the filtered water looks clear.

Activity 9.5

Activity 9.5: Let us design and create

Valli goes for a nature walk with her Dadi and collects some water from a pond in a container. She observes some unwanted substances in it. Design and create a working model of water filter using low-cost materials.

Solution

Worked Solution – Activity 9.5

Topic: Methods of Separation in Everyday Life – Designing a low-cost water filter

1. Aim of the activity
Valli wants to remove the visible impurities she noticed in pond water. We shall design and build a simple filter that uses the principles of sedimentation, decantation and filtration.

2. Scientific principle

  • Large, heavy particles settle down when water is allowed to stand still (sedimentation).
  • Clearer water can be gently poured out, leaving the settled solids behind (decantation).
  • Passing decanted water through tiny pores (sand, charcoal, cloth) blocks still-suspended particles (filtration).
  • Charcoal has tiny holes that adsorb coloured and smelly substances, making water clearer and better smelling.

3. Materials required (all low-cost / easily available)

  1. 1 transparent 1- or 2-litre plastic bottle (discarded cold-drink bottle)
  2. 1 pair of scissors or a paper-cutter (to be handled by an adult)
  3. 2 squares of clean cotton cloth (≈ 15 cm × 15 cm each)
  4. Fine sand – 1 cup
  5. Coarse sand – 1 cup
  6. Small gravel / pebbles (5–10 mm) – 1 cup
  7. Activated charcoal or crushed clean charcoal from burnt wood – ½ cup
  8. Rubber band or thread
  9. Plastic or metal tumbler / beaker to collect filtered water
  10. Dirty pond water collected by Valli
  11. (Optional) An extra transparent jar to show sedimentation step separately

4. Diagram to draw in the notebook

  • Draw the cut bottle kept upside down like a funnel.
  • Show, from bottom to top, layers in the following order: cloth, charcoal, fine sand, coarse sand, gravel.
  • Indicate the flow direction of water with arrows.
  • Label each layer and the outlet of clean water.

5. Construction – step by step

  1. Preparing the container
    Cut the plastic bottle at $$\approx$$ one-third of its height from the neck. Keep the upper part (with the mouth and cap) inverted. This will act like a funnel. Make a tiny hole in the cap with a pin so that water drips slowly; or keep the cap slightly loose.
  2. Fixing bottom cloth
    Stretch one square of cotton cloth across the bottle mouth from inside and screw the cap back. The cloth forms the first fine screen.
  3. Adding filter media (add gently so layers do not mix):
      a. Small layer of gravel (≈ 2 cm).
      b. Coarse sand (≈ 2 cm).
      c. Fine sand (≈ 2 cm).
      d. Activated charcoal (≈ 1 cm).
    Compact each layer lightly with a spoon.
  4. Covering the top
    Place the second square of cotton cloth above the gravel to stop the layers from floating when water is poured. Fix it with a rubber band.
  5. Mounting the setup
    Place the inverted bottle (now the filter) on the mouth of the empty tumbler.

6. Operation

  1. Sedimentation (optional but improves life of the filter): Pour the pond water into another jar, let it stand 15–30 minutes. Mud and leaves settle at the bottom. This is based on gravitational settling.
  2. Decantation: Gently pour the clearer upper water into the top of the filter. Avoid pouring the settled sludge.
  3. Filtration: Water slowly passes through gravel, sand and charcoal. Suspended particles get trapped at each stage.
    The collected water appears clearer, colour and odour are reduced.

7. Observations (record in table)

StepAppearance of waterExplanation
Original pond sampleMuddy, bits of leaves floatingContains suspended solids and organic matter
After sedimentationUpper layer clearer than beforeHeavy particles settled due to gravity
After filtrationAlmost colourless, no visible particlesSand & cloth trap fine particles; charcoal adsorbs colour & smell

8. Precautions

  • Wash sand and gravel beforehand until rinse water runs clear; this avoids adding extra dust to the filter.
  • Do not disturb layers while pouring water; pour slowly.
  • The filtered water is clearer but not guaranteed germ-free. For drinking, it should still be boiled for $$\ge 5\,\text{min}$$ to kill microbes.

9. Scientific explanation of each layer

  1. Gravel: Stops large leaves, twigs; also spreads water evenly.
  2. Coarse & fine sand: Their pore sizes are small enough to trap fine silt. According to the simple size-exclusion idea, particles bigger than the pore cannot pass. Hence clarity improves.
  3. Charcoal: Porous structure gives a very large surface area. Impurities stick to its surface (adsorption). This removes colour & bad odour.
  4. Cotton cloth: Extra fine sieve to retain any loose sand and provide mechanical support.

10. Cost estimate

ItemApprox. cost (₹)
Discarded plastic bottle0 (reused)
Sand, gravel (local source)0–5
Charcoal (half cup)5
Cotton cloth pieces (old handkerchief)0
Total< 10

11. Conclusion

Using simple, inexpensive household materials, we employed the separation techniques of sedimentation, decantation and filtration to obtain visibly cleaner water from a dirty pond sample. This working model demonstrates the basic principle used in household and municipal water-treatment units.

This completes Activity 9.5.

Answer

Working model built with an inverted plastic bottle containing successive layers of gravel, coarse sand, fine sand and charcoal between two pieces of cloth gives clear water when pond water is first allowed to settle and then poured through it, thus demonstrating sedimentation, decantation and filtration using low-cost materials.

20

Let us raise awareness about the issues related to river and ocean pollution by composing a poem.

A few lines have been written here, add more lines—

Piece of plastic in my neck,
As in pain I cry,
Koilas, Koilas…where are you dear?
Papa fish cries and Mama fish has tears.

Aware of the harm, yet they let it flow,
Koilas faintly hears mother's sorrow,

Stop plastic pollution at source,
Rivers are our huge resource.

Solution

Step 1 – Understand the task
We are asked to extend the given poem so that it spreads awareness about plastic pollution in rivers and oceans.

Step 2 – Recall the given part
Piece of plastic in my neck,
As in pain I cry,
Koilas, Koilas…where are you dear?
Papa fish cries and Mama fish has tears.
Aware of the harm, yet they let it flow,
Koilas faintly hears mother's sorrow,
Stop plastic pollution at source,
Rivers are our huge resource.

Step 3 – Plan the new lines
• Keep the easy vocabulary suitable for Class 6.
• Maintain the rhyme and rhythm (mostly ‑ow / ‑ear / ‑orce / ‑an sounds).
• Mention everyday separation methods—sieving, filtration, decantation—to connect with the chapter.
• End with a motivating pledge.

Step 4 – Compose and polish
Below is the completed poem with the newly added lines shaded for clarity; in your notebook you can copy only the plain text.

Completed poem
Piece of plastic in my neck,
As in pain I cry,
Koilas, Koilas…where are you dear?
Papa fish cries and Mama fish has tears.
Aware of the harm, yet they let it flow,
Koilas faintly hears mother's sorrow,
Stop plastic pollution at source,
Rivers are our huge resource.

From cities and towns the rubbish drifts,
Choking gills and coral reefs.
Take a sieve, remove the waste,
Give pure water back its taste.
Pick the wrapper, reuse the jar,
Tiny actions travel far.
Separate paper, metal, glass,
Let not single-use plastics pass.
Filter, settle, do your part,
Clean blue streams will thank your heart.
When we reduce, recycle, reuse,
Life in oceans cannot lose.
Plant the pledge in every mind,
Leave no plastic trace behind.

The poem now:

  • Shows the suffering of aquatic life.
  • Names simple separation techniques (sieving, filtration, settling) from the chapter.
  • Ends with a clear call to action.

Write it neatly, add your own drawings of happy, plastic-free rivers, and share it on the school notice-board to raise awareness!

Answer

From cities and towns the rubbish drifts,
Choking gills and coral reefs.
Take a sieve, remove the waste,
Give pure water back its taste.
Pick the wrapper, reuse the jar,
Tiny actions travel far.
Separate paper, metal, glass,
Let not single-use plastics pass.
Filter, settle, do your part,
Clean blue streams will thank your heart.
When we reduce, recycle, reuse,
Life in oceans cannot lose.
Plant the pledge in every mind,
Leave no plastic trace behind.

21 A bowl of milk in your home has gone sour. Discuss with your parents how you can use it in another way. Also, which method of separation will you use in the process?

Solution

What happened? A bowl of milk turned sour because naturally present bacteria produced lactic acid.

Talk with parents – what can we do instead of throwing it?

  1. Mother suggests making paneer (cottage cheese) because sour milk curdles easily.

Step-by-step procedure

  1. Pour the sour milk into a saucepan and warm it on a low flame (do not boil hard).
  2. Add 1 – 2 teaspoons of lemon juice / vinegar and stir gently.
    The acid supplies extra $$ ext{H}^+$$ ions, so the milk proteins coagulate.
  3. Very soon two distinct parts appear:
    • White solid curds (coagulated casein + fat)
    • Pale-green liquid whey (water + lactose + minerals)
  4. Place a clean muslin cloth over a strainer and keep it on another vessel.
  5. Carefully pour the hot mixture into the cloth.
  6. The cloth traps the curds; clear whey passes through and is collected below.
  7. Rinse the curds with a little cold water, gather the cloth corners, twist, press and keep a weight on it for about 30 minutes to get a firm block of paneer.

Which method of separation is used?
When we pour the curdled milk through the muslin cloth, we are applying filtration. The cloth acts as the filter medium, the curds are the residue and the whey is the filtrate.

Result The spoiled milk is converted into edible paneer, and no food is wasted.

Answer

Convert the sour milk into paneer (cottage cheese) and separate the curds from the whey by filtration using a muslin cloth.

22 Can you name one kitchen appliance which runs on electricity that is used to prepare buttermilk?

Solution

Step 1 – Why do we churn curd?
To make buttermilk, we beat (churn) curd so that the lighter fat (butter) separates from the liquid part. The remaining liquid is called buttermilk.

Step 2 – Traditional way
Earlier this was done by hand with a wooden churner, which takes a lot of time and effort.

Step 3 – Appliance that uses electricity
Today we can perform the same churning quickly with a kitchen appliance that has metal blades driven by an electric motor. When switched on, the blades rotate fast and beat the curd, giving buttermilk in a minute or two.

Step 4 – Name of the appliance
The appliance is commonly called an electric mixer. It is also known as a mixer-grinder or blender in many homes.

Answer

Electric mixer (mixer-grinder / blender)

23 Which method of separation did the carpenter use? Recall the chapter 'Exploring Magnets'.

Solution

Step 1 – Recall the situation from the lesson
The scene described in the textbook shows a carpenter who has accidentally mixed iron nails with heaps of fine saw-dust (wood shavings). He wants to recover the nails without wasting time picking them one by one.

Step 2 – Recall the property studied in Chapter 13 “Exploring Magnets”
In that chapter we learnt that a magnet attracts objects made of iron, steel, cobalt and nickel, but it does not attract substances like wood, sand or plastic. This exclusive attraction is called magnetism.

Step 3 – Linking the property to a separation method
When two materials are mixed and only one of them (for example, the iron nails) is attracted by a magnet, we can separate the mixture quickly by moving a bar magnet over it. The nails jump and stick to the magnet, while the non-magnetic material (saw-dust) is left behind.

Step 4 – Name of the method
This technique is called magnetic separation or separation by using a magnet.

Step 5 – Complete statement
Therefore, the carpenter separated the iron nails from the saw-dust by using a magnet; the method is magnetic separation.

Answer

Magnetic separation — he used a magnet to pull out the iron nails.

Activity 9.6

Activity 9.6: Let us play

Write the following phrases on small slips of paper—

  1. Separating small stones from pulses.
  2. Churning curd to obtain butter.
  3. Taking out green chillies from cooked dalia (dish made of broken wheat) or poha (dish made of flattened rice).
  4. Taking out seeds from watermelon.
  5. Sorting piles of sawdust and iron nails from a mixed heap of building material.
  6. Picking marigold flowers from a heap of other flowers to make a garland.
  7. Separating pebbles from sand.
  8. Separating coconut pieces from rice flour.
  9. Separating oil from water.
  10. Separating salt from salt solution.

Now, take two baskets, each representing one of the two purposes for which we separate substances. Form two teams and see who will get the maximum correct entries.

Think and start. The two baskets are labelled: 'To remove any one of the components that is not useful' and 'To separate two different but useful components'. This activity helps in assessing your understanding as to why we separate substances.

Solution

Chapter 9 – Methods of Separation in Everyday Life
Worked solution to Activity 9.6 “Let us play”

The teacher asked us to decide, for each situation, why we are separating the substances. There are only two possibilities:

  1. Basket A : To remove an unwanted (not-useful) component
  2. Basket B : To obtain / keep two different but useful components

Let us study every slip one by one, think of the purpose, and drop it in the correct basket.

S. No.Slip written on the paperReasoning (in very simple words)Basket chosen
1Separating small stones from pulsesWe want clean pulses for cooking; stones are useless and may even hurt our teeth.Basket A
2Churning curd to obtain butterAfter churning we get butter and buttermilk; both can be used.Basket B
3Taking out green chillies from cooked dalia / pohaChillies give only flavour; most children do not eat them. We throw them away.Basket A
4Taking out seeds from watermelonWhile eating the red pulp we spit out the seeds; we do not need them at that moment.Basket A
5Sorting sawdust and iron nails in a heap of building materialWe really need the iron nails; sawdust is merely dirt here.Basket A
6Picking marigold flowers from a heap of mixed flowersTo make a garland we only need marigolds; other flowers are ignored.Basket A
7Separating pebbles from sandPebbles are unwanted for construction / gardening once fine sand is required.Basket A
8Separating coconut pieces from rice flourWe may use coconut for curries and keep the rice flour for sweets; both parts are useful.Basket B
9Separating oil from waterOil can be used again for cooking and water can be reused or safely discarded.Basket B
10Separating salt from salt solutionHere we mainly want the salt; the water evaporated into air is of no further use in this process.Basket A

Check yourself
Count the slips in each basket:

  • Basket A (“remove the unwanted”) » 7 slips : 1, 3, 4, 5, 6, 7, 10
  • Basket B (“two useful components”) » 3 slips : 2, 8, 9

If your team placed every slip exactly as above, you scored full marks and have clearly understood why we carry out separation in our daily life.

Answer

Basket A (‘remove the unwanted’) : 1, 3, 4, 5, 6, 7, 10
Basket B (‘two useful components’) : 2, 8, 9

Let us enhance our learning

1

What purpose does handpicking serve in the process of separation?

  1. Filtration
  2. Sorting
  3. Evaporation
  4. Decantation

Solution

Understanding the choices

  1. Filtration – separates an insoluble solid from a liquid with the help of a filter medium.
  2. Sorting – separating different solid components of a mixture on the basis of size, shape, colour or some other visible property. Handpicking and sieving are common examples.
  3. Evaporation – removes the liquid part of a solution by heating so that the dissolved solid is left behind.
  4. Decantation – gently pouring out the clear liquid from a mixture in which a heavy solid has settled at the bottom.

Linking handpicking to the correct process

Handpicking is the simplest form of sorting. We use our fingers to pick out undesirable solid pieces (for example, stones from rice) because those pieces look different and are easy to recognise. No liquid is involved, so it cannot be filtration, evaporation or decantation.

Hence, handpicking serves the purpose of sorting.

Answer

Sorting  (Option 2)

2

Which of the following substances are commonly separated using the churning method?

  1. Oil from water
  2. Sand from water
  3. Cream from milk
  4. Oxygen from air

Solution

Step 1  Recall what “churning” means
Churning is the rapid stirring or rotating of a liquid containing tiny suspended particles. The motion makes the lighter particles collect near the centre and separate out. In homes this is most often done with milk or curd to obtain butter/cream.

Step 2  State the key idea
Because churning relies on the difference in density between two liquid (or semisolid) parts, it works only when both parts can move freely. One must be lighter so that it floats or collects on top after rotation.

Step 3  Check each option

OptionMixtureAre both parts liquids that can be stirred?Suitable for churning?
(1)Oil + waterYes, both are liquids, but ordinary household churning does not break the surface tension that keeps oil droplets separate. The two layers will simply reform; we normally separate them by decantation or a separating funnel.No
(2)Sand + waterSand is a solid; it cannot be “spun out” because it is heavy and settles by itself under gravity. We separate it by sedimentation and decantation or by filtration.No
(3)Cream + milkYes. Milk contains tiny droplets of fat (cream) dispersed in water. On churning, the lighter fat globules clump together and rise, forming a separate creamy layer. This is exactly the traditional method to get cream/butter at home.Yes
(4)Oxygen + airAir is already a gas mixture; churning has no effect on gases. Industrial separation uses fractional distillation of liquid air.No

Step 4  Conclusion
The only mixture in the list that we commonly separate by churning is cream from milk.

Answer

Only option (3): Cream from milk.

3

Which factor is usually essential for the filtration?

  1. Apparatus size
  2. Presence of air
  3. Pore size
  4. Temperature of the mixture

Solution

Step 1 – Recall what filtration means
Filtration is a method in which a mixture of a solid and a liquid (or gas) is poured through a filter paper (or any filtering device). The filter has many tiny holes called pores. Particles that are bigger than these pores stay back on the filter, while the liquid (called the filtrate) passes through.

Step 2 – Identify the deciding factor
Whether a particle can pass depends entirely on the size of the pores. If the pore size is smaller than the particle, the particle is trapped; if it is larger, the particle goes through. Thus the pore size must be chosen carefully for the desired separation.

Step 3 – Check each option

  • (i) Apparatus size – The equipment can be big or small; it does not directly decide which particles pass the filter.
  • (ii) Presence of air – Air is not needed for the filtering action itself; filtration works in a vacuum as well.
  • (iii) Pore sizeEssential; the whole process depends on matching pore size to particle size.
  • (iv) Temperature of the mixture – Temperature may change speed, but filtration is possible at many temperatures; it is not essential.

Step 4 – Conclude
Therefore, the factor that is usually essential for filtration is the pore size of the filter.

Answer

(iii) Pore size

4 State with reason(s) whether the following statements are True [T] or False [F]. Also, correct the False statement(s).

(i) Salt can be separated from salt solution by keeping it under the Sun.

Solution

Observation: A salt solution is a mixture of common salt (solid) and water (liquid).

Principle involved: Under the Sun’s heat, water changes into vapour (evaporation) while common salt, being non-volatile, is left behind.

Step-by-step reasoning

  • Sunlight supplies heat energy to the solution.
  • Water molecules gain energy and escape as vapour: $$\text{H}_2\text{O (l)} \rightarrow \text{H}_2\text{O (g)}.$$
  • After all the water has evaporated, only dry crystals of salt remain in the container.

Hence the statement is True.

Answer

True

(ii) Handpicking should be used only when the quantity of one component is less.

Solution

Handpicking is convenient when the unwanted component (stones, rotten grains, etc.) is present in a small quantity and can be easily recognised and picked out by hand.

Therefore the sentence “Handpicking should be used only when the quantity of one component is less” correctly states the condition under which the method is useful.

Hence the statement is True.

Answer

True

(iii) A mixture of puffed rice and rice grains can be separated by threshing.

Solution

Threshing separates grains from harvested stalks by beating or rubbing. It is not meant for separating two different edible components that are already free of stalks.

Puffed rice is very light while rice grains are heavier. Such a mixture can be separated by winnowing (or even sieving/handpicking), not by threshing.

Therefore the statement is False.

Correct statement: “A mixture of puffed rice and rice grains can be separated by winnowing.”

Answer

False. Correct statement: A mixture of puffed rice and rice grains can be separated by winnowing.

(iv) A mixture of mustard oil and lemon water can be separated by decantation.

Solution

Mustard oil does not mix with water-based liquids such as lemon water. On standing, the lighter mustard oil forms a separate upper layer. By gently pouring (decanting) the upper oily layer into another vessel, the two liquids can be separated.

Since decantation is suitable for immiscible liquids, the statement is True.

Answer

True

(v) Sieving is used to separate a mixture of rice flour and water.

Solution

Sieving works when the two components are solids having different particle sizes (e.g., flour and husk). In a flour–water mixture one component is liquid; the flour disperses in water and passes through the sieve along with the water.

Thus sieving cannot separate rice flour from water. The correct technique is filtration (using filter paper or a fine cloth) or sedimentation followed by decantation.

Therefore the statement is False.

Correct statement: “A mixture of rice flour and water can be separated by filtration (or sedimentation followed by decantation).”

Answer

False. Correct statement: A mixture of rice flour and water is separated by filtration, not sieving.

5

Match the mixtures in Column I with their method of separation in Column II.

Column IColumn II
(i) Gram flour mixed with black gram(a) Handpicking
(ii) Chalk powder mixed with water(b) Magnetic separation
(iii) Corn mixed with potatoes(c) Decantation
(iv) Iron powder mixed with sawdust(d) Sieving
(v) Oil mixed with water(e) Filtration

Solution

Step 1 – Recall the main physical properties used for separation

  • Size difference → we use sieving.
  • Visibility of big pieces → we use hand-picking.
  • Magnetic property → we use magnetic separation.
  • Insoluble solid in a liquid → first sedimentation then decantation or better, filtration.
  • Two immiscible liquids of different densities → we use decantation (or a separating funnel).

Step 2 – Analyse each mixture in Column I

  1. Gram flour + black gram: Gram flour (fine powder) passes through a sieve while the bigger black-gram seeds stay back. Hence  $$\text{sieving}$$.
  2. Chalk powder + water: Chalk is insoluble. A filter paper will trap the chalk particles and clear water will pass. Hence  $$\text{filtration}$$.
  3. Corn + potatoes: Both are large and easily visible. We can simply pick one from the other. Hence  $$\text{hand-picking}$$.
  4. Iron powder + sawdust: Iron is attracted by a magnet, sawdust is not. Hence  $$\text{magnetic separation}$$.
  5. Oil + water: Oil floats over water forming two distinct layers. We let the layers settle and then pour (decant) the upper one. Hence  $$\text{decantation}$$.

Step 3 – Write the matched pairs

Mixture (Column I)Method (Column II)
(i) Gram flour + black gram(d) Sieving
(ii) Chalk powder + water(e) Filtration
(iii) Corn + potatoes(a) Handpicking
(iv) Iron powder + sawdust(b) Magnetic separation
(v) Oil + water(c) Decantation

All mixtures are now correctly matched with their most suitable method of separation.

Answer

(i) → (d), (ii) → (e), (iii) → (a), (iv) → (b), (v) → (c)

6 In what situations would you use decantation instead of filtration to separate solids from liquids?

Solution

Step 1 — Recall what “decantation” means
Decantation is a two–step process:

  1. Sedimentation — we first keep the mixture undisturbed so that the heavier, insoluble solid particles settle at the bottom of the container.
  2. Pouring off — we then gently tilt the container and pour the clear liquid layer into another vessel, leaving the settled solids (the sediment) behind.

No filter paper or sieve is used, so nothing stops very fine particles from passing if they are still floating in the liquid.

Step 2 — Recall what “filtration” means
Filtration uses a porous barrier such as filter paper, a cloth or a strainer. The barrier lets the liquid pass through the tiny pores but holds back even small suspended solid particles.

Step 3 — Compare the two methods

FeatureDecantationFiltration
EquipmentOnly two vesselsFilter paper / funnel in addition to vessels
Time needed before separationMust wait for particles to settleNo waiting; can be done at once
Size of solid particles held backOnly large, heavy particles that settleBoth large and very tiny particles
Clarity of liquid obtainedMay still be a bit cloudyUsually clear

Step 4 — Situations best suited for decantation

  • When the solid particles are large and heavy, so they settle quickly and completely. Examples: sand in water, rice grains soaked in water, or pebbles in a bucket of water.
  • When high clarity is not essential. If a little turbidity is acceptable, decantation saves the effort of setting up filtration.
  • When we have no filter medium handy. In day-to-day life we often do not carry filter paper or a fine strainer; merely pouring off is simpler.
  • When the liquid volume is large and the solid forms only a small, heavy sediment at the bottom; filtration of many litres would be slow, but gentle pouring is quick.
  • When we intend to discard the liquid and keep the solid (for example, after washing rice or dal). Any slight loss of liquid is acceptable, so decantation is convenient.

Step 5 — Summarise the answer
Therefore, use decantation instead of filtration whenever the solid is coarse, heavy and settles readily, the liquid does not need to be perfectly clear, and using filter paper or a sieve would be unnecessary trouble.

Answer

Decantation is preferred when the solid particles are large, heavy and settle down quickly, so that you can simply pour the clear liquid layer away without needing a filter. Typical examples are sand-water mixtures, washed rice or pulses, or any case where a little cloudiness in the separated liquid is acceptable and no filter paper is available.

7 Can you relate the presence of nasal hair to any separation process?

Solution

Step 1 − Recall the idea of a separation process
In Chapter 9 you learnt that when an undesired solid is mixed with a fluid (liquid or gas), we often remove the solid by filtration. In filtration the fluid passes through a barrier that has tiny pores, while the larger solid particles are stopped by that barrier.

Step 2 − Observe what enters our nose
The air we breathe is not a pure substance. It is a mixture of gases such as $$\mathrm{N_2}$$, $$\mathrm{O_2}$$, $$\mathrm{CO_2}$$ and suspended solid particles like dust, smoke, pollen and germs.

Step 3 − Role of nasal hair
Just inside each nostril there is a fringe of short stiff hairs. When the mixture of gases + dust flows in, the gaseous molecules are so small that they slip straight between the hairs, but the much larger dust particles strike the hairs and get stuck to the moist inner surface of the nose. In other words:

  • Solid dust (larger size)  →  retained on the barrier (the hair).
  • Cleaned air (very small gas molecules)  →  passes through.

Step 4 − Name of the comparable laboratory method
This working is exactly what you do when you pour muddy water through a filter paper: the water flows out while mud stays behind. Hence nasal hair performs the same function as a filter. The separation process to which it is related is therefore filtration (sometimes also described as sieving when the barrier has comparatively large openings).

Conclusion
Nasal hair acts as a natural filter that separates suspended solid particles from the incoming air before the air reaches the lungs. Thus its action is most closely related to the separation process of filtration.

Answer

Nasal hair works like a filter: it traps dust and other solid particles while clean air passes through, so it is analogous to the separation process of filtration.

8 During the COVID-19 pandemic, all of us wore masks. Generally, what material are they made of? What is the role of these masks?

Solution

Step 1 – Recall what a mask looks like
A typical disposable “surgical” or “medical” mask feels like soft paper, but it is actually a kind of fabric. Instead of the ordinary woven cloth we have in shirts, the fibres are laid randomly and pressed together. Such a fabric is called non-woven fabric.

Step 2 – Name of the material
The fibre most commonly used for this non-woven layer is the plastic polypropylene. Hence most ready-made masks are made of non-woven polypropylene sheets. (Homemade masks, on the other hand, are usually two or three layers of woven cotton.)

Step 3 – Why do we wear the mask? — Link with “separation”

  • When we breathe, talk, cough or sneeze, tiny liquid drops (aerosols) come out. Many of these droplets are about $$1\,\text{µm}=1\times10^{-6}\,\text{m}$$ in diameter and can carry the coronavirus.
  • The mask works exactly like a filter paper that you have used for filtration experiments in the laboratory. The pores in the polypropylene layer are even smaller than the droplets (roughly $$0.3\,\text{µm}$$), so most droplets are trapped in the fibres while the clean air passes through.
  • Thus the mask separates germs and dust from the air before it reaches our nose and mouth, and also stops our own droplets from reaching others.

Step 4 – Summary
Masks are made mainly of non-woven polypropylene sheets. They act as a filter, separating infectious droplets, dust and other suspended particles from the air, and therefore protect both the wearer and the surrounding people during the COVID-19 pandemic.

Answer

They are usually made of non-woven polypropylene fabric. The mask acts as a fine filter, stopping virus-carrying droplets and dust while letting clean air pass, so it protects both the wearer and others.

9 A mixture containing potatoes, salt and sawdust has been given to you. Outline a stepwise procedure for separating each component from this mixture.

Solution

The three substances have different observable properties that we can exploit:

  • Potatoes: big, hard pieces; completely insoluble in water; much heavier than water → easy to pick up by hand.
  • Sawdust: fine, light wood particles; insoluble in water; density lower than water so it floats.
  • Table salt (mainly $$\mathrm{NaCl}$$): tiny crystals; highly soluble in water.

Follow the steps in the given order so that no component is lost or contaminated.

  1. Hand-picking the potatoes

    Spread the whole mixture on a clean tray and remove every piece of potato with your fingers or a pair of tongs. Put the potatoes in a separate bowl. Only the solid powder (salt + sawdust) now remains in the tray.

  2. Dissolving the salt

    Transfer the remaining powder into a beaker and add enough water to cover it. Stir with a glass rod for a minute. Salt dissolves according to

    $$\mathrm{NaCl\,(s) \xrightarrow[]{\;H_2O\;} Na^+\,(aq) + Cl^-\,(aq)}$$

    but sawdust does not dissolve.

  3. Separating the sawdust by flotation and filtration

    1. Wait a short time: sawdust particles float to the surface while the clear salt solution stays below.
    2. Skim the floating layer gently with a spoon or pour the lower salt solution through a filter paper. In either case the sawdust is caught and the salt solution passes through.
    3. Spread the wet sawdust on a sheet of paper and let it dry in the sun. You now have dry sawdust.
  4. Getting solid salt back by evaporation

    1. Pour the clear salt solution into an evaporating dish.
    2. Heat it gently or leave it in a warm, airy place. Water slowly escapes as vapour:
    3. $$\mathrm{H_2O\,(l) \longrightarrow H_2O\,(g)}$$

    4. After all the water has evaporated, white crystals of salt remain in the dish. Scrape them out and store in a dry container.

Result: Each of the three original substances—potatoes, sawdust and common salt—has been obtained separately, clean and usable.

Answer

Pick out the potatoes by hand → add water → salt dissolves and sawdust floats → skim/filter to collect sawdust → evaporate the filtrate to get dry salt.

10

Read the following story titled 'Intelligent Leela' and tick the most appropriate options. Provide a suitable title of your choice for the paragraph.

Leela was working in the farm with her father when she realised that they left their drinking water at home. Before her father felt thirsty/hungry, she went to the nearby pond to fetch some water/grains. After obtaining some water in the container, she noticed that the water was muddy and fit/unfit for drinking. To purify the water, she kept it for some time and then she filtered/churned the muddy water using a piece of paper/muslin cloth. Leela, then, cooled/boiled the water for about 10 minutes in a covered pan. After cooling/boiling, she filtered/churned it again and made it fit/unfit for drinking. She served this water to her father while having food, who blessed her and appreciated her efforts.

Solution

Step 1 : Understanding the context

The paragraph is about Leela collecting muddy pond water and making it safe for drinking while she and her father are working on the farm. Therefore, every blank word must match two things:

  • What a person actually needs in that situation (for example, one feels thirsty on a hot farm, not hungry).
  • The scientific method of purifying muddy water taught in Class 6 (sedimentation → decantation/filtration → boiling → cooling → filtration).

Step 2 : Choosing the correct option for each blank

Blank No.Sentence fragmentCorrect wordReason
1Before her father felt thirsty / hungrythirstyThey went out without drinking water; the immediate need is water, so he would feel thirsty.
2to fetch some water / grainswaterShe must bring water for drinking, not grains.
3the water was muddy and fit / unfitunfitMuddy pond water is not safe to drink.
4she filtered / churned the muddy waterfiltered“Churning” separates cream from milk; “filtering” removes insoluble mud particles.
5using a piece of paper / muslin clothmuslin clothAt a farm she is likely to have muslin cloth; filter-paper is a laboratory material.
6Leela, then, cooled / boiled the waterboiledBoiling for about 10 minutes kills germs (micro-organisms).
7After cooling / boiling, she …coolingOnce the water is boiled, it must first cool down before the next step.
8she filtered / churned it againfilteredSecond filtration removes any dead micro-organisms or remaining suspended matter.
9and made it fit / unfit for drinkingfitAfter proper purification the water becomes safe (= fit) for drinking.

Step 3 : Explaining the science behind Leela’s method

  1. Sedimentation & Decantation – By keeping the muddy water undisturbed “for some time”, heavier mud particles settle down due to gravity.
  2. Filtration – Pouring the top (clearer) layer through a folded muslin cloth traps the remaining suspended particles. This is the first filtration.
  3. Boiling – Heating the water for 10 min kills most disease-causing organisms such as bacteria, viruses and protozoa. The process does not remove dissolved salts but it does make the water microbiologically safe.
  4. Cooling – Hot water must cool so that it can be handled safely and so that the next filtration can be done without scalding the cloth (and to avoid steam burns).
  5. Second Filtration – A final pass through the cloth removes dead microbes and any particles produced during boiling, giving visibly clear water.

In everyday life this combination (settling, filtration and boiling) is one of the simplest ways to make pond or river water potable.

Step 4 : Giving a suitable title

Because Leela quickly applies the correct methods of separation to make safe drinking water for her father in the field, a suitable title could be:

"Leela’s Smart Way to Purify Water"

Answer

Title: Leela’s Smart Way to Purify Water

Correct choices (in order): thirsty, water, unfit, filtered, muslin cloth, boiled, cooling, filtered, fit

Learning further

Fun with parents Fun with parents: We are proud of our Indian heritage. Under supervision of your elders, try to prepare some herbal remedies using various parts of plants. For example—tulsi kadha. Which methods of separation will you use while preparing herbal kadha?

Solution

Step 1 — Collecting the ingredients
The first thing we do is pick a handful of fresh tulsi (holy basil) leaves, a small piece of ginger, some peppercorns and, if we like, a little cinnamon. At this stage we use the separation method called hand-picking to remove any dry, yellow or insect-eaten leaves from the lot.

Step 2 — Washing the plant parts
The picked leaves and other pieces are likely to carry dust, mud or tiny sand particles. We immerse them in a bowl of clean water $$\mathrm{H_2O}$$ and gently stir. The dirt either dissolves in the water or settles at the bottom. We then pour out the clear upper layer into a strainer while leaving the muddy water behind. The two separation techniques used here are

  • Decantation — pouring out the clearer liquid from the top, and
  • Sedimentation — allowing the heavier soil particles to settle at the bottom before decanting.

Step 3 — Crushing (no separation method here)
The clean leaves, ginger, etc., are crushed with a mortar and pestle to expose more surface area so that their juices can mix with water quickly when we boil them. No special method of separation is involved in crushing; it is just a preparatory mechanical step.

Step 4 — Boiling and extracting the essence
The crushed mixture is transferred to a pan containing about one cup of water. We boil it for 5 – 7 min. During boiling, some water changes into steam and escapes, so the liquid becomes slightly concentrated. This change is an example of evaporation, a physical process of separation that removes part of the solvent (water) from the mixture.

Step 5 — Straining the decoction
Once the colour of the water turns light brown and the aroma spreads, we switch off the flame. The next job is to remove all the solid plant pieces so that we get a clear liquid kadha. We pour the hot mixture through a fine metal sieve or a muslin cloth into a cup. The solid residue remains on the sieve while the clear liquid passes through. The method used here is filtration.

Step 6 — Optional additions
We may add a little honey or jaggery for taste. If there are any undissolved particles in jaggery, they are again removed by filtration.

Final list of separation methods applied while preparing tulsi kadha

  • Hand-picking   (removing damaged leaves)
  • Sedimentation   (allowing soil to settle)
  • Decantation   (pouring away clean water)
  • Evaporation   (loss of water as steam during boiling)
  • Filtration   (straining to get clear decoction)

Thus, even a simple household remedy like tulsi kadha uses several basic methods of separation that you have studied in this chapter.

Answer

Hand-picking, sedimentation, decantation, evaporation and filtration are successively used to get a clear, tasty tulsi kadha.

Stage play Stage play: Imagine you and your friend are Malli and Valli. Write dialogues of a play presenting their entire 'Bharat ki Yatra', highlighting the different methods of separation of substances that they observed. Enact the play in your school assembly.

Solution

Characters:
Malli, Valli, Narrator, Friendly Locals (Farmer, Salt-worker, Tea-maker, etc.)

Scene 0 – School Assembly Stage
(Narrator stands centre–stage; Malli and Valli wait to one side with small travel bags and map of India.)

Narrator: Good morning! Today we present “Bharat ki Yatra – Methods of Separation in Everyday Life.”

Narrator: Malli and Valli will travel from Kanyakumari to the Himalayas, spotting how people separate mixtures to obtain useful materials. Watch, listen and learn!


Scene 1 – Tamil Nadu (Paddy fields)

  • Farmer (holds basket of threshed paddy, stands on stool; fan blows): I toss the grain into the breeze… (demonstrates)
  • Malli: Wow, the light husk is blown away while the heavier rice grains fall straight down.
  • Valli: That’s winnowing – using wind to separate lighter and heavier solids.
  • Farmer: Exactly! Try it. (they try)

Scientific note: Lighter husk experiences greater air resistance, so the breeze carries it sideways while the heavier grain falls almost straight down.


Scene 2 – Rajasthan (Desert roadside dhaba)

  • Dhaba Cook (shakes flour with a sieve): I first remove pebbles before making chapati.
  • Malli: The mesh allows only fine flour to pass.
  • Valli: Method? Sieving – separation on the basis of particle size.

Scene 3 – Goa (Salt pans)

  • Salt-worker (points to shallow ponds): Sea-water is spread and sunlight makes the water evaporate.
  • Malli: Then white crystals are left behind – that’s evaporation.
  • Valli: Water slowly changes to vapour in sunshine; dissolved $$\mathrm{NaCl}$$ stays back as common salt.

Scene 4 – Kerala (Tea estate)

  • Tea-maker (pours tea through strainer): Leaves stay back, clear tea passes.
  • Malli: Classic filtration using a muslin cloth.
  • Valli: Insoluble solids are trapped; the liquid filtrate is collected.

Scene 5 – Punjab (Dairy farm)

  • Dairy Farmer (rotates hand-churn in pot of curd): Churning separates butter.
  • Malli: The less dense fat globules clump together and float as butter.
  • Valli: Called churning.

Scene 6 – Kolkata (Water-treatment plant on river Ganga)

  • Engineer: First, we let muddy water stand – heavy sand settles. That’s sedimentation.
  • Then we tilt the tank gently to pour the clear water on top into the next chamber – decantation.
  • For the very fine clay particles that refuse to settle, we add a pinch of alum. The tiny particles stick together to form larger lumps that sink down – this clumping is called coagulation (also known as flocculation).
  • Finally, the water passes through sand and charcoal beds – filtration again.
  • Malli & Valli together: Four methods in one plant!

Scene 7 – Odisha (Iron-ore mine)

  • Miner (places magnet near mixture): See the iron filings stick to the magnet, leaving non-magnetic impurities.
  • Malli: That’s magnetic separation.

Scene 8 – Uttarakhand (Hill science camp)

  • Instructor (shows apparatus): We heat muddy water; vapour rises, condenses in a spiral and collects as pure distilled water.
  • Valli: Two steps – evaporation followed by condensation; together called distillation.
  • Malli: Distilled water has only $$\mathrm{H_2O}$$ molecules – no salts.

Finale – Back at School

  • Narrator: Summarise please!
  • Malli (counts on fingers): Winnowing, Sieving, Sedimentation, Decantation, Coagulation (flocculation), Filtration, Evaporation, Condensation, Churning, Magnetic separation.
  • Valli: Ten methods – all spotted on one Bharat Yatra.
  • All: Jai Hind! Learn science from everyday life!

Teacher’s Note for Students

  1. Prepare simple props: sieve, hand-fan, magnet, tea strainer, small churn, funnel with filter paper.
  2. Use labelled placards for each method so the audience recognises them instantly.
  3. Rehearse transitions quickly to fit a 10-minute assembly slot.

End of play. Curtain falls.

Answer

Sample dialogue script provided for enacting Malli and Valli’s “Bharat ki Yatra,” covering all major separation techniques studied in Chapter 9 — winnowing, sieving, sedimentation, decantation, coagulation (flocculation), filtration, evaporation, condensation, churning and magnetic separation.

Group activity Group activity: Observe and list separation methods you employed and noticed in your surroundings throughout a week. Explain the reasons behind using these methods and compile the ones you utilised or observed the most. Compare your observations with your group members.

Solution

Objective of the activity — To keep a seven-day diary of every time I (and people around me) used a separation method, to record why that particular method was chosen, to count which methods were used the most, and finally to compare my list with my two group-mates, Meera and Arjun.

1. Individual observation diary

DayMixture handled / scene noticedMethod of separationReason for choosing the method
MondayMother removed stones from dry riceHandpickingImpurities (stones) are bigger and distinctly visible → can be picked easily.
TuesdayGrandfather poured off water after washing riceDecantationHeavier rice settles; lighter water with dirt is poured away gently.
WednesdaySister filtered lemon juiceFiltration (using strainer)Solid seeds and fibres are larger than strainer holes → remain behind.
ThursdayMason separated gravel from sand for plasterSievingMesh allows fine sand but holds back larger gravel pieces.
FridayDairy man obtained butter from curdChurning (centrifugation)Fast rotation forces lighter fat (butter) to collect separately.
SaturdayWatchman removed iron nails from garbage using magnetMagnetic separationIron is magnetic whereas plastic/paper are not.
SundayEvaporating excess water while making jaggery syrupEvaporationWater changes to vapour at $$\approx 100\,{}^{\circ}\text{C}$$; sugar solution becomes thicker.

2. Counting how many times each method appeared

  • Handpicking: $$1$$ time
  • Decantation: $$1$$ time
  • Filtration: $$1$$ time
  • Sieving: $$1$$ time
  • Churning / centrifugation: $$1$$ time
  • Magnetic separation: $$1$$ time
  • Evaporation: $$1$$ time

Because each was noted once, there is a tie. If we include smaller, repeated household acts (e.g. everyday hand-picking of tea leaves floating in cup, daily filtering of milk), then:

  • Handpicking: $$5$$ times (tea leaves, vegetable sorting, etc.)
  • Filtration: $$4$$ times (milk, tea, juice, dal water)
  • Decantation: $$3$$ times (washing rice, pulses, soaking poha)

Thus the most-used methods during the week were handpicking, filtration and decantation in that order.

3. Comparison with group-mates

MethodMy countMeera’s countArjun’s countCommon to all 3?
Handpicking543Yes
Filtration454Yes
Decantation322Yes
Sieving110Meera & I
Winnowing021Meera & Arjun
Magnetic separation100Only me

We concluded that our families constantly need to remove visible solid impurities from food, so simple handpicking is the champion method. Filtration is next because we strain almost every liquid we prepare.

4. Learning points noted in class

  1. The nature of the mixture → decides the most suitable separation method (size difference, state of matter, magnetic property, boiling point, density etc.).
  2. Sometimes two or more methods are applied in sequence, e.g. sedimentation → decantation → filtration to clean muddy water.
  3. Keeping a diary made us realise that separation is an everyday life skill, not just a laboratory activity.

Teacher’s remark: CWell-done. Good variety of examples and correct reasons given. D

Answer

Most-used methods during the week (after counting repeated acts):

  • Handpicking
  • Filtration
  • Decantation

Be a stalwart of your community Be a stalwart of your community: Interview a ragpicker(s) and prepare a case study about the method(s) of separation he/she uses in his/her daily life. Encourage children of your community below the age of 14 to join a neighbourhood school.

Solution

NCERT Class 6 — Chapter 9: Methods of Separation in Everyday Life

Activity – Case Study

1. Purpose of the activity

  • To discover how a member of the community (a ragpicker) actually applies the separation methods we learn in class.
  • To understand the importance of these methods in recycling, health and livelihood.
  • To motivate children younger than 14 years to attend the neighbourhood school so that, in future, they can explore better work options.

2. Preparing for the interview

  1. With the permission of my parents and school, I located Ms. Rekha Devi, a 34-year-old ragpicker who works near the municipal segregation shed.
  2. I prepared 8 short questions covering her daily routine, types of waste she handles, and the exact steps she takes to separate valuable material.
  3. I carried a notebook, pen, a bottle of safe drinking water for the guest and wore a mask and gloves for hygiene.

3. Transcribed interview (shortened)

QuestionMs. Rekha’s Reply
Q1. What time do you start work?I leave my jhuggi at 5 a.m. so I can reach the dump before the compactor van.
Q2. Do you collect all waste?Mostly ‘dry’ waste—plastics, paper, glass and metals.
Q3. How do you separate useful things from the mixed heap?First by hand picking, then I use a magnet for iron, and finally wash plastics clean.
Q4. Why is separation important for you?If I don’t separate properly, the scrap dealer gives me less money.
Q5. Do you know the names of the methods you use?No, but I know how they work.
Q6. How much do you earn per day?About ₹250 on a good day.
Q7. Do your children go to school?My eldest son (12) dropped out; the younger girl (8) still goes.
Q8. What help would you like from the community?Free books and uniforms so my son can join school again.

4. Scientific analysis of the methods she uses

  1. Hand picking
    She visually separates large pieces of plastic, glass and cloth. The science name is picking. It is useful when the size of the pieces is big and the number of unwanted components is small.
  2. Magnetic separation
    She waves an old loud-speaker magnet over the heap. The magnetic force $$F \propto mB$$ (where $$m$$ = magnetic moment, $$B$$ = field) pulls out iron nails, caps and small scrap. This saves time and prevents injury.
  3. Sieving and shaking (informal)
    At the segregation shed she pours the remaining fine mixture onto an iron mesh. Small sand and dust fall through, while plastic flakes remain. This works because of the difference in particle size.
  4. Washing & flotation
    Plastic is put in a tub of water. Heavier glass chips sink but plastic pieces float, showing density-based separation. Density of glass ≈ $$2.5~\text{g cm}^{-3}$$, density of most plastics ≈ $$0.9{-}1.4~\text{g cm}^{-3}$$.

5. Environmental & social impact

  • By recovering $$\approx 30~\text{kg}$$ of recyclable material daily, she reduces landfill load and saves natural resources.
  • However, lack of protective gear exposes her to disease. Proper segregation at source would make her work safer and more profitable.

6. Community Action Plan to enrol children < 14 years in school

  1. Door-to-door survey: We listed 17 children of ragpicker families in our ward who are out of school.
  2. One-page flyers: We designed a colourful leaflet in Hindi showing that education can raise future earnings from $$₹250$$ per day (ragpicking) to $$₹800$$ per day (skilled recycler).
  3. Bridge-course camp: Our school will run a 4-week afternoon class to revise reading and maths, after which the children can be admitted to the nearest government school under the Right to Education (RTE) Act.
  4. Starter kit: Using donations, we will supply each child with 2 notebooks, pencils, eraser and a cloth mask.
  5. Role-model talk: We invited Ms. Rekha’s daughter, who is in Class 3, to share her experience and encourage others.

7. Reflection

  • I realised that the separation techniques in our textbook are not only laboratory tricks; they directly affect the livelihood of people like Ms. Rekha.
  • Simple scientific knowledge (for example, why a magnet pulls only iron) can help ragpickers work faster and more safely, and can motivate their children to value schooling.

8. Conclusion

By interviewing a ragpicker, I saw hand picking, magnetic separation, sieving, and washing-flotation in real life. These methods, exactly as given in Chapter 9, turn waste into resources. Our class has started a small but practical campaign so that ragpickers’ children can benefit from education and possibly choose safer, higher-income professions in the future.

Answer

Case study prepared, methods identified (hand picking, magnetic separation, sieving, washing / flotation) and community plan launched to enrol out-of-school children under 14.

Be a reporter

Be a reporter:

  1. Gather newspaper clippings and articles related to various methods of separation implemented in your society, such as in agricultural fields or at construction sites.
  2. Conduct interviews with local farmers to explore the latest agricultural separation methods that they use.

Solution

Chapter 9 – Methods of Separation in Everyday Life
Activity : Be a Reporter

This question is an open investigation. Below is a step-by-step model that shows exactly how a Class 6 student can carry it out and write the final report.


STEP 1 Collecting Newspaper Clippings & Articles

  1. Keep an A4 scrapbook or digital folder dated for one full week.

  2. Every day, skim the newspaper (national + local) and free neighbourhood newsletters for words such as sieving, winnowing, filtration, magnetic separation, decantation, threshing, combine harvester, silt trap, etc.

  3. Cut or print each relevant piece. Directly below every cutting, add a hand-written note answering four questions:

    • What substance is being separated?
    • From which mixture?
    • Which method is used?
    • Why is that method suitable?
  4. If the item is found on a web-site or e-paper, take a screenshot and paste it or note the full URL.

Sample entries (illustrative):

S.No.Headline & DateMixtureMethod MentionedShort Note
1"City installs new sand trap in drainage canal"
(The Daily Chronicle, 3 May)
Muddy rain-water + sandSedimentation & DecantationHeavy sand settles, clear water is released downstream.
2"Modern wheat mill adds magnetic plate"
(Agritech Weekly, 5 May)
Wheat flour + iron filings (from machines)Magnetic SeparationSteel particles are pulled out to keep food safe.
3"Workers sieve gravel for road repair"
(Local Reporter, 6 May)
Gravel + fine sandSievingDifferent mesh sizes give uniform gravel.
4"Milk co-op buys cream separator"
(Kisan Times, 7 May)
Raw milk (fat + water)CentrifugationFast spinning pushes heavier skimmed milk outward; cream collects at centre.
5"Farmers adopt solar dryer for chillies"
(Green News, 8 May)
Fresh chillies + water vapourEvaporation/DryingMoisture reduced from $$15\%$$ to $$8\%$$ — prevents fungal growth.

STEP 2 Planning & Conducting Farmer Interviews

  1. Contact 2–3 farmers through school, relatives or the local Krishi Vigyan Kendra (KVK). Fix a 15-minute slot, preferably when they are free (late afternoon).

  2. Prepare a question-sheet. Example questions are listed below; leave space for answers.

Suggested interview questions

  • Which crops do you grow this season?
  • How do you separate grains from stalks? (Traditional beating / mechanical thresher / combine?)
  • Do you still use winnowing with wind, or motorised blowers?
  • How is cleaned grain dried and stored? Any moisture tester used?
  • What happens to stones or metal pieces accidentally mixed with crop?
  • Any new machine purchased in the last five years? Cost and benefit?

Sample interview notes – Farmer A (Mr R. Patil, Village Rampur, 7 May)

QuestionKey Points Said
Threshing method?Owns a power thresher—can do 10 quintals h-1.
Winnowing?Uses an electric fan; lighter chaff goes 3–4 m away.
Drying?Spreads paddy on plastic sheet; measures moisture with handheld meter, target $$\le 12\%$$.
Removing stones?Passes grain through an inclined grader + gravity table.
New tech?Bought a mini destoner last year (₹ 35 000) — reduces labour by $$\approx 50\%$$.

STEP 3 Arranging the Final Report

  1. Title page – “Separation Methods Practised in My Locality – A Class 6 Field Report”.

  2. Introduction – 1 paragraph stating why separation is needed (purity, safety, value).

  3. Section 1 : Media Survey – paste all clippings in chronological order, with your four-point notes.

  4. Section 2 : Farmer Interviews – give each farmer a sub-heading, attach the question-answer table, and, if permitted, a photo of equipment.

  5. Section 3 : Discussion – compare traditional versus modern techniques. You may include a simple bar-graph (hand-drawn) of money saved or time saved.
    Example sentence: “By shifting from manual winnowing to a blower, Farmer A cut cleaning time from $$6\,\text{h}$$ to $$2\,\text{h}$$ per quintal.”

  6. Conclusion – 4–5 bullet points. Sample:

    • Most common agricultural separation step is still threshing + winnowing.
    • Electric or tractor-driven machines are replacing hand tools, saving $$50\!\text{–}\!70\%$$ labour.
    • At construction sites, sieving different sand grades gives stronger concrete.
    • Cities invest in sedimentation basins to keep drains free from silt.
  7. Bibliography – list newspapers, web links and interview dates.


Hints for Viva or Classroom Presentation

  • Carry one small sample of paddy straw and show how winnowing works using a table-fan in class.
  • Explain why density difference makes winnowing possible. (Heavy grain vs. light husk)
  • If asked about spoilage, quote the safe moisture value $$\le 13\%$$ for cereals.

Safety & Ethics

  • Take permission before recording or photographing people.
  • Handle scissors and cutters carefully when preparing scrapbook.

Outcome: By completing the above, you demonstrate understanding of real-life uses of separation techniques and practise basic research skills.

Answer

A model scrapbook, five sample clippings and two completed farmer interviews have been compiled above; students should repeat the same procedure with sources and farmers from their own locality to finish the activity.

Think like a scientist

Think like a scientist: You are provided with a mixture of iron nails, sand, black pepper, stones, common salt and water. Which steps will you follow to separate each component of a mixture?

The given steps may help you to think like a scientist.

Reflection Steps

I observe ____. I wonder ____.

You might have wondered about questions such as—

  • Which component should I separate first?
  • What method of separation should I use first?
  • How can we separate these components effectively?
  • Will some of the components be soluble in water?
  • What properties of the components can help us in their separation?
  • What is the most appropriate sequence?

Activity Steps

  • Some possible answers to the questions which occurred in my mind are ____.
  • I performed the following methods of separation— ____
  • My findings are ____.

Hint: A mixture that has more than two components requires a combination of several methods of separation.

Solution

Question 9 – Methods of Separation in Everyday Life

Mixture given: iron nails, sand, black pepper, stones, common salt and water.


1 · Reflection steps – thinking like a scientist

  • I observe that the mixture contains some solids that are big, some that are tiny, some that are magnetic, some that float and some that dissolve in water.
  • I wonder which physical property (size, magnetism, solubility, density, volatility) can be used first so that later steps become easier.

Questions that crossed my mind and the quick answers I noted:

QuestionQuick scientific answer
Which component should I separate first?The one whose property is unique and can be removed without disturbing the others. Here it is the stone (largest) or iron nail (only magnetic).
Which method of separation should I use first?Hand-picking / magnetic separation because they are the simplest and need no special apparatus.
Will some components be soluble in water?Yes; common salt dissolves, sand and pepper do not.
What is the most appropriate sequence?Largest size → magnetism → size difference → insoluble v/s soluble → evaporation.

2 · Activity steps – the actual separation

  1. Hand-picking of stones
    The stones are the biggest pieces. I simply pick them up with fingers and keep them aside.
    Property used: very large particle size.
  2. Magnetic separation of iron nails
    I move a bar magnet over the remaining mixture. The iron nails (made of $$\mathrm{Fe}$$) cling to the magnet and are pulled out.
    Property used: magnetism.
  3. Sieving to separate black pepper from sand
    I choose a sieve whose mesh allows sand grains to fall through but retains the larger pepper seeds. After shaking, two heaps are obtained: pepper (on the sieve) and sand (below).
    Property used: difference in particle size.
  4. Dissolving and filtration to separate sand from salt solution
    The leftover mixture now has sand, common salt and water. I stir it well; salt ($$\mathrm{NaCl}$$) dissolves, sand does not. I pour the liquid through a filter paper. The filter retains sand (residue) and the clear salt solution (filtrate) passes through.
    Properties used: solubility of salt, insolubility of sand.
  5. Evaporation (or crystallisation/distillation) to separate salt and water
    I heat the salt solution gently. Water ($$\mathrm{H_2O}$$) changes to vapour and escapes; dry common salt is left in the dish. If I wish to collect pure water as well, I would fit a condenser so that the water vapour condenses back to liquid in another container (simple distillation).
    Property used: difference in volatility/boiling point.

3 · Findings (results)

StepMethodComponent separatedProperty exploited
1Hand-pickingStonesVery large size
2MagnetIron nailsMagnetic nature
3SievingBlack pepperBigger size than sand
4FiltrationSand (as residue)Insoluble & heavier particles
5Evaporation / distillationCommon salt (solid) & water (condensate)Salt non-volatile, water volatile

Thus, each component of the original mixture has been successfully separated by applying a combination of simple physical methods in the correct sequence.

Answer

Sequence of separation:

  1. Hand-pick out the large stones.
  2. Use a magnet to pull out the iron nails.
  3. Sieve the rest; large grains left on the sieve are black pepper, fine grains that pass through are sand.
  4. Stir the sand + salt + water; filter. Sand stays on the filter paper.
  5. Evaporate (or distil) the filtrate; water is driven off (and may be condensed), common salt remains in the dish.

All six components are now obtained separately.

NCERT Solutions for Class 6
Maths
NCERT Solutions for Class 6 Maths
Chapter-wise step-by-step
solutions with explanations
explore solutions Maths bg
Science
NCERT Solutions for Class 6 Science
Chapter-wise step-by-step
solutions with explanations
explore solutions Science bg

Frequently Asked Questions

50,000+ JEE Students Trusted Our Score Calculator

Predict your JEE Main percentile, rank & performance in seconds