Join WhatsApp Icon JEE WhatsApp Group
NCERT Solutions for Class 6 Science

Chapter 11: Nature's Treasures

Download Solutions PDF
Daily JEE Updates, Tips & Important Alerts
Join 30,000+ students and stay updated with JEE notifications and preparation insights.
Join Now!
Free PDF
Complete NCERT Solution PDF for Chapter 11: Nature's Treasures

NCERT Solutions For Class 6 Science Chapter 11 Nature's Treasures helps students understand the importance of natural resources and their role in supporting life on Earth. The page provides comprehensive NCERT Solutions that explain textbook questions from the Class 6 Science syllabus in a clear and student-friendly way. NCERT Solutions For Class 6 Science help students learn about resources such as air, water, soil, forests, minerals, and their conservation. The chapter encourages students to understand the need for responsible use of natural resources and environmental protection. These solutions support students in revising key concepts, completing assignments, and preparing for examinations. Students can access the chapter PDF for easy learning and quick revision. The detailed explanations help build environmental awareness and develop scientific understanding among students.

Download Solutions PDF

Intext Questions

Activity 11.1

Activity 11.1: Let us experience

  • Take a deep breath in, and then breathe out slowly.
  • Take a deeper breath in again.
  • Hold your breath for as long as you can and then breathe out slowly.
  • How long can you hold your breath?
  • How do you feel when you hold your breath?

Solution

Step 1 – Prepare a timer
Ask a classmate to hold a wrist-watch, stop-watch or the stopwatch app in a phone. The dial or display must show the seconds clearly.

Step 2 – Breathe in and out once
Breathe in normally, fill your lungs, and breathe out slowly so that the lungs are almost empty. This clears the air passages and leaves you relaxed for the next, deeper breath.

Step 3 – Take the deepest possible breath
Now inhale again, but this time as deeply as you can, so that your chest and abdomen expand fully. The partner simultaneously presses Start on the timer.

Step 4 – Hold your breath
Close your lips and keep the air inside. Keep one hand raised; the moment you can no longer hold your breath, lower the hand to signal the partner to press Stop. You have now measured how long you could hold your breath.

Typical observations in a class of eleven-to-twelve-year olds

StudentTime (seconds)
A18 s
B24 s
C30 s
D27 s
E22 s

Most class-6 pupils are able to hold their breath for roughly 20–30 seconds. A physically active child may occasionally manage up to 40 seconds, whereas anyone with a cold or asthma may stop earlier.

Step 5 – Record how you felt

  • After about 15 s the chest begins to feel tight.
  • By 20–25 s the urge to breathe becomes very strong; some pupils report a mild burning sensation in the throat.
  • If one tries to continue, the face may redden slightly and the heart beats faster.
  • The instant you breathe out and then inhale fresh air, you feel relieved and relaxed.

Why does this happen?
While you are holding your breath, the oxygen ($$\mathrm{O_2}$$) present inside the lungs is steadily used up for cellular respiration, and carbon dioxide ($$\mathrm{CO_2}$$) keeps accumulating. The respiratory centre in the brain is very sensitive to rising $$\mathrm{CO_2}$$ levels; it sends urgent signals to the diaphragm and chest muscles, forcing you to breathe. Thus the uncomfortable feeling is the body’s warning that it needs a fresh supply of air to survive.

This simple activity shows that air—especially its oxygen component—is one of nature’s most important treasures. Without a continuous supply of it we cannot live even for a minute.

Answer

You are likely to hold your breath for only about 20–30 seconds, after which you feel chest tightness, a strong urge to breathe and slight discomfort. The feeling arises because oxygen is getting used up and carbon-dioxide is building up inside your body, signalling that you must breathe again.

2 Can you name some gases which are present in the air?

Solution

Step 1 – Recall what air is
Air is not a single substance; it is a mixture of several different gases. When we breathe in, we are actually taking in that whole mixture.

Step 2 – List the main gases present in ordinary air
Scientists have measured the composition of clean, dry air near the Earth’s surface. The most abundant gases (along with their approximate percentages by volume) are:

GasSymbol / FormulaApproximate percentage
Nitrogen$$\mathrm{N_2}$$$$\approx 78\%$$
Oxygen$$\mathrm{O_2}$$$$\approx 21\%$$
Argon$$\mathrm{Ar}$$$$\approx 0.93\%$$
Carbon dioxide$$\mathrm{CO_2}$$$$\approx 0.04\%$$
A small, changing amount of water vapour$$\mathrm{H_2O}$$(g)variable (0–4 %)

Step 3 – Mention still smaller traces
Besides the ones in the table, air also contains very tiny (trace) amounts of gases such as neon $$\mathrm{Ne}$$, helium $$\mathrm{He}$$, krypton $$\mathrm{Kr}$$, methane $$\mathrm{CH_4}$$ and ozone $$\mathrm{O_3}$$.

Step 4 – Answer the textbook question
Therefore, when the question asks, “Can you name some gases which are present in the air?”, we can correctly reply with any of the following: nitrogen, oxygen, carbon dioxide, water vapour, argon (and even trace gases like neon or methane).

Answer

Nitrogen, oxygen, carbon dioxide, water vapour and argon are some of the gases present in the air.

Activity 11.2

Activity 11.2: Let us make and decorate

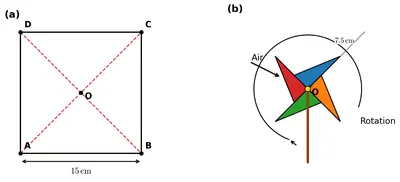
  • Take a square paper of size 15 cm x 15 cm, a pair of scissors, an all-pin and a soft stick.
  • Follow the instructions shown in Fig. 11.2 to make a firki.

Now, you can hold the firki in your hand and run. You can also blow air on it. What do you observe? Does the firki rotate? When you move it a little back and forth, the firki rotates. What makes a firki rotate?

Fig. 11.2
Fig. 11.2

Solution

Step 1 : Make the firki
Follow the paper-folding and cutting steps shown in Fig. 11.2 of the textbook. Fix the four alternate corners of the cut square at the centre with an all-pin and press this pin into the soft stick. The paper blades are now free to turn about the pin.

Step 2 : Perform the activity and record what you see

  • Hold the stick so that the firki is in front of you. Now start running.
  • Alternatively, keep the stick steady and blow air on the paper blades.

Observation : In both cases the paper blades begin to spin quite fast. If you stop running or stop blowing, the spinning slows down and finally stops. When you gently move the stick a little forward and backward, the rotation starts again.

Step 3 : Explain why the firki rotates

  • While you are standing still, the air around the firki is almost at rest; there is no net push on the blades, so they do not turn.
  • When you run (or blow), the air now moves rapidly with respect to the firki. The moving air hits the slanting surfaces of the blades and exerts a force on them.
  • Because the four blades are bent in the same direction, the forces on them are not balanced; together they give a turning (rotational) push called a moment or torque.
  • This torque makes the pinwheel spin about the pin.
  • As soon as the air becomes stationary with respect to the firki again, the unbalanced force disappears and friction gradually brings the rotation to a stop.

Conclusion : A firki rotates whenever there is moving air (wind) relative to it. The wind pushes on the inclined blades and supplies the turning force that makes it spin.

Answer

The firki does rotate. It spins whenever air moves past it—either because you run with it or blow on it. The moving air pushes unevenly on the slanted blades, giving a turning force (torque) that makes the pinwheel rotate. Thus, it is the moving air or wind that makes a firki rotate.

4 Muppandal Wind Farm in Tamil Nadu, Jaisalmer Wind Park in Rajasthan and Brahmanvel Wind Farm in Maharashtra are some of the leading windmill farms in our country. Find out more other windmill farms in our country.

Solution

Step 1 – Understanding the task
We already know three major wind farms—Muppandal (Tamil Nadu), Jaisalmer (Rajasthan) and Brahmanvel (Maharashtra). Our job is to collect the names of some other wind-energy farms working in India.

Step 2 – Where to look for information

  • Text-book side-bars and school library books on renewable energy.
  • Newspapers such as The Hindu, Times of India (look for the business or science pages).
  • The web-pages of the Ministry of New & Renewable Energy (MNRE) and the Tamil Nadu Energy Development Agency (TEDA).
  • Maps and the “Wind Atlas of India” available in the geography laboratory.

Step 3 – Collecting data

From the above sources we note down every place that is mentioned as a wind-power centre. Then we sort and keep only those that are farms (a cluster of many turbines), not single test masts.

Step 4 – Cross-checking
Each name is cross-checked in two different sources so that we do not copy a spelling mistake or an abandoned project.

Step 5 – Final list

Wind farmStateNearest city / district
Dhalgaon Wind FarmMaharashtraSangli
Vankusawade Wind ParkMaharashtraSatara
Chalkewadi Wind FarmMaharashtraSatara
Kayathar Wind FarmTamil NaduThoothukudi (Tuticorin)
Dhank Wind FarmGujaratRajkot / Porbandar region
Tuppadahalli Wind FarmKarnatakaKoppal & Ballari
Sadla Wind FarmGujaratSurendranagar

Step 6 – Presenting the answer
We mention that these are examples; India has hundreds of smaller farms spread over Tamil Nadu, Gujarat, Karnataka, Maharashtra, Rajasthan and Andhra Pradesh.

Answer

Some other windmill (wind-energy) farms in India are:

  • Dhalgaon Wind Farm – Sangli, Maharashtra
  • Vankusawade Wind Park – Satara, Maharashtra
  • Chalkewadi Wind Farm – Satara, Maharashtra
  • Kayathar Wind Farm – Thoothukudi, Tamil Nadu
  • Dhank Wind Farm – Gujarat
  • Tuppadahalli Wind Farm – Karnataka
  • Sadla Wind Farm – Surendranagar, Gujarat

5 Can you think of some more uses of water in your daily life? Write down your responses in the blank bubble.

Solution

Step 1 – Understand what is being asked
In the textbook activity a single empty “thought bubble” is given. We have already learnt two daily uses of water – drinking and bathing. The question now asks us to think of more ways in which we use water during a normal day and to fill that bubble.

Step 2 – Recall your day from morning to night
Start when you wake up and move through the entire day. Whenever you touch or see water, note the purpose. This systematic recall guarantees that we do not miss any common use.

Step 3 – Note the observations

  • Brushing teeth : You rinse your mouth with water several times.
  • Cooking food : Washing vegetables, boiling rice or dal, making tea, etc.
  • Drinking : The most obvious use – to keep the body hydrated.
  • Bathing / showering : For personal cleanliness.
  • Washing hands : Before eating or after using the toilet.
  • Flushing the toilet : Carries away waste.
  • Laundry : Soaking and rinsing clothes in water.
  • Cleaning utensils : Plates, spoons, cookers, etc.
  • Mopping floors and cleaning houses.
  • Watering plants / gardening.
  • Giving water to pets and farm animals.
  • Making ice or other cool drinks : Ice cubes, lemonade, fruit juices.
  • Playing and recreation : Swimming, water fights on Holi, etc.
  • Construction work : Mixing cement, curing concrete.
  • Fire control : Putting out small fires.
  • Cooling engines or iron box : Radiators or sprinkling water on a hot surface.
  • Scientific experiments in school lab : Dissolving salts, preparing solutions.
  • Religious or cultural activities : Puja, sprinkling holy water.

Step 4 – Write your final answer in the textbook bubble
You can either pick 4–5 most common uses or, if space permits, list as many as possible. Remember that every one of these activities relies on the same chemical substance – water, $$\mathrm{H_2O}$$.

(Tip for the activity) : Use short phrases to fit inside the bubble, e.g. “washing clothes”, “cooking food”, “watering plants”, “flushing toilet”.

Answer

Some additional daily uses of water are:
washing clothes, cooking food, brushing teeth, watering plants, flushing the toilet, cleaning utensils, mopping floors, giving water to pets, making ice/lemonade and swimming.

6 We need water for many daily activities, such as drinking, cooking, bathing, washing and cleaning. It is also used for growing crops and for industrial purposes. Where do we get water from? Make a list of the different sources of water.

Solution

Step 1 · Identify the ultimate (primary) source
All fresh water that we use ultimately comes from rainfall. Rain forms when water from oceans, rivers, lakes and soil evaporates, cools, condenses as clouds and then falls back to the ground. Thus, rainwater is the primary or original source of all usable water on land.

Step 2 · Trace what happens to rainwater

  • Some of the rainwater flows over the ground and collects in low-lying places to form surface-water bodies such as ponds, lakes, streams and rivers.
  • Some rainwater seeps into the soil. It fills up the spaces between soil particles and the cracks in rocks to form groundwater. We reach this water by digging wells, installing tube-wells or using hand pumps.
  • In very cold regions rain and river water freeze into ice and snow. With time this frozen water forms glaciers and ice-caps. When glaciers melt, they feed many rivers.

Step 3 · List the practical (direct) sources of fresh water we use in daily life

  • Rainwater — sometimes collected directly in tanks or through rooftop rain-water harvesting systems.
  • Surface-water bodies (fresh water):
    • Ponds
    • Lakes
    • Rivers
    • Streams
    • Reservoirs and dams (man-made lakes)
  • Groundwater sources:
    • Dug wells
    • Bore-wells / tube-wells
    • Hand pumps
    • Natural springs
  • Glaciers and snowfields — their melt-water feeds many rivers and is therefore an indirect source of fresh water.

Note about seas and oceans: Although they store the largest amount of water on Earth, the water is salty. It cannot be used directly for drinking, cooking, bathing or for growing crops. Hence seas and oceans are not ordinary sources of usable water; they become useful only after expensive desalination, or for limited industrial purposes.

Step 4 · Combine the information into one neat answer
The different sources of the fresh water we actually use can therefore be grouped and listed as shown in the answer below.

Answer

  • Rainwater (and rain-water harvesting)
  • Surface fresh water — ponds, lakes, rivers, streams and reservoirs/dams
  • Groundwater — dug wells, tube-wells, hand pumps and natural springs
  • Ice and snow — glaciers and ice-caps whose melt-water feeds rivers

(Seas and oceans contain salt water, so they are not direct sources of water for our daily activities.)

Activity 11.3

Activity 11.3: Let us find out

Fill the Column II and Column III in Table 11.1.

Table 11.1: Wastage of water in your daily activities

Column I — ActivityColumn II — How is water wasted?Column III — Suggest ways to reduce wastage of water.
1. Hand washing
2. Washing clothes
3. Washing utensils
4. Taking shower
5. Cooking
6. Gardening
7. Brushing teeth

Solution

The aim of Activity 11.3 is to make you observe two things for each routine job:

  1. Where exactly does unnecessary water escape? (Column II)
  2. What simple action can stop or lessen that escape? (Column III)

Think of the sequence in which the tap is opened, used and finally closed. If water keeps flowing even when it is not doing any work, it is wasted. The suggestions given in Column III either shorten the running time of the tap, use a more efficient tool, or reuse the same water for another purpose.

Filled-in Table 11.1:

Column I — ActivityColumn II — How is water wasted?Column III — Suggest ways to reduce wastage of water
1. Hand washing
  • Tap left fully open while rubbing soap
  • Leaky tap not repaired
  • Wet hands, close tap, soap, then open tap only to rinse
  • Fit tap with aerator to reduce flow
  • Repair leaks at once
2. Washing clothes
  • Continuous flow hose pipe
  • Running fresh water for final rinse when mildly used water could do
  • Use bucket instead of running hose
  • Collect last rinse water for mopping floors or cleaning bathroom
  • Run full washing-machine loads, not half loads
3. Washing utensils
  • Tap open while scrubbing each utensil
  • Using wide-mouth jet instead of spray
  • Fill one tub with warm water + detergent, soak utensils
  • Scrub with tap closed, then rinse all together
  • Attach spray nozzle (uses less water than full jet)
4. Taking shower
  • Long showers for singing/relaxing
  • High-flow shower head
  • Keep shower time within 5 minutes (use timer or song)
  • Use low-flow shower head
  • Collect bucket of initial cold water and reuse for flushing
5. Cooking
  • Excess water for washing vegetables
  • Throwing away water in which rice/dal is rinsed
  • Rinse veggies in a bowl; reuse the same water for plants
  • Steam vegetables instead of boiling in plenty of water
  • Measure exact water for rice/dal instead of draining extra
6. Gardening
  • Over-watering lawns
  • Using hose at noon – more evaporation
  • Water early morning or late evening
  • Use drip irrigation or watering can, not open hose
  • Mulch soil to retain moisture
  • Collect rainwater in barrels for garden use
7. Brushing teeth
  • Tap left running for full 2–3 minutes
  • Wet brush, close tap, brush, open tap only to rinse mouth
  • Use a tumbler of water instead of running tap

By following these small, practical steps you can easily save several buckets of water every single day.

Answer

ActivityHow water is wastedHow to reduce wastage
Hand washingTap kept open while soaping; leaksClose tap while soaping; fix leak; fit aerator
Washing clothesRunning hose; half-load machineUse bucket or full machine load; reuse rinse water
Washing utensilsTap open during scrubbingSoak first, rinse together; use spray nozzle
Taking showerVery long shower; high-flow head5 min limit; low-flow head; collect initial cold water
CookingExcess water for washing/boilingRinse in bowl and reuse; steam; measure exact water
GardeningOpen hose; watering at noonWater in morning/evening; drip system; rainwater harvest
Brushing teethTap running all the timeUse mug or close tap while brushing

8 What conclusion can you draw from the information you gathered in the table? What can you and your family do to reduce this wastage of water?

Solution

Step 1 – Rewriting the information you collected

Suppose, after observing every tap, bucket, flush and pipe in the house for one whole day, you filled in the class-work table like this:

Place / ActivityReason for lossApprox. loss in one day (L)
Leaking wash-basin tapDrips all day10
Kitchen tap left open while washing vegetablesRunning water not needed the whole time15
Toilet cisternFlush leaks slowly5
Over-watering garden with hoseNo sprinkler head, water splashes on path20

Step 2 – Finding the total wastage

Add the losses row by row:

$$10\;\text{L} + 15\;\text{L} + 5\;\text{L} + 20\;\text{L} = 50\;\text{L}$$

Therefore, about 50 L of clean water is being wasted from a single home every day.

Step 3 – What does this tell us?

  • Even small, steady drips add up to many litres in 24 hours.
  • Most wastage is avoidable; it is caused by carelessness (open taps) or delayed repairs (leaks).
  • If every family in a neighbourhood wasted the same 50 L, the colony could lose thousands of litres daily.

Step 4 – Actions my family and I can take

  1. Repair or replace every leaking tap and cistern washer immediately.
  2. While brushing teeth or scrubbing dishes, close the tap; open it only for rinsing.
  3. Use a bucket and mug for bathing instead of a continuously running shower; this saves about $$\approx 15\;\text{L}$$ each bath.
  4. Fit an aerator/spray nozzle to kitchen and bathroom taps to reduce the flow rate.
  5. Water plants with a watering-can in the early morning or late evening; this avoids evaporation loss and needs less water.
  6. Collect the last rinse-water from clothes or utensils and reuse it for mopping floors or flushing.
  7. Teach every visitor and helper in the house to shut taps tightly after use.

By following these simple steps, the 50 L daily wastage identified in the table can be reduced almost to zero. This helps conserve Nature’s most valuable treasure – fresh water.

Answer

We found that one household was wasting about 50 L of clean water each day, mainly from dripping taps, leaking flushes and taps left running. By fixing leaks, closing taps when not needed, reusing rinse-water and watering plants carefully, my family can cut this wastage to almost nothing.

9 Identify other human activities that lead to water pollution. Discuss with your friends in the class what you can do to reduce water pollution.

Solution

Step 1 – Recall the meaning of water pollution
When unwanted substances (called pollutants) get mixed with water and make it unfit for drinking, bathing, irrigation or for aquatic life, we say the water is polluted.

Step 2 – List more human activities that add pollutants to water

  • Detergent discharge : Washing clothes, utensils, vehicles or animals directly in ponds or rivers adds phosphates and other chemicals.
  • Sewage disposal : Draining untreated household sewage into canals, lakes or the sea introduces germs that spread diseases such as cholera and typhoid.
  • Immersion of idols and flowers : After festivals large painted idols, plastic garlands and flowers are dipped in rivers. Paints often contain harmful heavy-metal salts of lead and mercury.
  • Throwing solid waste : Plastics, food wrappers, cans and other litter choke drains and float on water, harming fish and birds.
  • Agricultural run-off : Rain washes excess chemical fertilisers (rich in nitrate and phosphate) and pesticides from fields into nearby water bodies, causing algal bloom and killing aquatic life.
  • Industrial effluents : Factories sometimes release hot water, acids, dyes, oils or toxic metals such as $$\mathrm{Cr^{3+}}$$ directly into rivers without proper treatment.
  • Oil spills : Leakage from oil tankers, offshore drilling or refineries forms an oily layer that blocks oxygen for marine plants and animals.
  • Mining and quarrying : These activities wash silt, poisonous cyanide or arsenic from the mines into streams.
  • Construction activities : Cement, lime and fine dust mix with rain-water flowing to the nearest drain.
  • Thermal pollution : Power plants sometimes discharge water used for cooling at a much higher temperature. Warm water holds less dissolved oxygen and stresses fish.

Step 3 – Actions we (students and community) can take to reduce water pollution

  • Use eco-friendly products : Prefer biodegradable soaps, detergents and natural cleaning powders.
  • Dispose waste correctly : Never throw plastic bags, medicines, paint, used batteries or food waste into drains or water bodies; put them in the proper dustbin or a collection centre.
  • Save water at home : Closing taps when not in use reduces the volume of dirty water generated each day.
  • Promote composting : Convert kitchen waste and garden leaves into manure instead of letting it reach open drains.
  • Encourage organic farming : Motivate elders to use compost and bio-pesticides so that fewer chemicals are washed off from fields.
  • Plant trees and maintain green belts : Roots hold soil, preventing silt from being carried to rivers during rains.
  • Participate in cleanliness drives : Form small groups to clean the neighbourhood pond or riverbank on weekends and put up awareness posters.
  • Celebrate eco-friendly festivals : Use clay idols painted with natural colours; collect flowers separately for composting.
  • Report leakages : Inform the local authority if you notice an oil spill, a sewage pipe leaking into a stream or illegal dumping.
  • Spread awareness : Present skits, posters and charts in school assemblies explaining how polluted water harms health and what simple steps everyone can follow.

Conclusion
Water pollution is largely the result of everyday human actions. By making small but disciplined changes in our habits and by spreading awareness, we can protect Nature’s precious treasure – clean water – for ourselves and for all living beings.

Answer

  • Activities such as washing with detergents, draining sewage, throwing plastic or festival idols, fertiliser-run-off from fields, industrial discharge, oil spills, mining and releasing hot water all pollute rivers, lakes and seas.
  • We can help by using eco-friendly products, never dumping waste in water, saving water, composting, supporting organic farming, planting trees, joining cleanliness drives and spreading awareness.

10 It is important for us to conserve water and use it judiciously. We must also prevent it from being polluted so that water remains fit for consumption by all living beings. In what ways can you conserve water?

Solution

Detailed Explanation – How we can save and protect water

  1. Close taps when not in use
     While brushing teeth, shaving, soaping hands or washing dishes, turn the tap off. Open it only to rinse.
  2. Fix leakages immediately
     A dripping tap can waste several litres a day. Tell elders or a plumber if you notice a leak in taps, pipes, cisterns or overhead tanks.
  3. Use a bucket instead of a running hose
     • Take a bucket bath instead of a long shower.
     • Wash vehicles, pets or balconies with a bucket and mug. A hosepipe can waste almost $$500\,\text{L}$$ of water in half an hour.
  4. Reuse relatively clean water
     • Water used for washing rice, vegetables or fruits can be poured on potted plants.
     • Left-over drinking water in bottles can be used to water saplings.
  5. Harvest rainwater
     • Keep a large, clean container or build a rooftop rainwater-harvesting system to collect rain. This stored water can recharge wells or be used for gardening and cleaning.
  6. Grow drought-resistant and native plants
     Such plants need less watering. Mulching soil with dry leaves also reduces evaporation loss.
  7. Water plants in the early morning or late evening
     Cooler temperatures reduce evaporation, so less water gives the same benefit.
  8. Run washing machines with a full load
     Each wash cycle uses many litres. A full load means fewer washes per week.
  9. Use dual-flush or low-flow toilets
     They use nearly half the water of ordinary cisterns.
  10. Do not dump waste into water bodies
     Never throw plastic, chemicals, oils or soaps into drains, rivers or lakes. They pollute water and make it unsafe for humans and animals.
  11. Create awareness
     Discuss water conservation in school assemblies, prepare posters and participate in community clean-up drives near ponds and rivers.

If each of us follows these simple steps every day, we can save thousands of litres of fresh water and keep it clean for all living beings.

Answer

We can conserve water by closing taps when not in use, fixing leaks, using buckets instead of hoses, reusing relatively clean water, harvesting rainwater, watering plants during cool hours, growing native plants, running washing machines only with full loads, installing low-flow toilets, avoiding dumping waste into water bodies and spreading awareness about these practices.

11 Find traditional water harvesting practices in your locality. Discuss with your teachers and parents to learn more about it.

Solution

Activity carried out

  1. I first spoke to my grandparents, two elderly neighbours and our school Social-Studies teacher. I asked them how people stored rain-water in our region (Jaipur district, Rajasthan) before hand-pumps and municipal pipelines became common.
  2. Next, I took photographs of three surviving structures within 5 km of my house and made brief notes in my science journal.
  3. Finally, I compared their information with short articles from the State Water Resources Department website.

Traditional water-harvesting structures found

Name of structureHow it worksMain building materialSpecial points told by elders/teacher
Baori (Step-well)Deep masonry well, wide mouth; broad steps go down to the water table so that even when the water level falls people can walk down and fetch water.Locally quarried sandstone blocks joined with lime mortar.Kept cool even in May–June heat; women used the landing platforms for rest and social meetings.
JohadSmall semicircular earthen embankment built across a gently sloping valley; stores monsoon run-off and allows it to percolate, recharging wells around it.Compacted local soil, sometimes faced with stones to stop erosion.My teacher said johads revived many dried hand-pumps when villagers cleaned them after every 4–5 years.
TankaUnderground circular tank (≈3 m diameter, 3–4 m deep) plastered with lime; rainwater from a roof or a paved courtyard is led into it through a silt-trap.Lime-surkhi plaster inside; stone or brick lining outside.Grandmother recalled that a family tanka kept sweet water for an entire summer; mouth was always covered to keep animals and dust away.

Common features noticed

  • All three use gravity — no external energy needed to move water.
  • Structures are built from locally available, low-cost materials (soil, stone, brick, lime).
  • Besides supplying water, they recharge groundwater and keep the surroundings cooler.

What I learnt

  1. Traditional methods are perfectly suited to local climate (low, erratic rainfall & high summer evaporation).
  2. Community maintenance (desilting, repairing cracks before monsoon) is the key to their long life.
  3. Reviving these structures today can reduce our dependence on deep bore-wells and save electricity.

Suggested follow-up for the class: measure the dimensions of any one baori, estimate its maximum storage volume using the formula for a frustum of a cone, and compare it with current daily water need of the adjoining village.

Answer

People in my area have long used three main rain-water harvesting systems: (i) baoris or step-wells, (ii) johads (small earthen check-dams) and (iii) underground tankas. All collect monsoon rain, store it safely and recharge the groundwater without any pumps.

12 World Water Day is observed on 22nd March every year. Find out its importance.

Solution

Step 1 – The origin of World Water Day

In December 1992 the General Assembly of the United Nations decided that from 1993 onwards 22 March would be celebrated every year as World Water Day. The decision was taken because fresh water is limited and millions of people still do not get clean and safe drinking water.

Step 2 – Why 22 March is important

  • Awareness: The day reminds everybody that water is essential for life and that the supply of fresh water on Earth is finite. If we waste it, pollute it or do not share it fairly, both people and nature suffer.
  • Focus on a theme: Every year the United Nations chooses a special theme such as “Groundwater – making the invisible visible”, “Leaving no-one behind” or “Water and Climate Change”. The theme helps governments, schools and communities to study one water problem in depth and to look for solutions.
  • Action: Governments, scientists, NGOs and ordinary citizens launch projects on this day—tree planting near rivers, cleaning local ponds, saving rainwater, fixing dripping taps, organising quiz or poster competitions in schools, and many more activities that actually save or protect water.
  • Monitoring progress: Reports such as the UN World Water Development Report are released on 22 March. They tell us how much progress the world is making towards Sustainable Development Goal 6 (SDG-6): “Clean Water and Sanitation for All by 2030.”
  • Global cooperation: Because every river, lake or underground aquifer may flow through several countries, the day also reminds nations to cooperate and share fresh-water resources peacefully.

Step 3 – Importance for students

  • You learn good habits: closing the tap while brushing teeth, using a bucket instead of a shower, collecting rainwater for plants, etc.
  • You can become part of school campaigns—rallies, street plays, science projects or exhibitions—thus spreading the message further.
  • Understanding water issues at an early age helps you grow into a responsible citizen who respects natural resources.

Conclusion

World Water Day on 22 March is therefore important because it creates awareness, encourages learning, inspires practical action and promotes international cooperation so that every person, plant and animal on Earth can have access to clean and adequate water—today and in the future.

Answer

22 March is celebrated as World Water Day to remind everyone of the vital importance of fresh water, to focus each year on a key water-related theme, and to inspire governments, communities and individuals to conserve, protect and use water wisely so that clean water is available for all.

13

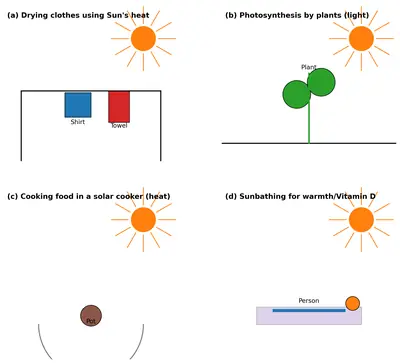
We use heat and light from the Sun for various purposes. What are some of the activities for which we need heat and light? Bhoomi draws some pictures to show the uses of heat and light from the Sun. Help her by adding more examples. Draw the pictures and write their descriptions in the space provided.
Figure
Figure

Solution

Step 1 – Recall what we get from the Sun

The Sun gives us two chief forms of energy:

  • Heat (thermal energy)
  • Light (radiant energy)

Everyday activities that depend on sunlight will therefore be grouped under these two heads. Some uses need mainly heat, some need mainly light and many need both. The task is to think of as many real–life examples as possible and then draw simple pictures to show them.

Step 2 – List of common activities that use the Sun’s heat

  1. Drying clothes after washing.
  2. Drying grains, spices, papad, pickles, chillies etc. in the open courtyard.
  3. Making salt in salt pans – water evaporates because of heat.
  4. Solar cooker for cooking dal, rice or vegetables.
  5. Solar water heater that warms water for bathing.

Step 3 – List of common activities that use the Sun’s light

  1. Photosynthesis – green plants make food in sunlight.
  2. Solar panels (photovoltaic cells) generating electricity to run a fan/bulb.
  3. Vitamin-D formation in our skin when we sit in sunlight.
  4. Day-time vision – we are able to see everything outdoors because of sunlight.

Step 4 – Combine heat & light examples

  1. Drying mud bricks or pottery before firing.
  2. Ripening of fruits and vegetables naturally in the field.

Step 5 – How to draw each picture (guidelines for Bhoomi)

No.What to drawShort description to write below the picture
1Clothesline between two poles, shirts and socks fluttering, bright Sun overhead.Drying clothes in the Sun – uses its heat.
2Courtyard with red chillies spread on mats, dog sleeping nearby, Sun shining.Drying spices and grains – Sun’s heat.
3Rectangular salt pans with white salt heaps, worker carrying a basket.Making salt by evaporating seawater – Sun’s heat.
4Box-type solar cooker kept on a stool; rays drawn from the Sun to the mirror.Cooking food in a solar cooker – Sun’s heat.
5Roof of a house having a solar water-heater panel and a storage tank.Heating water – Sun’s heat.
6Big green leafy tree, label: “Photosynthesis”.Plants make food in sunlight – Sun’s light.
7Two slanted solar panels wired to a glowing bulb.Generating electricity – Sun’s light.
8Child reading a book under daylight coming through a window.Seeing/reading during the day – Sun’s light.
9Person sitting in park with sleeves rolled up, smiling.Getting Vitamin-D – Sun’s light.
10Farmer spreading wet bricks in rows to dry.Drying bricks – Sun’s heat & light.

Step 6 – Final answer to write in the textbook lines

“We need the heat and light of the Sun for drying clothes and grains, cooking food in a solar cooker, making salt, heating water, helping plants to prepare food, generating solar electricity, allowing us to see in the day, getting Vitamin-D and many other activities.”

Answer

  • Heat: drying clothes, drying grains & spices, making salt, solar cooker, solar water-heater, drying bricks.
  • Light: photosynthesis, solar panels for electricity, daytime vision for reading, Vitamin-D formation.

14

One afternoon, Bhoomi and Surya pass by the field near Ajji's house, where they see a cow grazing the grass. They talk about the Sun being the main source of energy. Read the conversation carefully and answer.

Bhoomi: Look at this cow. It is grazing the grass and getting energy from it.

Surya: No, I think this cow is getting energy from the Sun.

Bhoomi: The cow is standing in the Sun. But it does not mean that it is getting energy from the Sun.

Surya: The cow is eating grass. Grass leaves need sunlight to grow. So, the main source of energy is the Sun. This way the cow gets energy from the Sun.

According to you, whose statement is correct and why?

Solution

Concept used: The Sun is the ultimate source of energy for almost every living organism on Earth. Green plants trap the Sun’s energy during photosynthesis and store it in the form of food. Animals obtain this stored energy by eating plants (or by eating plant-eating animals).

Step 1 — What does grass do with sunlight?
Grass is a green plant. With the help of chlorophyll present in the leaves it performs photosynthesis. In this process it converts the light energy of the Sun into chemical energy of food (glucose).

The simplified word equation and chemical equation of photosynthesis are

$$\text{Carbon dioxide} + \text{Water} \xrightarrow{\text{Sunlight}} \text{Glucose} + \text{Oxygen}$$

$$\mathrm{6\,CO_2 + 6\,H_2O \xrightarrow{Sunlight} C_6H_{12}O_6 + 6\,O_2}$$

Thus the food inside grass leaves actually contains the Sun’s energy trapped in chemical form.

Step 2 — How does the cow get its energy?
The cow is a herbivore; it eats grass. When the cow digests and oxidises the food present in the grass, the chemical energy released is used by the cow to walk, run, give milk, keep its body warm, etc.

Step 3 — Tracing the energy path
Sun → Grass → Cow can be written symbolically as: $$\text{Sun} \\longrightarrow \text{Grass (producer)} \\longrightarrow \text{Cow (primary consumer)}$$

So, even though the cow is not directly “soaking up” sunlight like the grass does, the energy it gets from grass originally came from the Sun. Therefore the Sun is the main source of energy for the cow as well.

Conclusion
Surya’s statement is correct. Bhoomi’s observation that the cow is eating grass is true, but she has missed the earlier step in the food chain—grass gets its energy from sunlight. Hence the energy present in the cow’s food ultimately comes from the Sun.

Answer

Surya is correct — the cow’s energy comes from the Sun indirectly, because grass first traps solar energy by photosynthesis and the cow obtains that stored energy when it eats the grass.

15

What will happen if the Sun is not visible for a few days?

  1. We may have to depend on artificial lighting during day time also.
  2. __________
  3. __________

Solution

Step 1 – Why do we normally not need lamps in the daytime?
In the day the Sun gives us plenty of light and heat. Because of this natural light, we do not have to switch on tube-lights or bulbs.

Step 2 – What changes if the Sun suddenly stays hidden for many days?

  1. No sunlight → no natural light for us.
     So we shall depend on artificial lighting even in the daytime (the first point already given in the textbook).
  2. No sunlight → plants cannot make food.
     Green plants prepare their food by the process called photosynthesis. The simplified word-equation is
     $$\text{Carbon dioxide} + \text{Water} \xrightarrow{\text{Sunlight / Chlorophyll}} \text{Food\ (Glucose)} + \text{Oxygen}$$
     Without sunlight this reaction will not take place. Hence plants will stop making food, animals (including us) will soon face food shortage and oxygen level will also not rise.
  3. No sunlight → no warming of the Earth.
     The Sun is our chief source of heat. If it remains hidden for several days, the ground, air and water bodies will keep losing heat by radiation but will receive almost no new heat. Therefore the temperature will fall sharply; the weather will become extremely cold and many living beings may not survive such cold.

Step 3 – Putting the three effects together
Thus, if the Sun is not visible for a few days we would (i) need artificial lights even during the day, (ii) face stoppage of photosynthesis and a shortage of food and oxygen, and (iii) experience a severe drop in temperature making the environment very cold.

Answer

(i) We may have to depend on artificial lighting during the daytime also.
(ii) Plants will not be able to perform photosynthesis, so food production (and oxygen release) will stop.
(iii) The temperature will fall sharply, making the surroundings very cold.

16 Discuss with your friends and make a list of at least five products that we get from forests.

Solution

Step 1 – Recall what a forest is
A forest is a large area covered mainly with trees and other plants. These living things (producers) prepare their own food by photosynthesis and become the starting point of many food-chains. Apart from food, the trees and shrubs inside a forest give us many useful materials.

Step 2 – Brain-storm possible materials
Sit with your friends and think of common objects you use daily that are made from wood, leaves, bark, seeds, sap, etc. Ask questions such as:
• Which part of the tree is it made of?
• Do we use it at home, in school or in industry?
Write each idea in your notebook.

Step 3 – Group similar ideas and choose at least five
After everyone shares, sort the ideas into groups (wooden items together, medicines together, etc.). Make sure you finally keep at least five different products. A neat list could be:

  • Timber / Wood – used to make furniture, doors, windows, boats and paper pulp.
  • Fuel wood / Fire-wood – logs and twigs burnt for cooking and heating, especially in villages.
  • Medicinal plants – bark of Cinchona (gives quinine against malaria), leaves of Neem, roots of Sarpagandha, etc.
  • Gums and Resins – sticky sap from trees like Acacia (gum arabic) and Pine (rosin, turpentine) used in medicines, paints and adhesives.
  • Food items – wild fruits (jamun, amla), nuts (pine nuts), honey collected by bees, mushrooms, etc.

Other acceptable products your group might also mention – cork, natural rubber, fibres (bamboo, cane), essential oils (eucalyptus oil), tannins for leather, and leaves for plates (sal or teak leaves).

Step 4 – Write the final answer neatly
Copy your chosen five (or more) products in clear bullet points in your exercise book. This completes the discussion task.

Answer

  • Timber (wood for furniture, paper, etc.)
  • Fuel wood (fire-wood)
  • Medicinal plants and herbs
  • Gums and resins (e.g., turpentine, gum arabic)
  • Forest food products (fruits, nuts, honey, mushrooms)

17 What are the consequences of cutting a large forest area? Make a presentation or do a role play, or write a story or a poem that shows what could happen if we continue to cut down trees in our forests.

Solution

Question 11
What are the consequences of cutting a large forest area? Make a presentation or do a role play, or write a story or a poem that shows what could happen if we continue to cut down trees in our forests.

Step 1 — Recall what forests give us

  • Pure air: trees take in carbon dioxide and release oxygen.
  • Home for animals: birds, insects, reptiles, mammals and countless microorganisms live there.
  • Rain and water security: trees let water seep slowly into the ground and also help clouds to form.
  • Soil protection: roots hold soil, stopping it from being washed away.
  • Climate balance: green cover keeps Earth cool by absorbing the Sun’s heat.
  • Resources for people: fruits, fuel-wood, fibres, medicines, honey and jobs.

Step 2 — List the main consequences of large-scale cutting (deforestation)

  1. Soil erosion: loose soil is carried away by wind and rain; fertile land becomes barren.
  2. Floods and droughts: without roots to soak up water, rivers overflow in the rainy season and run dry in summer.
  3. Loss of biodiversity: species lose their shelter and food chains break down; some become extinct.
  4. Climate change: fewer trees mean more $$\mathrm{CO_2}$$ stays in the air, trapping heat and raising global temperature.
  5. Desertification: green land gradually turns into desert when plants cannot grow back.
  6. Impact on people: tribes and villagers who depend on the forest lose their livelihood; cities suffer hotter summers and poorer air.

Step 3 — A short story to show these effects

"The Whispering Woods"

Once, on the edge of Sunnyville, there stood a thick, emerald forest. Children called it the Whispering Woods because the leaves rustled like friendly voices. One year, loggers arrived with roaring machines. Day after day, trees crashed, birds scattered, and sunlight hit the bare soil for the first time in centuries.

At first the townspeople enjoyed cheaper timber and wide open land. But the very next monsoon, heavy rain beat down on the naked slope. With no roots to hold it, the top-soil slid into the river, turning its clear water chocolate-brown. The swollen river spilled into Sunnyville’s lanes. Houses flooded, and crops drowned.

When the dry season returned, the river shrank to a trickle. Wells that had never failed went dry. The fields cracked, and farmers watched their seeds die in dust. Meanwhile, summer afternoons became unbearably hot; children, who once played outside, now hid indoors.

A wise old teacher gathered the townsfolk under the last giant banyan. “The forest gave us shade, rain, and life,” she said. “We thought cutting it was profit, but the bill is now bigger than the bargain.” Together they planted saplings, fenced protected patches, and promised never to repeat the mistake. Years later, birdsong returned, streams gurgled, and the Whispering Woods began to whisper again—this time with a warning the people would never forget.

Step 4 — A four-line poem for the classroom chart

Cut a tree and the sky grows grey,
Rivers rage, then dry away.
Save a tree — the Earth will sing;
Green is the colour of life we bring.

Step 5 — Key message for the presentation

  • Forests are Nature’s treasure chests; if we empty them, we lose air, water, soil and life itself.
  • Plant more trees, use paper wisely, support wildlife sanctuaries and teach others the same.

Conclusion
Cutting large forest areas causes soil erosion, floods, droughts, loss of biodiversity, climate change and hardships for humans. Protecting and re-growing forests is the only safe, smart choice.

Answer

Large-scale cutting of forests leads to soil erosion, floods in the rainy season, drought in summer, loss of wildlife, hotter climate and difficulties for people. Therefore we must protect and re-grow our forests.

Activity 11.4

Activity 11.4: Let us investigate

  • Collect samples of soils from different areas around your home and school.
  • Guess what could be there in different soils.
  • Observe carefully each soil sample and note its colour.
  • Touch each soil sample and feel its texture.
  • Observe the soil samples with your naked eye. If you have a magnifying lens, look at the soil through it.
  • Record your observations in Table 11.2.

Table 11.2: Soil samples

Location from which soil sample was collectedWhat I guessed about the soil?Observation of soil with naked eye including its colour and textureObservation of soil with magnifying lens
Soil from a farm after ploughing
  • Is there any difference between your guess and what you can actually observe when you look closely?
  • Do you see any differences in the soil samples taken from different places?
  • Do you see differences in what you are able to observe with your naked eye and what you can observe with a magnifying lens?

Solution

Step 1 – Collecting the samples
Four small, dry, clean, and labelled polythene bags (or jars) were taken. About one small cup of soil was collected from each of the following places.

  • (A) Farm just after ploughing
  • (B) Road-side flower bed in front of the school
  • (C) Football field (near the goal-post)
  • (D) Soil from an earthen pot kept on the balcony at home

Step 2 – Making a guess before looking closely
Using what we already know about each place (amount of water, manure, traffic, etc.) we first wrote what we expected to find. This is recorded in the second column of the table below.

Step 3 – Observing with the naked eye
Each sample was poured on separate white sheets so that colour and texture could be noticed easily. We gently broke the clods (if any) and rubbed a pinch of soil between the fingers to feel whether it was coarse, smooth, sticky, etc.

Step 4 – Observing with a magnifying lens (5×)
About half a teaspoon of every soil was kept on a watch glass. A hand-lens was used from a height of about 2 cm. Any very small particles, fibres, shiny grains, or organisms that were not visible earlier were now noted.

Step 5 – Recording the observations

Location from which soil sample was collectedWhat I guessed about the soil?Observation of soil with naked eye including its colour and textureObservation of soil with magnifying lens
Soil from a farm after ploughing (A) Dark brown, loose, rich in humus; may contain remains of roots and dry leaves. Colour dark brown; small clods break easily; feels loose and slightly moist; sticks very little on fingers. Can see very fine roots, tiny pieces of dry leaves, and shiny mica-like particles; a tiny insect was also noticed.
Road-side flower bed (B) Should be fairly fertile but mixed with some sand and small gravel thrown from the road. Light brown with some grey particles; looks uneven; small rounded pebbles visible; texture gritty. Individual sand grains become clearer; brick-red tiny chips (from construction debris) and a few sparkling quartz grains observed.
Football field near goal-post (C) Expected to be hard and compact with more clay because the ground is watered and rolled. Colour yellowish brown; appears compact; forms a smooth lump when pressed; feels sticky on adding a drop of water. Surface looks like packed plates; almost no organic matter; very fine cracks visible between particles.
Soil from an earthen pot at home (D) Very dark, light in weight, full of manure and coco-peat. Blackish brown; extremely loose and porous; many small bits of dried leaves; feels very light. Fibrous pieces of coco-peat and decomposed leaves clearly seen; almost no sand grains; some white fungal threads visible.

Step 6 – Answering the questions given after Table 11.2

  1. Is there any difference between your guess and what you can actually observe when you look closely?
    Yes. For sample B I did not expect so many brick chips; for sample C I thought it would be only clay but I could also see mica-like shiny bits. Thus careful observation corrected some of my earlier guesses.
  2. Do you see any differences in the soil samples taken from different places?
    Clearly, each place has its own kind of soil. The farm soil (A) was rich in organic matter and loose, the road-side soil (B) was sandy–gritty, the football-field soil (C) was clayey and compact, while the potting soil (D) was humus-rich and very porous.
  3. Do you see differences in what you are able to observe with your naked eye and what you can observe with a magnifying lens?
    Yes. The lens revealed tiny roots, fungal threads, mica flakes, quartz grains, and very hair-like cracks that were impossible to notice with the unaided eye. Thus a magnifying lens helps in detecting much finer details of soil composition.

Conclusion
Soils from different locations differ in colour, particle size, organic matter, and moisture. Using both touch and a magnifying lens gives a more accurate picture than guessing or looking with the naked eye alone.

Answer

The four soil samples differed clearly in colour, texture and composition; the magnifying lens showed still finer details such as mica flakes, fungal threads, tiny roots and quartz grains that were not visible to the naked eye. Hence both the original guesses and the naked-eye observations were only partially correct; closer examination proved that soils from different places really do vary a lot in their properties.

19 Coal is mainly used for the production of electricity. It is found in several parts of India. Find out the major coal-producing states and mark them in a map of India.

Solution

Step 1 – Recall what the question asks
We have to find the major coal-producing states of India and then show, on an outline map of India, where those states lie.

Step 2 – Collect information from a reliable source
Turn to a recent school atlas, the Ministry of Coal website or the latest India Year Book. All of them give the same broad picture:

  • Most of India’s coal comes from the eastern and central part of the country.
  • The biggest producing states are constant from year to year, even though the exact order may change slightly.

Step 3 – List the states that together supply almost the entire output
The following six states account for roughly 98 % of India’s total coal production:

  1. Jharkhand (Jharia, Bokaro, Giridih, etc.)
  2. Odisha (Talcher, Ib-Valley)
  3. Chhattisgarh (Korba, Raigarh)
  4. West Bengal (Raniganj)
  5. Madhya Pradesh (Singrauli, Sohagpur)
  6. Telangana (Singareni)
Two more—Maharashtra (Wardha Valley) and Uttar Pradesh (part of the Singrauli field)—also produce coal, but their share is much smaller, so they are often shown as minor producers.

Step 4 – Mark the states on an outline map of India
Take a blank political map of India (the kind supplied in school work-books). Shade or outline each of the six major states above. Next to each shaded state, write its name in neat, small letters.
Tip for neat labelling: use blue or black for the state name and light grey shading for the state itself, so the labels remain readable.
Optional enrichment: pinpoint one famous coal field in each state—e.g. ‘Jharia’ in Jharkhand—using a small black dot.

Step 5 – Double-check
Count: six shaded states, labelled correctly, covering the belt from West Bengal in the east to Telangana in the south-central zone. That satisfies the requirement of “major coal-producing states”.

Your map is now complete.

Answer

Major coal-producing states to mark: Jharkhand, Odisha, Chhattisgarh, West Bengal, Madhya Pradesh and Telangana.

Activity 11.5

Activity 11.5: Let us conduct a survey

  • Conduct a survey of vehicles in your neighbourhood.
  • Which types of vehicles are there? What types of fuels do they use?
  • Record the information that you collect in Table 11.3.

Table 11.3: Types of vehicles and fuels used

Type of vehicleType of fuel used

Solution

Step 1 — Planning the survey

We first decide what information is needed.

  • The type of vehicle (for example, car, bus, motorcycle, etc.).
  • The type of fuel it normally uses (such as petrol, diesel, CNG, electricity, LPG, or no fuel for bicycles).

Step 2 — Collecting data

  1. Stand at a convenient place (your society gate or the main road) for about 20 minutes.
  2. Each time a vehicle passes, note its category and the fuel written on its body or known from common knowledge.
    Example: Most city buses have CNG painted on them; petrol pumps display whether two-wheelers nearby are being filled with petrol or diesel.
  3. Ask neighbours or family members if you are unsure of a particular vehicle’s fuel.

Step 3 — Recording the information

Write every observation in a rough column like this:

  • Car  —  petrol
  • Scooter  —  petrol
  • Bus  —  CNG
  • Auto-rickshaw  —  CNG
  • Bicycle  —  no fuel
  • Car  —  diesel

Step 4 — Preparing the final table

After twenty minutes you might have seen many examples of the same vehicle type. Combine identical entries so that the table is neat. Table 11.3 below shows one possible outcome of such a survey.

Table 11.3 — Types of vehicles and fuels used

Type of vehicleType of fuel used
CarPetrol / Diesel
Motorcycle / ScooterPetrol
Auto-rickshawCNG (sometimes LPG)
BusDiesel / CNG

Step 5 — What do we learn?

  • Most private vehicles (cars, scooters) still rely on petrol and diesel, which are fossil fuels.
  • Public transport in many cities is shifting to CNG, a cleaner fuel that produces fewer harmful gases.
  • Non-motorised vehicles like the bicycle need no fuel at all and are the most environment-friendly.

This completes Activity 11.5.

Answer

Type of vehicleType of fuel used
CarPetrol / Diesel
Motorcycle / ScooterPetrol
Auto-rickshawCNG (or LPG)
BusDiesel / CNG

21

Let us do our bit to conserve the fossil fuels by—

  • Walking or cycling to nearby places.
  • Using public transport.

Suggest some more ways.

Solution

Step 1 – Why do we need to save fossil fuels?
Fossil fuels such as coal, petroleum and natural gas were formed millions of years ago from the remains of plants and animals. They are non-renewable, which means that, once exhausted, they cannot be replaced in a human lifetime. Burning these fuels also produces greenhouse gases like $$\mathrm{CO_2}$$ that cause air pollution and global warming. Hence we must use them carefully.

Step 2 – Ways already suggested in the question

  • Walking or cycling to nearby places.
  • Using public transport (bus, metro, tram, etc.).

Step 3 – More practical ideas to conserve fossil fuels

  • Car-pooling: When several people who live and work nearby share one car instead of driving separately, the total fuel burnt is reduced nearly to $$\dfrac{1}{n}$$, where $$n$$ is the number of people sharing the ride.
  • Switch off the vehicle engine at long traffic signals. An idling engine may waste about $$0.1$$ L of petrol in 5 minutes.
  • Keep vehicles well maintained: Correct tyre pressure and regular servicing improve mileage (distance travelled per litre), so less fuel is required for the same trip.
  • Prefer CNG, LPG or biogas over diesel and petrol wherever possible. These gaseous fuels burn more cleanly and efficiently.
  • Use renewable energy at home: Install solar water heaters or photovoltaic panels. Every unit (1 kWh) of solar electricity saves roughly $$0.35$$ kg of coal.
  • Cook efficiently: Use pressure cookers, keep vessels covered and switch off the gas a little earlier to let food cook in retained heat.
  • Switch off electrical appliances when not in use. Electricity in many areas is still produced by burning coal, so wasting electricity also wastes fossil fuel.
  • Choose energy-efficient appliances: Buy devices with a 4-star or 5-star BEE label. An efficient refrigerator can save over $$100$$ kWh per year.
  • Reuse, reduce, recycle: Manufacturing new products (especially metals and plastics) consumes large amounts of fossil fuel energy. Recycling aluminium, for example, saves up to $$95\%$$ of the energy required to obtain it from ore.
  • Plant trees: Although planting does not directly save fuel, every tree absorbs $$\mathrm{CO_2}$$ released by vehicles and power plants, helping to balance the carbon cycle.

Step 4 – Conclusion
If we adopt even a few of these simple habits in our daily life, we can slow down the depletion of precious fossil fuels and make our environment cleaner and healthier.

Answer

Additional ways to conserve fossil fuels:

  • Car-pool or share rides.
  • Switch off the engine at long traffic signals.
  • Service vehicles regularly and keep tyres properly inflated.
  • Prefer CNG/LPG/biogas over petrol and diesel.
  • Install solar gadgets (water heater, lights, panels).
  • Use pressure cookers and keep vessels covered while cooking.
  • Switch off lights, fans and gadgets when not needed.
  • Buy energy-efficient (4- or 5-star) appliances.
  • Follow the 3 R’s—reduce, reuse, recycle.
  • Plant and protect trees to balance $$\mathrm{CO_2}$$.

22 Can you list some alternatives for reducing air pollution?

Solution

Step 1 – Recall what ‘air pollution’ means
When harmful or excessive amounts of gases such as $$\mathrm{CO_2}$$, $$\mathrm{SO_2}$$, smoke, dust or other substances get mixed with the clean air around us, we say that the air is polluted.

Step 2 – Think of where these pollutants come from
Common everyday sources are:

  • Exhaust from cars, buses, scooters and trucks.
  • Smoke from factories and power-plants.
  • Burning of coal, fire-wood and dung-cakes for cooking or heating.
  • Open burning of rubbish and dry leaves.

Step 3 – Plan how to reduce each source
Instead of trying to remove the dirty gases after they are formed, it is wiser to stop or reduce them at the source. Below is a list of practical alternatives a family, a school or a town can adopt.

S.No.Source of pollutionCleaner alternative
1Private petrol / diesel vehicles
  • Use public transport (bus, metro).
  • Share rides (car-pooling).
  • Use bicycles or walk for short distances.
  • Prefer vehicles that run on CNG or electricity.
2Cooking and heating with coal, wood or kerosene
  • Adopt LPG, biogas or solar cookers.
  • Use smokeless chulhas in villages.
3Electricity made in coal power-plants
  • Save electricity at home and school (switch off lights & fans when not required).
  • Install and use solar panels and other renewable energy sources.
4Factory smoke
  • Fit chimneys with special filters (electrostatic precipitators).
  • Shift to cleaner fuels like natural gas.
  • Locate big industries away from densely populated areas.
5Open burning of garbage or leaves
  • Practise proper waste segregation and recycling.
  • Convert kitchen waste into compost instead of burning it.
6Loss of trees (fewer leaves to absorb $$\mathrm{CO_2}$$)
  • Plant more trees (afforestation) and protect the existing ones.

Step 4 – Summarise the key alternatives
If we use cleaner fuels, travel wisely, save energy, manage waste properly and grow more plants, the amount of harmful gases released into the atmosphere will reduce, keeping the air fresh for all living beings.

Answer

  • Travel by bus, metro, bicycle, walk or share a car instead of driving separate petrol / diesel vehicles.
  • Cook with LPG, biogas or solar cookers rather than burning coal or wood.
  • Save electricity and promote solar, wind or other renewable power.
  • Fit factory chimneys with filters and shift industries to cleaner fuels like CNG.
  • Avoid burning garbage; recycle or compost waste.
  • Plant and protect more trees (afforestation).

Activity 11.6

Activity 11.6: Let us make a list of natural resources used

Make a list of activities you do in your daily life and write down the natural resources used directly or indirectly for each activity. In Table 11.4, some items are already filled in. Using them as a guide, fill the remaining blank rows.

Table 11.4: Natural resources used

ActivityNatural resource
Washing clothesWater
Making clay toys
Collecting firewood
Making kites
Having breakfast

How many natural resources did you list? Compare your list with that of your friend.

Solution

Step 1 – Understand the task
An activity of our daily life usually needs one or more things that we get directly or indirectly from nature. These things are called natural resources. Examples are air, water, soil, wood from trees, the metals obtained from rocks (ores), food obtained from plants and animals, etc.

Step 2 – Look at the partly-filled table
Table 11.4 already shows one activity – “Washing clothes” – and the natural resource “Water”. We must complete the remaining blank cells in a similar way.

Step 3 – Think of the main thing taken from nature for each activity

  • Making clay toys – the toys are shaped out of moist clay. Clay is a type of soil taken straight from the ground. So the chief natural resource is clay/soil.
  • Collecting firewood – we go to forests or gardens and collect pieces of wood from trees. Hence the resource is wood (trees).
  • Making kites – the main material is paper. Paper itself comes from the pulp of trees. Very often we also use thin bamboo sticks (a plant) and cotton thread (from cotton plants). The most basic resource common to every kite is paper (wood from trees), so we write that.
  • Having breakfast – breakfast consists of food items like roti, idli, bread, milk, fruits, eggs, etc. All of them finally originate from plants (cereals, pulses, fruits) or animals (milk, eggs, butter). Therefore we write the broad resource food from plants and animals.
  • The last blank line is meant for any other activity of your own choice. One common daily activity is “Going to school on a bicycle”. A bicycle frame is made from iron or steel, and the tyres are made from rubber which comes from the latex of rubber trees. The simplest single resource that covers the bicycle frame is iron (metal ore). We shall list that.

Step 4 – Fill the complete table

ActivityNatural resource
Washing clothesWater
Making clay toysClay / Soil
Collecting firewoodWood (trees)
Making kitesPaper (wood from trees)
Having breakfastFood obtained from plants and animals
Going to school on a bicycleIron (metal ore) and rubber (latex from trees)

Step 5 – Count the natural resources listed
We have written at least six different natural resources in the table: water, clay/soil, wood, paper (i.e. wood again, but it is a separate entry in the activity), food (plants and animals), and iron + rubber. Therefore we can say we listed about six natural resources.

Step 6 – Compare with your friend
Ask your friend to fill the same table. Some answers may be the same (water, wood) while others may differ (your friend may write “wind” for flying kites, or choose a different daily activity). Discuss why each answer is also a natural resource and correct each other wherever necessary. This will help you recognise still more things that come from nature.

Answer

Completed Table 11.4

ActivityNatural resource
Washing clothesWater
Making clay toysClay / Soil
Collecting firewoodWood (trees)
Making kitesPaper (wood from trees)
Having breakfastFood from plants & animals
Going to school on a bicycleIron (metal ore) & rubber

You listed about six natural resources; compare your entries with your friend’s list and discuss any differences.

Let us enhance our learning

1

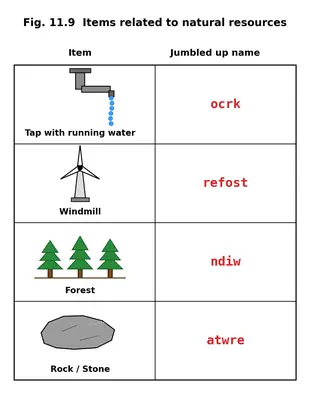
Fig. 11.9 shows items related to natural resources. Match them with their jumbled up names. Make another table and write the names of these resources. Classify these resources as renewable or non-renewable.

ItemJumbled up name
Tap with running water (image)ocrk
Windmill (image)refost
Forest (image)ndiw
Rock/stone (image)atwre
Fig. 11.9
Fig. 11.9

Solution

Step 1  — Unscramble each jumbled word

Jumbled-up wordRe-arranged lettersCorrect word
ocrkc r o krock
refostf o r e s tforest
ndiww i n dwind
atwrew a t e rwater

Step 2  — Match the pictures with their correct names

Picture shown in Fig. 11.9Correct natural resource
Tap with running waterWater
WindmillWind
Forest (trees)Forest
Rock / stoneRock

Step 3  — Recall what “renewable” and “non-renewable” mean

  • Renewable resource – one that can be replaced naturally in a short time, e.g. in months, years or a few decades.
  • Non-renewable resource – one that forms so slowly that it cannot be replaced once the present stock is exhausted (millions of years).

Step 4  — Classify the four resources

Natural resourceTypeReason
WaterRenewableIt is part of the water cycle and keeps circulating.
WindRenewableIt is continuously produced by uneven heating of Earth.
Forest (trees)Renewable*Trees regrow if we allow time and replant them.
Rock (minerals)Non-renewableThey take millions of years to form again.

*A forest is renewable only when used carefully and replanted; reckless cutting would destroy it.

Answer

ItemResourceRenewable / Non-renewable
Tap with running waterWaterRenewable
WindmillWindRenewable
Forest (trees)ForestRenewable*
Rock / stoneRockNon-renewable

*Renewable only if trees are replanted.

2 State whether the following statements are True [T] or False [F]. If False, correct them.

(i) Nature has all the resources to meet human needs. [ ]

Solution

Step 1 – Recall the definition
Resources that occur in nature without human intervention are called natural resources. The chapter tells us that these natural resources give us everything we need for living – food, water, air, minerals, sunlight, soil, etc.

Step 2 – Check the statement
The sentence says, “Nature has all the resources to meet human needs.” This matches the textbook idea that nature already contains all basic necessities for life.

Conclusion
The statement is therefore correct.

Answer

T

(ii) Machines are a resource found in nature. [ ]

Solution

Step 1 – Understand the term “resource found in nature”
A resource “found in nature” is something that exists on Earth without being made by humans—for example, water, petroleum, iron ore, forests and sunlight.

Step 2 – Check what a machine is
Machines such as cars, sewing machines or computers are manufactured by humans from metals, plastics, etc. Hence they are man-made (or human-made) resources, not natural resources.

Conclusion and correction
The given statement is false.
Correct statement: “Machines are man-made resources; they are not found in nature.”

Answer

F  –  Machines are man-made resources, not natural ones.

(iii) Natural gas is a non-renewable resource. [ ]

Solution

Step 1 – Recall the definition
A non-renewable resource is one that takes millions of years to form and, once used up, cannot be replenished within a human lifetime. Examples: coal, petroleum, natural gas.

Step 2 – Identify natural gas
Natural gas is a fossil fuel formed from the remains of plants and animals buried under the Earth for millions of years.

Step 3 – Apply the definition
Because natural gas requires such a long formation time, it cannot be replaced quickly, so it is non-renewable.

Conclusion
The statement is correct.

Answer

T

(iv) Air is a renewable resource. [ ]

Solution

Step 1 – Recall what a renewable resource is
A renewable resource can be naturally replaced or recycled in a short period of time compared with human life spans.

Step 2 – Consider air
Air is a mixture of gases that is continuously recycled by natural processes such as photosynthesis (plants absorb $$\mathrm{CO_2}$$ and release $$\mathrm{O_2}$$) and respiration (animals do the opposite). Thus the total supply of air is constantly replenished.

Conclusion
Air therefore qualifies as a renewable resource, so the statement is true.

Answer

T

3 Fill in the blanks using the most appropriate option—

(i)

A fuel that is commonly used in two wheelers like scooters or bikes is………

  • (a) Kerosene
  • (b) Petrol
  • (c) Diesel
  • (d) LPG

Solution

Two-wheelers such as scooters and motor-bikes have a small internal-combustion engine. The fuel must be
• a liquid (so that it can be stored easily in the tank),
• volatile (so that it mixes readily with air to burn inside the cylinder), and
• capable of rapid ignition.

Among the given choices:

  • (a) Kerosene – used mainly in wick stoves and some jet engines; it is less volatile.
  • (b) Petrol – a highly volatile liquid that vaporises quickly and is therefore the usual fuel for spark-ignition engines found in two-wheelers.
  • (c) Diesel – used in heavier compression-ignition engines (trucks, buses, some cars).
  • (d) LPG – supplied in cylinders for cooking or in some specially modified vehicles, not the ordinary scooter/bike.

Hence the correct option is petrol.

Answer

(b) Petrol

(ii)

An example of a renewable resource is ……………….

  • (a) Coal
  • (b) Water
  • (c) Natural gas
  • (d) Petrol

Solution

A renewable resource is one that can be replaced naturally in a short period of time compared with its rate of consumption.

  • (a) Coal – forms over millions of years; once mined it is gone ⇒ non-renewable.
  • (b) Water – continuously cycled by the hydrological (water) cycle through evaporation, condensation and rainfall, so the supply is naturally replenished ⇒ renewable.
  • (c) Natural gas – a fossil fuel; limited and non-renewable.
  • (d) Petrol – refined from crude oil; also a fossil fuel ⇒ non-renewable.

Therefore, among the four, water is the example of a renewable resource.

Answer

(b) Water

4 Classify the following as renewable or non-renewable resources—coal, natural gas, forests and minerals.

Solution

Step 1 · Understand the key idea

Natural resources are grouped according to the speed at which Nature can replace (replenish) them after we use them.

  • Renewable resources: Replaced by natural processes within a human lifetime or within a few decades. If we use them sensibly, supplies are not exhausted.
  • Non-renewable resources: Form extremely slowly (often millions of years). Once the present stock is used up, we cannot get more in any practical time.

Step 2 · Examine each item given in the question

  1. Coal: A fossil fuel formed from the remains of plants buried and compressed over millions of years. It cannot be replaced on a human time-scale → non-renewable.
  2. Natural gas: Another fossil fuel (mainly methane) produced from buried organic matter over geological time → non-renewable.
  3. Forests: Trees grow again from seeds or new shoots in a few years to decades. With proper management (re-planting, controlled cutting) we can keep getting timber → renewable.
  4. Minerals: Metallic and non-metallic ores form deep inside Earth over very long periods. Once mined and used, they are practically irreplaceable → non-renewable.

Step 3 · Make the final classification

ResourceType
CoalNon-renewable
Natural gasNon-renewable
ForestsRenewable
MineralsNon-renewable

Answer

Coal, natural gas and minerals  →  non-renewable;   forests  →  renewable.

5 Why do we say that petroleum is a non-renewable resource?

Solution

Step 1 – Recall the meaning of a natural resource

Anything that human beings obtain from the Earth and use directly is called a natural resource.

Step 2 – Classify natural resources

Scientists divide natural resources into two broad groups:

  • Renewable resources – they are replaced naturally in a comparatively short time, so the supply can be built up again while people are still using them (examples: sunlight, wind, wood from trees that can grow again).
  • Non-renewable resources – once the present stock is taken out of the Earth and used, Nature needs millions of years to create fresh stock, so for human time-scales they cannot be replaced.

Step 3 – How petroleum forms

(a) Millions of years ago, tiny marine plants and animals died and settled at the bottom of seas.

(b) They were buried under layers of sand and clay. Because of high pressure and high temperature inside the Earth and absence of air, those remains slowly changed into a dark, oily liquid called petroleum.

(c) The whole process took a very long geological period: roughly $$10^7$$ to $$10^8$$ years (ten to a hundred million years).

Step 4 – Compare formation time with usage time

Today, humans pump out and burn enormous quantities of petroleum for fuel, plastics, fertilisers, etc. This consumption happens within decades, i.e. $$10^1$$–$$10^2$$ years.

Key comparison:

\[ \text{Time needed by Nature to form petroleum} \approx 10^7\text{–}10^8\ \text{years} \]

\[ \text{Time taken by humans to use it up} \approx 10^1\text{–}10^2\ \text{years} \]

The difference is about six to seven orders of magnitude! Nature cannot keep up with the rate at which we take petroleum out.

Step 5 – Conclude why it is called non-renewable

Because the natural formation of fresh petroleum is so slow (millions of years) while our consumption is so fast (tens of years), the stock that we extract cannot be replaced within a human lifetime. Therefore petroleum is classified as a non-renewable resource.

Short statement we can remember: "Petroleum is non-renewable because it takes millions of years to form but only a few years to exhaust."

Answer

Petroleum is called a non-renewable resource because Nature needs millions of years to create it from dead organisms, while humans extract and use it within only a few decades, so the amount we remove cannot be replaced in any reasonable human time-scale.

6 It is difficult to regrow forests. Justify this statement.

Solution

To judge whether regrowing a forest is easy or difficult, we must look at all the things that make up a mature forest and how long each of them takes to come back once the trees have been cut down.

  1. Trees need many years to reach full size.
    Most forest trees do not become fully grown in one or two seasons like crops. A teak or sal tree, for example, often needs 40 – 60 years before its trunk becomes thick and strong. Even fast-growing species such as eucalyptus usually take about 15 years to turn into sizeable trees. Thus, once large trees are felled, a long period is required before new ones can replace them.
  2. Soil quality falls after felling.
    Roots that held the topsoil get removed along with the trees, so rain and wind easily wash the fertile layer away. If fertile topsoil is lost, young saplings cannot obtain enough nutrients and many fail to survive. Re-creating fertile soil again may take several decades because leaves have to fall, decompose and mix with the ground repeatedly.
  3. Forest animals, birds and insects go elsewhere.
    Each creature in a forest depends on others. If shelter-giving trees vanish, birds lose nests, herbivores lose food and predators lose prey. After migration, it is difficult for the same balanced web of life to return because every species must find sufficient food and hiding places at the same time.
  4. Micro-organisms and fungi need suitable, stable conditions.
    Invisible helpers, such as soil bacteria and fungi, recycle dead matter into nutrients. They thrive only when there is constant shade and moisture, which a cleared land cannot supply. Hence nutrient cycling remains poor until a dense canopy forms again.
  5. Climate around the area changes.
    Forests keep the local air cool and moist. Once they are gone, the place becomes hotter and drier during the day and colder at night. Such extreme conditions slow down seed germination and damage tender shoots, delaying regrowth.
  6. Human disturbance continues.
    Even if saplings are planted, they often suffer grazing by cattle, trampling by tourists, or additional fuel-wood removal. Protecting young growth over tens of years demands constant care and resources.

Because all of these factors—long growth periods, soil loss, disappearance of animals and microbes, climatic changes and ongoing human pressure—must be corrected simultaneously and each takes many years, scientists, foresters and environmentalists agree that merely planting a few trees cannot quickly re-establish a complete forest. Therefore we say that it is difficult to regrow forests once they have been destroyed.

Answer

Regrowing a forest is hard because trees need decades to mature, fertile soil is lost, animals and microbes that make the ecosystem balanced move away, the local climate becomes harsher, and young plants require long-term protection from grazing and human use. Hence, replacing a destroyed forest takes many years and careful effort.

7 Make a list of five daily activities in which you use natural resources. Suggest ways by which you can reduce their use.

Solution

Step 1 – Identify what the question is asking
The question wants us to: (i) pick five ordinary activities we do every day, (ii) state the natural resource each activity depends on, and (iii) suggest at least one practical way to reduce our consumption of that resource.

Step 2 – Recall examples of natural resources
Natural resources include water, air, sunlight, soil, minerals, petroleum, natural gas, coal, wood, etc. All these occur in nature and are useful to us without much processing.

Step 3 – Choose five daily activities
We pick activities that a Class 6 student commonly does every day:

  • Brushing teeth and taking a bath
  • Switching on lights, fans, television or a mobile charger
  • Travelling to school by school-bus, car or motor-bike
  • Writing homework in notebooks or reading printed books
  • Eating food that has been cooked on an LPG stove

Step 4 – Link each activity to the resource it uses

Daily activityMain natural resource consumed
Brushing / bathingWater
Using electrical appliancesCoal / natural gas (for most grid electricity)
Travelling by petrol or diesel vehiclePetroleum (fossil fuel)
Using paper notebooks / booksWood from trees
Cooking on an LPG stoveLPG = Liquefied Petroleum Gas

Step 5 – Suggest concrete ways to reduce consumption

ActivitySimple steps to save the resource
Brushing / bathingClose the tap while brushing; take a bucket bath instead of a shower. If a tap runs $$6\;\mathrm{L/min}$$ and you save 2 min, water saved = $$6\times 2 = 12\;\mathrm{L}$$ every day.
Using electricitySwitch off lights, fans and chargers when not in use; replace filament bulbs by LED lamps (they use about $$\dfrac{1}{5}$$ the electricity); use solar lamps where possible.
TravellingWalk or cycle for short distances; use a shared school-bus instead of individual cars—if 40 students share one bus, fuel used per student is roughly $$\dfrac{1}{40}$$ of that for one student in a car.
Paper for studyWrite on both sides of each sheet; avoid unnecessary print-outs; recycle old notebooks into rough paper. A typical notebook sheet has a mass of about $$5\;\mathrm{g}$$, so re-using one 100-page notebook saves roughly $$100\times 5\;\mathrm{g}=500\;\mathrm{g}\approx 0.5\;\mathrm{kg}$$ of paper (wood pulp).
CookingUse a pressure-cooker; keep vessels covered; switch off the burner just before food is fully done (residual heat finishes cooking); try a solar cooker for daytime meals.

Step 6 – Conclude
By following the small steps listed above, each of us can cut down our daily use of precious natural resources and help conserve Nature’s treasures for the future.

Answer

Five daily activities that use natural resources and ways to save them:

  1. Brushing / bathing – water: close the tap while brushing, take a bucket bath.
  2. Switching on lights / fans – electricity (coal, gas): switch off when not needed, use LED or solar lamps.
  3. Travelling by car / bus – petrol or diesel: walk, cycle, car-pool, or use public transport.
  4. Writing or reading books – paper (trees): write on both sides, avoid extra print-outs, recycle paper (a 100-page notebook is only about $$0.5\;\mathrm{kg}$$ of paper, but every notebook saved counts).
  5. Cooking on an LPG stove – liquefied petroleum gas: use a pressure-cooker, cover pans, try a solar cooker.

8 List four activities that are possible due to the presence of air.

Solution

Step 1 — Recall what air contains
Air is a mixture of many gases such as $$ ext{O}_2$$ (oxygen), $$ ext{N}_2$$ (nitrogen) and $$ ext{CO}_2$$ (carbon dioxide). Because of these gases and the fact that air has mass and occupies space, several day-to-day activities become possible.

Step 2 — Identify activities that need oxygen

  • Breathing / Respiration: Humans and animals take in the oxygen present in air to release energy from food.
  • Burning / Combustion: Substances such as wood, coal or LPG burn only when oxygen from air is available.

Step 3 — Identify activities that need the bulk of air (its push and lift)

  • Flying of birds, aeroplanes and kites: The wings push against air; the upthrust (lift) of air keeps them aloft.
  • Rotation of windmills / movement of sail-boats: Moving air (wind) exerts force on the blades of a windmill or the sails of a boat, making them turn or move forward.

Step 4 — Write any four of these as the final list
The four activities caused or supported by the presence of air are then stated as the answer.

Answer

  • Breathing (respiration) in humans and animals
  • Burning of fuels (combustion)
  • Flying of birds, aeroplanes or kites
  • Running of windmills / movement of sail-boats due to wind

9 How can you contribute towards enhancing the green cover of your locality? Make a list of actions to be taken.

Solution

Step 1 – Know what “green cover” means
Green cover is the total area in our surroundings that is occupied by plants, shrubs and trees. It works like Earth’s natural air-conditioner by giving out oxygen, taking in carbon dioxide and lowering the temperature.

Step 2 – Look around and note the present situation

  • Walk through your street, school campus and the nearby park.
  • Count the number of big trees, medium shrubs and potted plants. For example, if you find 12 big trees, 7 shrubs and 15 potted plants, write these numbers in your notebook.
  • Estimate empty spots. If a corner plot measures $$8\,\text{m}\times5\,\text{m}$$, its area is $$8\times5=40\,\text{m}^2$$, which can easily hold four medium-sized trees or a mini garden.

Step 3 – Decide how much space you can improve

  • Your own balcony/window sill → pots and vertical planters.
  • School playground boundary → flowering shrubs for a living fence.
  • Vacant community land → larger shade trees with permission from the local civic body.

Step 4 – Choose the right plants

  • Prefer native species (neem, peepal, jamun, gulmohar) because they adapt well and support local birds and insects.
  • Mix fast-growing species (subabul) with slow but long-lived ones (banyan).
  • Add herbs like tulsi and lemongrass in small pots for fragrance and health benefits.

Step 5 – Arrange for saplings, seeds and tools

  • Collect seeds from ripe fruits or buy young saplings from a government nursery.
  • Borrow spades, a watering can and protective gloves. Reuse old paint buckets as planters after making drainage holes.

Step 6 – Prepare the ground or the pot

  • Dig a pit about $$0.5\,\text{m}$$ deep for a sapling.
  • Mix the dug-out soil with one-third compost or rotted manure for better nutrients.
  • For pots, place pebbles at the bottom, then a layer of sand, then the enriched soil so that extra water can drain away.

Step 7 – Planting day

  • Gently remove the sapling from its plastic bag without hurting the roots.
  • Keep it upright in the centre of the pit, fill soil around it, and press lightly so that no air pockets remain.
  • Water immediately until the soil looks uniformly moist.

Step 8 – After-care (the most important part)

  • Water young plants daily in summer and every alternate day in other seasons.
  • Add mulch (dry leaves/straw) around the stem to keep the soil cool and reduce water loss.
  • Fix three bamboo sticks and tie a jute rope as a guard so that cattle cannot damage the sapling.
  • Check monthly for pests; remove infected leaves and spray neem oil if needed.

Step 9 – Make your own manure

  • Collect vegetable peels and fruit scraps from the kitchen.
  • Layer them with dry leaves in a bucket, sprinkle a little soil, keep moist; in about 45 days you get dark, crumbly compost — free fertiliser!

Step 10 – Involve others and spread awareness

  • Form an “Eco Club” with friends; decide to plant at least one tree each on birthdays.
  • Request the school to organise an annual “Van Mahotsav” drive.
  • Design colourful posters that say “Plant Trees, Breathe Easy” and put them up on the community notice-board.
  • Invite neighbours to a weekend sapling-distribution camp.

Step 11 – Keep records and celebrate success

  • Maintain a chart showing plant name, date planted, height every month.
  • Celebrate when a sapling completes one year by tying a green ribbon and clicking photos.

Summary – Action checklist

  1. Survey and list empty spaces.
  2. Choose native plant varieties suitable for each spot.
  3. Arrange seeds/saplings, soil and compost.
  4. Plant carefully and water regularly.
  5. Protect with guards, mulch and homemade pesticides.
  6. Use kitchen waste to prepare compost, reducing garbage at source.
  7. Involve schoolmates, neighbours and local authorities to widen the effort.
  8. Record growth data and celebrate milestones to stay motivated.

If every family in the locality adds even two healthy trees and looks after them, the neighbourhood’s green cover, beauty and air quality will improve noticeably within a couple of years.

Answer

  • Plant native tree saplings in vacant plots, school grounds and home gardens.
  • Keep them alive by daily watering, mulching and protecting with simple bamboo guards.
  • Grow small herbs and climbers in pots, balconies or terrace planters.
  • Prepare compost from kitchen vegetable peels to use as manure instead of chemical fertilisers.
  • Organise community and school tree-plantation drives on festivals and birthdays.
  • Put up posters and talk to neighbours so that more people join the effort.
  • Record the growth of each sapling to ensure long-term care.

10 In the given illustration, we see that food is being cooked. Answer the following questions—

(i) What type of energy is being used for cooking?

Solution

Step 1 – Observe the illustration
The picture shows a box-like device kept in sunlight and used for cooking. Such a device is called a solar cooker.

Step 2 – Identify the form of energy
The cooker works by trapping the Sun’s rays and converting the Sun’s light and heat into useful heat for cooking.

Step 3 – State the type of energy
Therefore, the energy being used is $$\text{solar energy}$$ (the heat and light that come from the Sun).

Answer

Solar energy is being used for cooking.

(ii) Name one benefit and one drawback of using this type of energy for cooking.

Solution

Because a solar cooker uses sunlight, its advantages and disadvantages are linked to the nature of solar energy.

  • Benefit (advantage) – Solar energy is renewable and clean; it produces no smoke or harmful gases while cooking.
  • Drawback (limitation) – A solar cooker works only when there is strong sunlight, so it cannot be used at night, on very cloudy days, or during rain, and even on sunny days the cooking process is slower than with conventional fuels.

Answer

Benefit: It is clean and renewable (no smoke or pollution).
Drawback: It can be used only when strong sunlight is available, so cooking becomes impossible or very slow at night or on cloudy days.

11 Cutting down trees on a large scale impacts the quality of the soil. Why do you think it is so?

Solution

Step 1 – What keeps soil in place?
Trees have a thick net of roots that spread both sideways and downwards. These roots hold the tiny soil particles tightly together, almost like the stitching on a piece of cloth. As long as roots remain in the ground, loose particles cannot be easily blown away by wind or washed away by rainwater.

Step 2 – How do trees make soil richer?
(a) Every year dried leaves, twigs and small branches fall to the ground. Micro-organisms break this dead plant matter into a dark, spongy substance called humus.
(b) Humus contains many mineral nutrients (for example, compounds of nitrogen and phosphorus) that plants need for healthy growth.
(c) Humus also improves the soil’s texture; it increases the soil’s capacity to hold air and water.

Step 3 – What happens to rainwater in a forest?
When rain falls on a forest, the leafy canopy and the thick layer of humus act as a cushion. Water trickles slowly into the ground, so hardly any topsoil is carried away. The moist, spongy layer also prevents sudden flooding.

Step 4 – Effects of cutting trees on a large scale (deforestation)

  • The roots die and can no longer anchor soil particles. Loose soil is exposed directly to wind and running water → soil erosion.
  • The continual supply of leaf litter stops, so new humus is not formed. Without humus the soil gradually loses essential nutrients and becomes less fertile.
  • Rain now hits bare ground with force, so the fertile top layer is washed away first. The remaining soil is often sandy, stony and poor in minerals.
  • Water runs off quickly instead of soaking in. This leads to both floods (too much surface run-off) and droughts later (groundwater not recharged).

Step 5 – Conclusion
Trees protect soil physically (by holding it together) and chemically (by adding humus and nutrients). Large-scale felling removes both protections, so the soil rapidly becomes eroded, nutrient-poor and unable to support healthy plant life. Therefore cutting down trees seriously lowers the quality of the soil.

Answer

Because trees anchor and enrich the topsoil, their large-scale removal stops the formation of humus and leaves the ground loose. Wind and rain then carry away the nutrient-rich upper layer, so the soil soon becomes eroded, infertile and poor in water-holding capacity.

12 Explain two ways in which human activities pollute the air. Propose one action which can help in reducing air pollution.

Solution

Step 1 – What is meant by air pollution?
Air becomes polluted when unwanted substances (smoke, harmful gases or very small dust-like particles) mix with it and lower its quality for breathing.

Step 2 – Human activity 1: Burning fuels in vehicles and factories

  • Cars, buses, trucks, motor-bikes and many factory boilers run on petrol, diesel or coal.
  • During burning the fuel’s carbon and sulphur combine with oxygen, giving off gases such as $$\mathrm{CO_2}$$ (carbon dioxide), $$\mathrm{CO}$$ (carbon monoxide), $$\mathrm{SO_2}$$ (sulphur-dioxide) and nitrogen oxides written as $$\mathrm{NO_x}$$.
  • These gases and the black smoke that we see coming out of exhaust pipes spread in the air and make it impure.

Step 3 – Human activity 2: Burning of rubbish, crop stubble or fire-wood

  • House-hold garbage, dry leaves and crop remains are often set on fire in the open.
  • Incomplete burning creates thick smoke containing tiny soot particles called particulate matter, along with $$\mathrm{CO}$$ and irritating gases.
  • Because the particles are very light they remain suspended in the air for a long time and enter our lungs when we breathe.

Step 4 – One practical action to reduce air pollution
We can use public transport, cycle or walk instead of taking separate motor-cars. When fewer vehicles run on the road, much less petrol or diesel is burnt, so the release of $$\mathrm{CO_2}$$, $$\mathrm{SO_2}$$ and smoke falls sharply, helping the air stay clean.

Thus, burning of fossil fuels and open burning of waste are two major human ways of polluting air, and switching to common or non-motorised transport is a simple step to lower that pollution.

Answer

Air is polluted by human beings mainly in two ways:
(i) Exhaust from vehicles and factory chimneys after burning petrol, diesel or coal adds $$\mathrm{CO_2}$$, $$\mathrm{CO}$$, $$\mathrm{SO_2}$$ and smoke to the atmosphere.
(ii) Open burning of garbage, crop stubble or fire-wood releases thick smoke and particulate matter.
Using public transport (or cycling / walking) so that fewer fuel-burning vehicles are used is one effective action to reduce air-pollution.

13 A family uses solar panels to generate electricity, a gas stove to cook food and a windmill for pumping water from a well. What would happen if there were no sunlight for a week?

Solution

Step 1 — Recall why each device works

  • Solar panel  → converts sunlight directly to electricity with photovoltaic cells.
  • Gas stove  → burns a fuel (LPG/biogas). It does not need the Sun at the moment of use.
  • Wind-mill  → the blades turn because air moves from a warm place to a cool place. The warmth that makes these air movements finally comes from the Sun.

Step 2 — Imagine one full week without sunlight

  • The sky is dark both day and night.
  • The ground and the air keep losing heat every hour because no fresh solar energy is arriving.

Step 3 — Effect on the three devices

  1. Solar panels
     • No incoming light ⇒ no electric current is produced.
     • The family will have to depend on stored battery power (if any) or some other source.
  2. Gas stove
     • The LPG cylinder or the biogas plant already contains chemical energy.
     • Hence the stove lights and cooks food exactly as usual; sunlight is not required at that moment.
  3. Wind-mill
     • Winds blow because the Sun heats the Earth’s surface unequally.
     • Without sunlight the temperature differences become smaller each day, so wind speed keeps dropping.
     • Before the week ends the wind may be too weak to turn the rotor, therefore water pumping will either slow down greatly or stop.

Step 4 — Extra consequences noticed by the family

  • Rooms and surroundings become much colder.
  • Plants look dull because photosynthesis almost stops; after a few days leaves may start yellowing.
  • Nights are darker because even moon-light is weak compared with sunlight.

Final conclusion

If there is no sunlight for a week, the family’s solar panels will give no electricity and the wind-mill will hardly pump any water. Only the gas stove will continue to work normally.

Answer

No Sun for a week ⇒ solar panels produce no electricity and the windmill almost stops, so water pumping fails; the gas stove still cooks because it burns stored fuel.

14

Fill up the blanks using the following terms—

(fossil fuels, forest, air, petroleum, coal, water and non-renewable resource)

The flow chart shows: Natural Resources branches into two — one unnamed branch (the non-renewable side) and Renewable Resources. The non-renewable side has a sub-branch with three boxes (one labelled Natural gas, two blank). The Renewable Resources side has three blank boxes. Fill in the blank boxes using the terms given.

Solution

Step 1  – Read the flow chart carefully
It begins with the box Natural Resources which then divides into two branches: one branch is already named “Renewable Resources”, the other branch is blank.

Step 2  – Recall the two main kinds of natural resources
Natural resources are usually grouped as

  • Renewable resources – they can be replaced by nature in a short time.
  • Non-renewable resources – they exist in limited amounts and take millions of years to form again.
Therefore, the blank branch that is opposite to “Renewable Resources” must be filled with the term non-renewable resource.

Step 3  – Read the next (indented) blank box on the non-renewable side
This box connects further to three smaller boxes, one of which already reads “Natural gas”. Natural gas belongs to the family of fossil fuels. Hence, we write fossil fuels in this box.

Step 4  – Complete the three fossil-fuel boxes
Among the terms still unused, two more fossil fuels are petroleum and coal. Fill them in the remaining two small boxes that sit beside “Natural gas”.

Step 5  – Fill the three blank boxes under “Renewable Resources”
Resources that nature can replace quickly from the given list are

  • air
  • water
  • forest (trees and other plants grow again if managed wisely)
Place these three terms into the three empty boxes on the renewable side.

Step 6  – Final completed flow chart (description)
Natural Resources

  • Non-renewable resource
    • Fossil fuels
      • Natural gas
      • Petroleum
      • Coal
  • Renewable Resources
    • Air
    • Water
    • Forest

Answer

Non-renewable branch : non-renewable resource
Sub-branch : fossil fuels
Three fossil fuels : Natural gas, petroleumcoal
Renewable resources : airwaterforest

15 There is an increasing demand of trees to meet the requirements of industries and for housing. Therefore, trees are being felled. Is it justified? Discuss and prepare a brief report.

Solution

Step 1 — Why are so many trees being cut?

  • Industries: Timber, paper, match-sticks, sports goods, plywood and packing boxes all come from wood.
  • Housing: Beams, doors, windows, flooring and furniture need good quality wood.
  • Fuel: In many villages wood is still the chief cooking fuel.

Step 2 — Are these uses important?
Yes. We need notebooks, desks, cupboards and safe houses. So using trees is not wrong in itself. The real issue is the rate and method of cutting.

Step 3 — What happens when we cut too many trees?

  • Soil erosion: Roots that once held the soil are gone. Rain washes the top-soil away and makes land barren.
  • Floods and droughts: Fewer trees mean less rainwater is trapped. Water runs off quickly — causing sudden floods first and drought later.
  • Increase of carbon dioxide: Trees absorb $$\mathrm{CO_2}$$ and release $$\mathrm{O_2}$$. Cutting them raises the level of $$\mathrm{CO_2}$$ which in turn warms the Earth (global warming).
  • Loss of biodiversity: Birds, insects and animals lose their homes; many species become rare or extinct.
  • Climate change: With fewer trees the local temperature rises and rainfall pattern changes.

Step 4 — Is large-scale felling justified?

No, because the harm caused (soil damage, climate change, health issues) is far larger than the short-term benefit (quick supply of timber). Hence, indiscriminate cutting is not justified. What is justified is planned, regulated and compensated cutting.

Step 5 — A brief report for the school Eco-Club

1. Introduction
Population and industrial growth have sharply raised the demand for wood. Trees are being felled at an alarming pace to make paper, furniture, houses and fuel.

2. Present position
Reports of the Forest Survey of India and global agencies show that several million hectares of forest cover are lost world-wide every year.

3. Merits of cutting trees

  • Supplies timber, paper and fuel.
  • Provides jobs in saw-mills, paper mills and furniture industries.
  • Earns revenue for the government.
  • Makes land available for housing and roads.

4. Demerits of over-cutting

  • Soil erosion and loss of fertile top-soil.
  • Floods during rains and droughts later.
  • Rise in atmospheric $$\mathrm{CO_2}$$ leading to global warming.
  • Loss of wildlife and biodiversity.
  • Change in local climate and rainfall.

5. Conclusion
The current rate of felling is unsustainable. We must balance use with renewal.

6. Recommendations

  • Adopt the rule: “Plant two saplings for every tree cut.”
  • Use alternatives wherever possible — recycled paper, bamboo, jute, metal or plastic.
  • Practise selective logging; never clear-fell a forest.
  • Create community wood-lots and school nurseries.
  • Enforce strict laws against illegal felling.

Step 6 — Final opinion

Thus, cutting some trees for genuine needs is acceptable only when we:

  1. Replace what we take (afforestation),
  2. Waste nothing (efficient use and recycling), and
  3. Protect the remaining forests (wildlife sanctuaries, community vigilance).

If these conditions are not met, large-scale felling is definitely unjustified.

Answer

Indiscriminate felling of trees to satisfy industrial and housing demands is not justified. We should cut trees only in a planned way, re-plant more than we remove, use alternatives like recycled paper and bamboo, recycle wood products and protect the remaining forests.

16 Propose a plan to use less water in your school. What steps would you take to make this plan happen and how would it help the environment?

Solution

Question: Propose a plan to use less water in your school. What steps would you take to make this plan happen and how would it help the environment?

Solution:

  1. Find out where water is used at present
    • Drinking water taps – $$12$$ taps
    • Hand-wash basins – $$8$$ basins
    • Toilets – $$20$$ flush tanks
    • Gardening – one hosepipe used for $$30 ext{ min/day}$$
  2. Measure today’s consumption

    A stopwatch and a jug showed one tap gives $$6 ext{ L}$$ in $$1 ext{ min}$$.

    During recess all $$12$$ drinking taps remain open for $$5 ext{ min}$$, so daily wastage is

    \[ 12 \times 6\,\text{L/min} \times 5\,\text{min}=360\,\text{L}. \quad(1)\]

    The gardener’s hose discharges $$15\,\text{L/min}$$. In $$30 \text{ min}$$ it uses

    \[ 15 \times 30 = 450\,\text{L}. \quad(2)\]

    Only these two points already add up to $$360 + 450 = 810\,\text{L}$$ every day.

  3. Plan to reduce this water use
    1. Push-type / sensor taps shut after $$8\text{ s}$$. One press therefore uses $$6\,\text{L/min}\times\dfrac{8}{60}=0.8\,\text{L}$$ instead of $$30 \text{ L}$$ in $$5 \text{ min}$$.
    2. Large posters: “Close the tap while soaping”.
    3. Put bricks or filled bottles in each flush tank, so each flush releases $$6 \text{ L}$$ instead of $$10 \text{ L}$$. Saving per flush = $$4 \text{ L}$$.
    4. Collect waste water from the drinking-water R.O. unit (≈$$25\,\text{L/day}$$) for floor cleaning.
    5. Replace the hose with drip irrigation. Drip gives $$4\,\text{L/min}$$, so gardening needs $$4\times30=120 \text{ L}$$; saving $$=450-120=330 \text{ L}$$.
  4. Steps to make the plan happen
    1. Prepare a short presentation with the numbers above and meet the Principal.
    2. Announce a “Save Water Week” at the morning assembly; class monitors demonstrate push taps.
    3. Ask the school plumber to install push taps and drip pipes during the next maintenance break.
    4. Create a two-student Water Patrol per class to check for leaking taps after lunch.
    5. Record the main-meter reading every afternoon on a notice-board bar graph; green if it drops, red if it rises.
  5. Environmental benefits
    • Saves at least $$360\,\text{L}+330\,\text{L}=690\,\text{L}$$ each day, i.e. \[ 690\times200\approx1.4\times10^{5}\,\text{L} \] per 200-day academic year.
    • Pumping $$1000\,\text{L}$$ of water uses about $$0.5\,\text{kWh}$$ of electricity, so electricity saved yearly is $$0.5\times\dfrac{1.4\times10^{5}}{1000}\approx70\,\text{kWh}$$.
    • Less electricity means lower $$\mathrm{CO_2}$$ emissions.
    • Drip irrigation prevents soil erosion near flower beds.
    • Students develop lifelong water-saving habits.

Conclusion: By measuring use, upgrading fixtures, recycling grey water and involving everyone, the school can cut its water demand by over $$60\%$$ and simultaneously save energy, lower pollution and protect soil.

Answer

Install push-type taps, use drip irrigation instead of a hose, reduce flush-tank volume with bricks, reuse R.O. waste water, and start a student Water Patrol with daily meter checks. These actions save about $$690\,\text{L}$$ of fresh water each day, lower electricity use for pumping, cut $$\mathrm{CO_2}$$ emissions and prevent soil erosion – a clear benefit to the environment.

Learning further

1 Rainwater harvesting is an age-old practice in India. Find out some of the traditional rainwater harvesting techniques being used in your state or in other parts of the country.

Solution

Step 1 – Read the question carefully
The exercise asks us to name some traditional rain-water harvesting techniques still used in our state or somewhere else in India. We therefore have to (i) recall or look up the names of such techniques and (ii) mention the place where each one is practised.

Step 2 – Recall methods used in our own state (example state: Maharashtra)

  • Bandhara / Katta – A low temporary wall of earth or stones is built across a seasonal stream. The trapped water raises the water-table and can be used for irrigation and drinking after seepage into wells.
  • Phad system (Kolhapur & Sangli districts) – A network of diversion weirs and canals carries flood-water from the rivers Panchaganga and Tapi on to fertile fields. The villagers manage the water jointly.
  • Malguzari tanks (Vidarbha) – Large village ponds excavated during the Maratha period to store monsoon water for rice cultivation.

Step 3 – Note famous techniques from other parts of India

Name of the structureMain state/regionShort description
JohadAlwar, RajasthanShallow earthen check-dam with crescent-shaped bunds to store rainwater and recharge wells.
KhadinJaisalmer, RajasthanLong earthen embankment built below sloping rocky land; water spreads over agricultural fields and infiltrates.
Tanka / KundThar Desert (Rajasthan & Gujarat)Circular underground cemented tank attached to roof or courtyard; collects clean rainwater for drinking.
Baoli / Step-wellGujarat, Rajasthan, DelhiDeep masonry well with steps leading down to the water; catches runoff and keeps it cool.
Kulh / KuhlsHimachal PradeshGravity channels cut along mountain slopes to bring melted snow or rainwater to terraced fields.
ZaboPhek district, NagalandSmall embankments divide hill-slopes; upper plots catch the silt and water, lower plots grow paddy.
Bamboo drip systemKhasi & Jaintia Hills, MeghalayaWater from hill springs is guided through hollow bamboos directly to betel and pepper plants – zero evaporation loss.
Ahar – PyneBihar & JharkhandAhars (bunded basins) receive flood-water via long channels called Pynes; water seeps slowly for rabi crops.
SurangamKasargod, Kerala & Dakshin Kannada, KarnatakaHorizontal tunnel dug in laterite hills; seeps groundwater which is led to open ponds.
Eri / OoraniTamil NaduLarge interconnected tanks store monsoon water; the surplus flows to the next tank in the chain.

Step 4 – Present the answer in clear points
Below is a neat bullet list that the teacher can check quickly.

  • In my state (Maharashtra): Bandhara or Katta, Phad irrigation system, and Malguzari tanks.
  • Other regions: Johad, Khadin, Tanka/Kund, Baoli (step-well), Kulhs, Zabo, Bamboo drip, Ahar-Pyne, Surangam, and Eri/Oorani.

Step 5 – Add a concluding sentence
All these techniques follow one simple rule—catch the rain where it falls—and have kept villages supplied with water for hundreds of years.

Answer

Examples of India’s traditional rain-water harvesting techniques include:

  • Bandhara / Katta, Phad system and Malguzari tanks (Maharashtra)
  • Johad and Khadin (Rajasthan)
  • Tanka or Kund, and Baoli / Step-well (Rajasthan & Gujarat)
  • Kulh mountain channels (Himachal Pradesh)
  • Zabo terraces and Bamboo-drip irrigation (Nagaland & Meghalaya)
  • Ahar–Pyne flood-water channels (Bihar)
  • Surangam underground tunnels (Kerala & Karnataka)
  • Eri and Oorani tank chains (Tamil Nadu)

Each method stores monsoon rain locally so that people and crops have water during the long dry months.

2 Investigate the effect of air pollution on human health by interacting with your elders or community members and identify the main sources of air pollution in your local area. Based on your findings, suggest two practical steps that your school or community could take to help reduce air pollution.

Solution

Step 1 – Planning the investigation

  1. With two classmates I listed the points we wanted to know:
    • Common health problems related to bad air.
    • Times of the day or year when the air feels the worst.
    • What smoke or dust sources people notice around them.
  2. We prepared five short questions, for example: “Do you often have cough or burning eyes when traffic is heavy?”
  3. We decided to speak to at least $$5$$ elders (parents, grandparents, shopkeepers, bus-stop commuters).

Step 2 – Collecting information

PersonHealth problems they linked to bad airMain local source they pointed out
Aunt (52 yr)Frequent dry cough, watery eyesMorning traffic outside colony gate
Neighbour (67 yr)Breathlessness while walkingGarbage burning behind market
School-bus driver (41 yr)Headache after long dutyDiesel exhaust from buses & auto-rickshaws
Fruit seller (34 yr)Sneezing, throat irritationDust from nearby construction site
Grandfather (73 yr)Asthma attack in winterSmoke from household wood stoves in village fringe

Step 3 – Analysing the findings

  • All five persons reported at least one respiratory or eye problem. The most repeated complaint was cough/irritation (4 out of 5).
  • The top three pollution sources mentioned were:
    1. Vehicle exhaust (4 mentions)
    2. Open burning of waste (2 mentions)
    3. Construction dust (1 mention, but produces visible haze)

Vehicle exhaust contains harmful gases such as $$\mathrm{CO}$$, $$\mathrm{SO_2}$$ and oxides of nitrogen $$\mathrm{NO_2}$$. These gases combine with tiny dust (particulate matter, PM2.5) and irritate the lungs. Burning rubbish also releases poisonous $$\mathrm{CO}$$ and fine ash.

Step 4 – Conclusion about health effects

  • Air pollution mainly affects the respiratory system. Continuous exposure reduces the amount of clean oxygen the lungs can absorb, so older people get tired quickly.
  • Irritants like $$\mathrm{SO_2}$$ and smoke inflame the eyes and throat, causing coughing, wheezing and watering eyes.
  • In winter the cold air keeps the smoke trapped near ground, increasing asthma attacks (observed by Grandfather).

Step 5 – Two practical steps our school or community can take

  1. Create a “Green Belt” around the school:
    • Each class plants and cares for at least two native, broad-leaf trees every year.
    • Leaves act as natural filters, trapping dust and absorbing $$\mathrm{CO_2}$$. When fully grown, one tree can take in about $$20\,\text{kg}$$ of $$\mathrm{CO_2}$$ per year and release oxygen, improving the micro-climate.
  2. Introduce a “No-Idling & Car-pool” rule:
    • All vehicles that drop children must switch off engines while waiting; this directly cuts fuel wastage and tail-pipe emissions.
    • A simple survey showed that if four families pool a car, traffic outside the gate could fall from $$40$$ to $$10$$ cars per morning, reducing exhaust by about $$75\%$$.

If these two measures are followed regularly, they will tackle both major pollution sources we identified—traffic smoke and excess $$\mathrm{CO_2}$$—and make the air cleaner for everyone.

Answer

Main sources found: vehicle exhaust, open waste burning and construction dust; these cause cough, eye irritation and asthma in elders.

Two steps to reduce pollution:

  1. Plant and nurture a green belt of native trees around the school/community.
  2. Enforce a “No-Idling & Car-pool” system for all vehicles that bring children or visitors.

3 Prepare a list of the names and uses of important minerals and rocks that are used in your village/town/city for various purposes.

Solution

Approach shown step by step (exactly how you could do it in your own locality)

  1. Walk-around survey
    Note the materials seen in houses, school buildings, roads, electric poles, kitchen counters, floor tiles, etc.
  2. Talk to users and shop-keepers
    Ask masons, construction-material dealers, potters, and household elders the local names of the stones, bricks or powders they buy.
  3. Find the scientific name and chief chemical present
    Use your textbook, a dictionary or internet to match the local name with the correct mineral / rock and write its principal chemical formula inside $$\mathrm{...}$$.
  4. Arrange the information neatly
    A two–column or three–column table makes the list clear and easy to remember.

Sample list for a typical Indian town (you may tick ✔ only those that really occur in your place and add new ones)

S.No.Name of mineral / rockMain chemical presentCommon local uses
1.Granite (igneous rock)Mostly $$\mathrm{SiO_2}$$ with feldspar & micaKitchen counter-tops, building blocks, floor slabs, memorial stones
2.Marble (metamorphic rock)Crystalline $$\mathrm{CaCO_3}$$Temple flooring, wall cladding, statues, table tops
3.Sandstone (sedimentary rock)Grains of $$\mathrm{SiO_2}$$ cemented togetherBoundary walls, decorative arches, paving blocks
4.Limestone$$\mathrm{CaCO_3}$$Main raw material for cement; also used to neutralise acid soils
5.Gypsum$$\mathrm{CaSO_4\cdot2H_2O}$$Added to cement to control setting; plaster of Paris for wall & ceiling finishing
6.Basalt (Deccan trap)Rich in $$\mathrm{Fe,Mg}$$ silicatesRoad metal, railway ballast, coarse aggregate in concrete
7.LateriteHydrated $$\mathrm{Al,Fe}$$ oxidesLocally cut into bricks for low-cost houses; garden soil conditioner
8.Clay / ShaleAluminium silicate mineralsBricks, roofing tiles, earthen pots, toys
9.Quartz sandPure $$\mathrm{SiO_2}$$Glass manufacture, water-filter beds, playground sand
10.Mica sheetsComplex $$\mathrm{KAl_2(AlSi_3O_{10})(OH)_2}$$Electrical insulators in irons, toasters, LED lamps
11.Iron ore (Hematite)$$\mathrm{Fe_2O_3}$$Sent to nearby steel plant; steel rods and gates come back to the town
12.Bauxite$$\mathrm{Al_2O_3}\,(hydrated)$$Source of aluminium used for window frames, pressure-cookers, foil

How to use or extend this table

  • If your village has a stone-crusher yard, add what rock it breaks.
  • If the local potter uses a special white clay, note its local name and chemical nature (often kaolin).
  • You may colour-code the list: construction, decorative, industrial, etc.

Key idea learnt: Everyday things like floors, chalk, bricks, even electric iron plates are all possible only because of particular minerals and rocks taken out of Earth — nature’s real treasures.

Answer

A typical finished list looks like this:

  • Granite – strong building & kitchen counters
  • Marble – floors, statues
  • Sandstone – walls, paving
  • Limestone – cement raw material
  • Gypsum – plaster of Paris, sets cement
  • Basalt – road metal, concrete aggregate
  • Laterite – low-cost bricks, soil conditioner
  • Clay/Shale – bricks, pots
  • Quartz sand – glass, filters
  • Mica – electrical insulation
  • Iron ore – steel for gates, rods
  • Bauxite – source of aluminium utensils & frames

Add or strike out examples to match the actual minerals and rocks used in your own village, town or city.

4 You are an eco-club monitor. Organise a tree plantation drive in your school with the help of your teacher. List the steps required for organising this activity. Prepare a one-page report listing the names of the trees planted along with their importance.

Solution

Complete Worked Solution – Organising a Tree-Plantation Drive

Role: Eco-club monitor, Class 6
Teacher-in-charge: Mrs Rao (Science Department)

A. Preparatory Steps (to be finished one week before the drive)

  1. Form a core team (Day –7)
    • Eco-club monitor + 6 volunteers (one from each section).
  2. Obtain permission (Day –6)
    • Meet Principal with teacher; submit written request explaining purpose and tentative date $$\text{(15\ July\ 20XX)}$$.
  3. Select plantation sites (Day –5)
    • School garden corners, along boundary wall, around playground.
  4. Choose suitable tree species (Day –5)
    • Short-list drought-resistant, shade-giving, native plants (see report in Part C).
  5. Arrange saplings, manure and tools (Day –4)
    • Place order with local nursery for 20 saplings.
    • Borrow spades, trowels, buckets, watering cans from the lab/store.
    • Arrange 4 sacks of compost; request school gardener for help.
  6. Create publicity material (Day –3)
    • Design colourful posters and a notice for the morning assembly.
  7. Prepare duty chart (Day –2)
    • Allot work: digging, planting, watering, photography, refreshment.
  8. Dig pits in advance (Day –1)
    • Each pit: $$45\,\text{cm}\times45\,\text{cm}\times45\,\text{cm}$$ (length × width × depth).

B. Execution on Plantation Day (15 July 20XX)

  1. Morning assembly announcement; distribute badges to volunteers.
  2. Principal inaugurates by planting the first sapling (Neem).
  3. Teams plant remaining saplings, add manure and water thoroughly.
  4. Mulching with dry leaves; tie name tags on stakes.
  5. Refreshments; eco-pledge recited.

C. Maintenance Plan

  • Water every alternate day in the first month, then twice a week.
  • Weed removal on the first Saturday of each month.
  • Monitor growth; record height in science notebook once a term.

D. One-Page Report for School Magazine

GREEN FUTURE – TREE PLANTATION DRIVE (15 July 20XX)

S. No.Common NameBotanical NameNo. PlantedImportance
1NeemAzadirachta indica4Medicinal; natural pesticide; provides dense shade.
2PeepalFicus religiosa3High $$\mathrm{O_2}$$ output even at night; houses birds.
3Amaltas (Golden Shower)Cassia fistula3Beautiful yellow flowers attract pollinators.
4GulmoharDelonix regia3Ornamental; excellent for avenue shade.
5JamunSyzygium cumini3Edible fruits rich in iron; supports wildlife.
6KachnarBauhinia variegata2Purple-pink flowers; controls soil erosion.
7Drumstick (Moringa)Moringa oleifera2Nutritious pods/leaves; fast-growing.

Total saplings planted: 20

The event saw enthusiastic participation from 80 students and 10 teachers. The Principal applauded the eco-club for taking a concrete step towards combating global warming. Photographs will be displayed on the science noticeboard, and survival rate will be reviewed after six months.

Report prepared by: Ananya Singh (Eco-club Monitor, Class 6-C)

Answer

Steps for organising the drive and the complete one-page report (including tree names and their importance) have been provided above.

NCERT Solutions for Class 6
Maths
NCERT Solutions for Class 6 Maths
Chapter-wise step-by-step
solutions with explanations
explore solutions Maths bg
Science
NCERT Solutions for Class 6 Science
Chapter-wise step-by-step
solutions with explanations
explore solutions Science bg

Frequently Asked Questions

50,000+ JEE Students Trusted Our Score Calculator

Predict your JEE Main percentile, rank & performance in seconds