NCERT Solutions for Class 7 Maths

Chapter 6: Constructions and Tilings

Download Solutions PDF
Daily JEE Updates, Tips & Important Alerts
Join 30,000+ students and stay updated with JEE notifications and preparation insights.
Join Now!
Free PDF
Complete NCERT Solution PDF for Chapter 6: Constructions and Tilings

NCERT Solutions For Class 7 Maths Part 2 Chapter 6 Constructions and Tilings introduces students to geometric construction and the arrangement of shapes to create repeating patterns. The page provides comprehensive NCERT Solutions that explain the mathematical reasoning behind constructions and tiling-based activities. NCERT Solutions For Class 7 Maths help learners understand how geometric figures can be created, combined, and arranged while following specific conditions. The chapter encourages precision, visualisation, and careful observation of shapes and patterns. Detailed solutions make construction-based questions easier to understand and reproduce. Students can download the chapter PDF for convenient revision and practice. These solutions are particularly useful when preparing diagrams and solving geometry-based exercises.
Download Solutions PDF

Intext Questions (Eyes and Perpendicular Bisector)

1 How do we find such A and B?

Solution

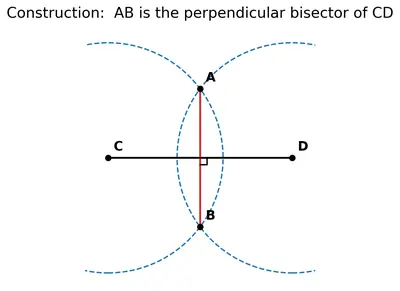
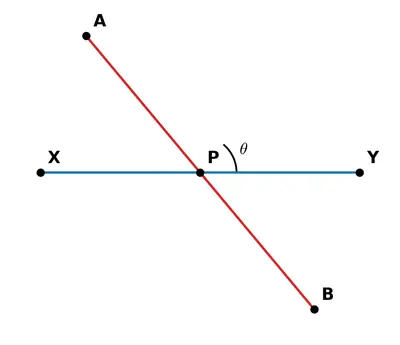
We are looking at Fig. 6.1, in which two arcs (looking like two eyes) are drawn on either side of a line segment $$XY$$. The points $$A$$ (above) and $$B$$ (below) are the points where the two arcs cross each other.

Construction:

1. Take a compass and open it to a length that is a bit more than half of $$XY$$ (any radius bigger than $$\tfrac{1}{2}XY$$ works, as long as it is the same for all four arcs).

2. Place the pointed end of the compass on $$X$$ and draw one arc above the line $$XY$$ and another arc below the line $$XY$$.

3. Without changing the radius, place the pointed end on $$Y$$ and draw two more arcs β€” one above $$XY$$ and one below $$XY$$.

4. The two upper arcs meet at a point β€” call it $$A$$. The two lower arcs meet at a point β€” call it $$B$$.

So $$A$$ and $$B$$ are the two points of intersection of the arcs. Both $$A$$ and $$B$$ are at the same distance from $$X$$ as they are from $$Y$$, because the same radius was used from $$X$$ and from $$Y$$.

Answer

$$A$$ and $$B$$ are found by drawing arcs of equal radius (greater than half of $$XY$$) from both $$X$$ and $$Y$$; the arcs meet above the line at $$A$$ and below the line at $$B$$.

2

In Fig. 6.1, join A and B with a line. Where does AB intersect XY, and what is the angle formed between them?
Fig. 6.1
Fig. 6.1

Solution

Draw the line segment $$AB$$ joining the two crossing points of the arcs. Let it meet $$XY$$ at a point $$O$$.

If we measure with a ruler we find $$XO = OY$$, that is, $$O$$ is exactly the midpoint of $$XY$$. If we measure with a protractor we find that the angle at $$O$$ is $$90^{\circ}$$, that is, $$AB$$ is perpendicular to $$XY$$.

So $$AB$$ cuts $$XY$$ at its midpoint and makes a right angle with it β€” $$AB$$ is the perpendicular bisector of $$XY$$.

Answer

$$AB$$ meets $$XY$$ at its midpoint $$O$$, and the angle between $$AB$$ and $$XY$$ is $$90^{\circ}$$.

3 Will the line joining the two points at which the arcs meet, above and below XY, always be the perpendicular bisector of XY, i.e., when XY is of any length, and the arcs are drawn using a radius of any length?

Solution

Yes. Try the construction with different lengths of $$XY$$ and with different radii of the arcs (only condition: the radius must be more than $$\tfrac{1}{2}XY$$, otherwise the arcs will not meet). In every case the joining line will cut $$XY$$ at its midpoint and at $$90^{\circ}$$.

Why it works: Because we use the same radius from $$X$$ and from $$Y$$, both crossing points $$A$$ and $$B$$ are at equal distance from $$X$$ and $$Y$$:

\[XA = YA \quad\text{and}\quad XB = YB.\]

So both $$A$$ and $$B$$ are equidistant from $$X$$ and $$Y$$, and the set of all such points forms the perpendicular bisector of $$XY$$. Hence the line $$AB$$ is always the perpendicular bisector of $$XY$$, regardless of the length of $$XY$$ or the radius used (as long as the arcs intersect).

Answer

Yes β€” for any length of $$XY$$ and any radius greater than $$\tfrac{1}{2}XY$$, the line joining the two arc-intersection points is always the perpendicular bisector of $$XY$$.

4 Which two triangles should be congruent for AB to be the perpendicular bisector of XY (that is, O is the midpoint of XY and AB is perpendicular to XY)?

Solution

Let $$O$$ be the point where $$AB$$ meets $$XY$$. Join $$XA$$, $$YA$$, $$XB$$ and $$YB$$. We look at the two triangles on either side of $$AB$$ (or, alternatively, on either side of $$XY$$).

Choice 1 β€” triangles $$\triangle XAB$$ and $$\triangle YAB$$. If these are congruent, then

$$\angle XAO = \angle YAO$$ and $$XA = YA$$, so $$\triangle XAO \cong \triangle YAO$$ by SAS, giving $$XO = YO$$ ($$O$$ is the midpoint) and $$\angle XOA = \angle YOA = 90^{\circ}$$ ($$AB \perp XY$$).

Choice 2 β€” triangles $$\triangle XOA$$ and $$\triangle YOA$$. If these are congruent (with the correspondence $$X \leftrightarrow Y,\; O \leftrightarrow O,\; A \leftrightarrow A$$), then directly $$XO = YO$$ and $$\angle XOA = \angle YOA$$; but these two angles form a linear pair on the line $$XY$$, so each equals $$90^{\circ}$$.

Either way, congruence of the two triangles on the two sides of $$AB$$ forces $$O$$ to be the midpoint of $$XY$$ and $$AB$$ to be perpendicular to $$XY$$.

Answer

The two triangles $$\triangle XAB$$ and $$\triangle YAB$$ (equivalently, the halves $$\triangle XOA$$ and $$\triangle YOA$$) should be congruent.

5 How do we get these different shapes? Try!

Solution

The shapes referred to are the different β€œeye”-like lens shapes obtained by choosing different radii for the arcs while keeping the same base segment $$XY$$.

The recipe is exactly the one used for the perpendicular bisector, but now we deliberately vary the compass opening:

  1. Draw the segment $$XY$$ (any convenient length).
  2. Choose a radius $$r$$ (must satisfy $$r > \tfrac{1}{2}XY$$ so that the two arcs meet).
  3. With centre $$X$$ and radius $$r$$, draw an arc that crosses over the line $$XY$$.
  4. With centre $$Y$$ and the same radius $$r$$, draw a second arc.
  5. The region caught between the two arcs is the β€œeye” (vesica) shape.

Now repeat with a slightly bigger or smaller radius. When $$r$$ is only just larger than $$\tfrac{1}{2}XY$$, the eye is thin and narrow. When $$r$$ is much larger than $$\tfrac{1}{2}XY$$, the eye becomes fat and rounded. So different radii, all with the same base $$XY$$, produce a family of eye shapes of different thicknesses.

We can also change the base $$XY$$ to get eyes of different heights, or overlap several eyes together to make petal designs.

Answer

By using the same construction (two equal arcs from $$X$$ and $$Y$$) but varying the radius (and/or the length of $$XY$$), we get eye/lens shapes of different thicknesses and sizes.

6 Will C and D lie on the perpendicular bisector AB?

Solution

Yes. $$C$$ and $$D$$ are constructed as the intersection points of a fresh pair of arcs drawn with the same radius $$r$$ from the two ends $$X$$ and $$Y$$. So, by construction,

\[XC = YC \quad\text{and}\quad XD = YD.\]

That is, both $$C$$ and $$D$$ are equidistant from $$X$$ and $$Y$$. From our earlier work (Q. 3–4), every point that is equidistant from $$X$$ and $$Y$$ lies on the perpendicular bisector of $$XY$$. Hence $$C$$ and $$D$$ must also lie on the same perpendicular bisector, which is the line $$AB$$.

So all four points $$A$$, $$B$$, $$C$$, $$D$$ β€” obtained from any pair of equal-radius arcs from $$X$$ and $$Y$$ β€” are collinear, all lying on the perpendicular bisector of $$XY$$.

Answer

Yes, $$C$$ and $$D$$ also lie on the perpendicular bisector $$AB$$, because they are equidistant from $$X$$ and $$Y$$.

7 Justify the following statement using the facts that we have established.
Any point that has the same distance from X and Y lies on the perpendicular bisector of XY.

Solution

Let $$P$$ be any point that is at equal distance from $$X$$ and $$Y$$, i.e. $$PX = PY$$. We shall show that $$P$$ lies on the perpendicular bisector of $$XY$$.

Let $$M$$ be the midpoint of $$XY$$, and join $$PM$$. Consider the two triangles $$\triangle PXM$$ and $$\triangle PYM$$.

  • $$PX = PY$$ (given).
  • $$XM = YM$$ (since $$M$$ is the midpoint of $$XY$$).
  • $$PM = PM$$ (common side).

By the SSS congruence rule, $$\triangle PXM \cong \triangle PYM$$. Hence the corresponding angles are equal:

\[\angle PMX = \angle PMY.\]

But $$\angle PMX + \angle PMY = 180^{\circ}$$ because they form a linear pair on line $$XY$$. Therefore each of them equals $$\tfrac{180^{\circ}}{2} = 90^{\circ}$$.

So $$PM \perp XY$$ and $$M$$ is the midpoint of $$XY$$; that is, $$P$$ lies on the perpendicular bisector of $$XY$$. Since $$P$$ was arbitrary, the statement is proved.

Answer

Proved β€” using SSS congruence $$\triangle PXM \cong \triangle PYM$$ (where $$M$$ is the midpoint of $$XY$$), we get $$PM \perp XY$$, so $$P$$ lies on the perpendicular bisector.

8 Given a line segment XY, how do we draw its perpendicular bisector using only an unmarked ruler and a compass?

Solution

Steps of construction:

  1. Draw the segment $$XY$$ with the ruler.
  2. Open the compass to a radius $$r$$ that is more than half of $$XY$$ (any such $$r$$ works).
  3. With centre $$X$$ and radius $$r$$, draw an arc that goes above and below the line $$XY$$.
  4. Without changing the compass width, with centre $$Y$$ and the same radius $$r$$, draw a second arc that also goes above and below the line $$XY$$.
  5. The two arcs cross each other at two points; call them $$A$$ (above $$XY$$) and $$B$$ (below $$XY$$).
  6. With the ruler, draw the line through $$A$$ and $$B$$.

The line $$AB$$ is the required perpendicular bisector of $$XY$$.

Why it works: Because the same radius was used from $$X$$ and from $$Y$$, we have $$XA = YA$$ and $$XB = YB$$. So both $$A$$ and $$B$$ are equidistant from $$X$$ and $$Y$$, and hence (by Q. 7) both lie on the perpendicular bisector of $$XY$$. Two points determine a line, so the line $$AB$$ is exactly that perpendicular bisector.

Answer

Draw equal-radius arcs (with $$r > \tfrac{1}{2}XY$$) from both $$X$$ and $$Y$$ on both sides of $$XY$$. Let the arcs meet at $$A$$ and $$B$$. The line $$AB$$ is the perpendicular bisector of $$XY$$.

Figure it Out (Perpendicular Bisector)

1 When constructing the perpendicular bisector, is it necessary to have the same radius for the arcs above and below XY? Explore this through construction, and then justify your answer.
[Hint 1: Any point that is of the same distance from X and Y lies on the perpendicular bisector.
Hint 2: We can draw the whole line if any two of its points are known.]

Solution

Exploration: Draw a segment $$XY$$. Take a radius $$r_1$$ (with $$r_1 > \tfrac{1}{2}XY$$) and, using the same $$r_1$$ from $$X$$ and from $$Y$$, draw arcs above $$XY$$ that meet at a point $$A$$. Now change the compass to a different radius $$r_2$$ (again $$r_2 > \tfrac{1}{2}XY$$) and, using this same $$r_2$$ from both $$X$$ and $$Y$$, draw arcs below $$XY$$ that meet at a point $$B$$. On joining $$A$$ and $$B$$ with a ruler, we still find that $$AB$$ passes through the midpoint of $$XY$$ and is perpendicular to $$XY$$.

Justification: By construction $$XA = YA = r_1$$, so $$A$$ is equidistant from $$X$$ and $$Y$$. By Hint 1, $$A$$ lies on the perpendicular bisector of $$XY$$. Similarly $$XB = YB = r_2$$, so $$B$$ also lies on the perpendicular bisector of $$XY$$. By Hint 2, two points $$A$$ and $$B$$ on that perpendicular bisector determine it completely, so the line $$AB$$ is the perpendicular bisector, regardless of whether $$r_1 = r_2$$ or not.

Conclusion: No, it is not necessary to use the same radius for the arcs above and below $$XY$$. The two radii can be different (each just has to be more than $$\tfrac{1}{2}XY$$, and the same on the two sides of the same pair).

Answer

No β€” the radius used above $$XY$$ need not equal the radius used below. As long as each radius is $$> \tfrac{1}{2}XY$$ and is the same between the two centres $$X$$ and $$Y$$ within a pair, the joining line is still the perpendicular bisector.

2 Is it necessary to construct the pairs of arcs above and below XY? Instead, can we construct both the pairs of arcs on the same side of XY? Explore this through construction, and then justify your answer.

Solution

Exploration: Draw a segment $$XY$$. Choose a radius $$r_1 > \tfrac{1}{2}XY$$ and, with centres $$X$$ and $$Y$$, draw arcs above $$XY$$ that meet at a point $$A$$. Now choose a different radius $$r_2 > \tfrac{1}{2}XY$$ and again draw arcs from $$X$$ and $$Y$$ β€” but this time also above $$XY$$. Let these meet at a point $$A'$$. On joining $$A$$ and $$A'$$ we still get the perpendicular bisector of $$XY$$ (extended down through the midpoint).

Justification: By construction $$XA = YA = r_1$$ and $$XA' = YA' = r_2$$. So both $$A$$ and $$A'$$ are equidistant from $$X$$ and $$Y$$, and therefore both lie on the perpendicular bisector of $$XY$$. Since two points determine a line, the line $$AA'$$ is the perpendicular bisector of $$XY$$.

Conclusion: No, it is not necessary to place the two pairs of arcs on opposite sides of $$XY$$. Both pairs may be drawn on the same side, provided the two radii are different (so that the intersection points $$A$$ and $$A'$$ are actually different) β€” otherwise we would only get one point and could not determine the line. Putting one pair above and one pair below is only a convenience β€” it automatically gives two well-separated points.

Answer

No, it is not necessary. Both pairs of arcs may be drawn on the same side of $$XY$$ as long as the two pairs use different radii; the two intersection points still lie on the perpendicular bisector.

3 While constructing one pair of intersecting arcs, is it necessary that we use the same radii for both of them? Explore this through construction, and then justify your answer.

Solution

Exploration: Draw a segment $$XY$$. From centre $$X$$ draw an arc of radius $$r_1$$ (with $$r_1 > \tfrac{1}{2}XY$$) above $$XY$$. From centre $$Y$$ draw an arc of a different radius $$r_2 \neq r_1$$ (also so that the arcs cross). Let them meet at $$A$$. Repeat below $$XY$$ β€” from $$X$$ use radius $$r_1$$ and from $$Y$$ use radius $$r_2$$ β€” and let them meet at $$B$$. On joining $$AB$$ we get a line, but if we measure carefully we find that $$AB$$ is not perpendicular to $$XY$$, and $$O$$ β€” the point where $$AB$$ meets $$XY$$ β€” is not the midpoint of $$XY$$.

Justification: The equidistance argument breaks down. Since $$XA = r_1$$ but $$YA = r_2$$, the point $$A$$ is not equidistant from $$X$$ and $$Y$$ (assuming $$r_1 \neq r_2$$). So $$A$$ need not lie on the perpendicular bisector of $$XY$$; in fact it will not. The same holds for $$B$$. Hence the line $$AB$$ will not, in general, be the perpendicular bisector of $$XY$$.

Conclusion: Yes, within one pair of intersecting arcs (the arc from $$X$$ and the arc from $$Y$$ that meet at $$A$$), the two radii must be equal. Otherwise the intersection point is not equidistant from $$X$$ and $$Y$$ and does not lie on the perpendicular bisector.

Answer

Yes, within a single pair of intersecting arcs the two radii must be equal β€” otherwise the intersection point is not equidistant from $$X$$ and $$Y$$, and the resulting line is not the perpendicular bisector.

4

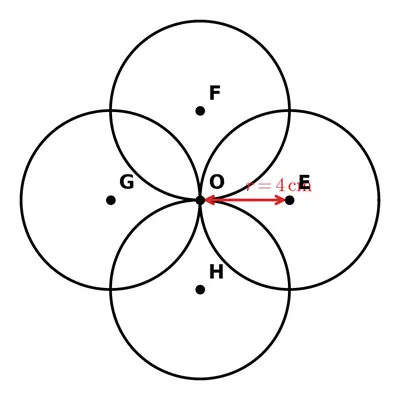
Recreate this design using only a ruler and compass β€” (a four-petal design shown in the figure).
Figure
Figure

Solution

The design consists of two perpendicular β€œeyes” (lens shapes) crossing at the centre to make four petals.

Steps of construction:

  1. Draw a horizontal line segment $$XY$$ of any convenient length (say $$6\,\mathrm{cm}$$).
  2. Construct its perpendicular bisector: with the compass opened to a radius $$r$$ (say $$r = 4\,\mathrm{cm}$$, i.e. more than $$\tfrac{1}{2}XY = 3\,\mathrm{cm}$$), draw arcs from $$X$$ above and below $$XY$$, and repeat from $$Y$$ with the same radius. Let the arcs meet at $$A$$ (above) and $$B$$ (below). While drawing these arcs, keep going a little past the crossing so that a full β€œeye” shape appears between $$X$$ and $$Y$$; that is petal-pair 1.
  3. Draw the line $$AB$$; it is the perpendicular bisector of $$XY$$. It meets $$XY$$ at the centre point $$O$$.
  4. On the line $$AB$$, mark points $$P$$ and $$Q$$ with $$OP = OQ = \tfrac{1}{2}XY = 3\,\mathrm{cm}$$. Then $$PQ$$ is a vertical segment of the same length as $$XY$$, centred at $$O$$.
  5. Repeat step 2 with $$P$$ and $$Q$$ in place of $$X$$ and $$Y$$, using the same radius $$r$$: with centres $$P$$ and $$Q$$, draw arcs on the left of $$PQ$$ and on the right of $$PQ$$. These arcs form a second β€œeye” between $$P$$ and $$Q$$, perpendicular to the first eye.

The two eyes cross at the centre $$O$$ and together produce the four-petal design.

Why it works: Each petal-pair (eye) is built by the standard perpendicular-bisector construction, which uses equal-radius arcs from the two ends of a segment. Making the two base segments $$XY$$ and $$PQ$$ perpendicular and of equal length, and using the same compass radius for both eyes, gives four petals of the same size arranged symmetrically about $$O$$.

Answer

Construct two perpendicular equal-length segments $$XY$$ and $$PQ$$ crossing at their midpoints $$O$$, and draw an β€œeye” (two equal-radius arcs from the two ends) about each of them using the same radius. The two overlapping eyes give the four-petal design.

Intext Questions (90 Degree Angle at a Point)

9 Can we extend the method of constructing the perpendicular bisector to construct a $$90^{\circ}$$ angle at any point on a line? Draw a line and mark a point O on it. Construct a $$90^{\circ}$$ angle at point O.

Solution

Yes. The trick is to first turn $$O$$ into the midpoint of a small segment of the line, and then draw the perpendicular bisector of that segment; it will automatically pass through $$O$$ at $$90^{\circ}$$.

Steps of construction:

  1. Draw a line $$\ell$$ and mark the point $$O$$ on it.
  2. Open the compass to any convenient radius $$s$$. With centre $$O$$ and radius $$s$$, draw an arc that cuts $$\ell$$ at two points; call them $$X$$ (to the left of $$O$$) and $$Y$$ (to the right of $$O$$). By construction, $$OX = OY = s$$, so $$O$$ is the midpoint of the segment $$XY$$.
  3. Now construct the perpendicular bisector of $$XY$$: open the compass to a bigger radius $$r > s$$. With centre $$X$$ and radius $$r$$, draw an arc above $$\ell$$; with centre $$Y$$ and the same radius, draw another arc above $$\ell$$. Let them meet at $$A$$.
  4. Draw the line $$OA$$ with a ruler.

The line $$OA$$ is the required perpendicular; hence $$\angle AO Y = 90^{\circ}$$ (and also $$\angle AOX = 90^{\circ}$$).

Why it works: Because $$OX = OY$$, $$O$$ is the midpoint of $$XY$$. The point $$A$$ is constructed to be equidistant from $$X$$ and $$Y$$ ($$XA = YA = r$$), so it lies on the perpendicular bisector of $$XY$$. The perpendicular bisector passes through the midpoint of $$XY$$ (which is $$O$$) at right angles β€” and that is exactly the line $$OA$$. So $$OA \perp \ell$$ at $$O$$, giving a $$90^{\circ}$$ angle at $$O$$.

Answer

Yes. First mark two points $$X, Y$$ on the line, equidistant from $$O$$ (using one arc from $$O$$). Then construct the perpendicular bisector of $$XY$$; it passes through $$O$$ at $$90^{\circ}$$.

10 Find a segment of this line for which O is the midpoint.

Solution

The trick used in Q. 9 is exactly this: we make $$O$$ the midpoint of a segment by cutting off equal lengths on both sides of $$O$$ using the compass.

How to find such a segment:

  1. Open the compass to any convenient radius $$s$$.
  2. Place the pointed end at $$O$$ and draw an arc on the line to the left; it meets the line at a point $$X$$. So $$OX = s$$.
  3. Without changing the radius, draw an arc on the line to the right of $$O$$; it meets the line at $$Y$$. So $$OY = s$$.

Now $$OX = OY = s$$, i.e. $$O$$ divides $$XY$$ into two equal pieces. Hence $$O$$ is the midpoint of the segment $$XY$$.

Since the choice of radius $$s$$ was arbitrary, there are infinitely many such segments β€” one for each radius $$s > 0$$.

Answer

With centre $$O$$ and any radius $$s$$, draw an arc cutting the line on both sides of $$O$$ at points $$X$$ and $$Y$$. Then $$OX = OY = s$$, so $$XY$$ is a segment of the line for which $$O$$ is the midpoint.

Figure it Out (Rope Construction of Perpendicular Bisector)

1

Justify why AB in Fig. 6.4 is the perpendicular bisector.
Fig. 6.4
Fig. 6.4

Solution

In the rope construction of Fig. 6.4, two people hold the ends of a rope at the two given points $$X$$ and $$Y$$. A third person keeps the rope stretched taut, first pulling it upwards to mark a point $$A$$ and then pulling it downwards to mark a point $$B$$.

Because the rope has a fixed total length and is pulled straight while its ends stay at $$X$$ and $$Y$$, the two halves of the rope always have the same length. So the distance from the pulling point to $$X$$ equals the distance from that same pulling point to $$Y$$. That is,

$$XA = YA$$ and $$XB = YB$$.

So both $$A$$ and $$B$$ are equidistant from $$X$$ and $$Y$$. As we proved earlier (see the intext solution on perpendicular bisector), any point equidistant from $$X$$ and $$Y$$ lies on the perpendicular bisector of $$XY$$. Hence both $$A$$ and $$B$$ lie on the perpendicular bisector of $$XY$$, and therefore the line joining them β€” the whole line $$AB$$ β€” is that perpendicular bisector.

Answer

The rope forces $$XA = YA$$ and $$XB = YB$$, so $$A$$ and $$B$$ are each equidistant from $$X$$ and $$Y$$. Every point equidistant from $$X$$ and $$Y$$ lies on the perpendicular bisector of $$XY$$, so the line $$AB$$ is that perpendicular bisector.

2 Can you think of different methods to construct a $$90^{\circ}$$ angle at a given point on a line using a rope?

Solution

Yes, several rope-based methods work. Let $$\ell$$ be the given line and $$O$$ the given point on $$\ell$$.

Method 1 (Same idea as Q. 9 β€” perpendicular bisector).

  1. Take a rope of some convenient length $$2s$$. Fold it in half to find its middle; put that middle point at $$O$$. Stretch the rope along the line $$\ell$$ on both sides of $$O$$. Mark the two ends of the rope on the line as $$X$$ (left of $$O$$) and $$Y$$ (right of $$O$$). Now $$OX = OY = s$$.
  2. Take a longer rope and hold its two ends at $$X$$ and $$Y$$. Pull it taut upwards to a point $$A$$ (as in the previous rope construction).
  3. The line from $$O$$ to $$A$$ is perpendicular to $$\ell$$ at $$O$$, so $$\angle AOY = 90^{\circ}$$.

Method 2 (The 3–4–5 rope trick used by ancient builders).

  1. Take a rope and put $$12$$ equally-spaced knots on it, dividing it into $$12$$ equal parts. Join the ends to form a closed loop.
  2. Pin the loop at three of the knots so that the three sides of the triangle formed have lengths $$3$$, $$4$$ and $$5$$ (measured in knot-spacings).
  3. Since $$3^2 + 4^2 = 9 + 16 = 25 = 5^2$$, by the converse of the Pythagoras theorem the angle opposite the side of length $$5$$ is a right angle. Place one leg of length $$3$$ (or $$4$$) along the line $$\ell$$ with the right-angle vertex at $$O$$; the other leg is then perpendicular to $$\ell$$ at $$O$$.

Method 3 (Compass-of-rope trick). A taut rope, one end pinned at $$O$$, acts like a compass. Use it exactly as in Q. 9: with the rope pinned at $$O$$, mark two points $$X$$, $$Y$$ on the line, equidistant from $$O$$. Then, with the rope pinned successively at $$X$$ and at $$Y$$ (at a longer radius), mark a point $$A$$ off the line that is equidistant from $$X$$ and $$Y$$. The line $$OA$$ is perpendicular to $$\ell$$ at $$O$$.

Answer

Yes. Two easy rope methods: (i) mark $$X, Y$$ equidistant from $$O$$ on the line using a folded rope, then construct the perpendicular bisector of $$XY$$ with a second rope, giving a $$90^{\circ}$$ at $$O$$; (ii) use a knotted rope loop with sides $$3\text{--}4\text{--}5$$ (Pythagorean triple) to form a right-angled triangle at $$O$$.

Intext Questions (Angle Bisection)

11

How do we construct this figure? (the 8-petalled figure shown in Fig. 6.5)
Fig. 6.5
Fig. 6.5

Solution

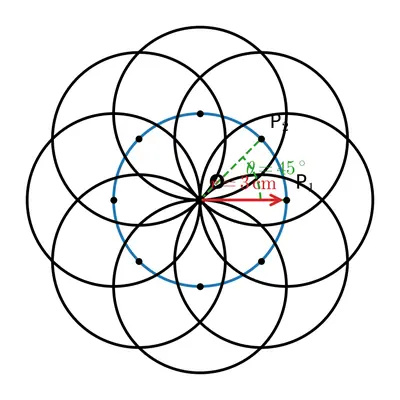
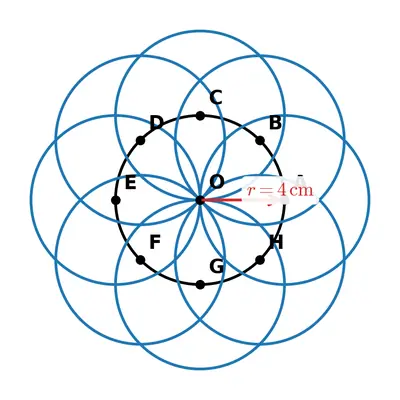
The 8-petalled figure is made of $$4$$ eye-shapes (lens shapes) drawn on $$4$$ lines through a common centre $$O$$, with the $$4$$ lines equally spaced (so consecutive lines make an angle of $$\tfrac{180^{\circ}}{4} = 45^{\circ}$$).

Steps of construction:

  1. Mark a centre point $$O$$.
  2. Draw a straight line through $$O$$ β€” this is line 1.
  3. Construct the perpendicular to line 1 at $$O$$ using the method of Q. 9 β€” this is line 2, perpendicular to line 1.
  4. Now construct the bisectors of the four $$90^{\circ}$$ angles that line 1 and line 2 make at $$O$$. Each bisector splits a right angle into two $$45^{\circ}$$ angles, so we get two more lines through $$O$$ β€” call them line 3 and line 4. Together the four lines make eight rays out of $$O$$ separated by $$45^{\circ}$$.
  5. On each of the four lines, mark two points equidistant from $$O$$ β€” say at distance $$d$$ on either side. Label these eight points $$P_1, P_2, \ldots, P_8$$ so that consecutive pairs (e.g. $$P_1P_2$$, $$P_3P_4$$, $$\ldots$$) lie on the same line and are the two ends of that chord through $$O$$.
  6. For each of the four line-segments $$P_1P_2$$, $$P_3P_4$$, $$P_5P_6$$, $$P_7P_8$$, construct an eye-shape (as in Q. 5) using equal-radius arcs from its two endpoints.

The four overlapping eyes make an 8-petalled flower centred at $$O$$.

(The angle-bisector construction used in step 4 will be studied in detail in the next few intext questions.)

Answer

Take a centre $$O$$; draw two perpendicular lines through $$O$$; bisect the four right angles to get four lines through $$O$$ at $$45^{\circ}$$ to each other; on each line construct an eye (lens) of equal size centred at $$O$$. Four overlapping eyes give the 8-petalled figure.

12 What is the angle between two adjacent lines?

Solution

In the 8-petalled figure of Fig. 6.5, four lines pass through the centre $$O$$, giving eight equally-spaced rays around $$O$$. The eight rays together make a full turn of $$360^{\circ}$$ at $$O$$, so the angle between two consecutive rays is

\[\frac{360^{\circ}}{8} = 45^{\circ}.\]

Equivalently, the four full lines divide the plane around $$O$$ into $$8$$ equal sectors, each of measure $$45^{\circ}$$. So the angle between any two adjacent lines (measured as the angle between two consecutive rays) is $$45^{\circ}$$.

Answer

The angle between two adjacent lines (i.e. between two consecutive rays out of $$O$$) is $$\dfrac{360^{\circ}}{8} = 45^{\circ}$$.

13 How do we construct a $$45^{\circ}$$ angle using only a ruler and a compass?

Solution

The idea is to first construct a $$90^{\circ}$$ angle and then bisect it. Half of $$90^{\circ}$$ is $$45^{\circ}$$.

Steps of construction:

  1. Draw a line $$\ell$$ and mark a point $$O$$ on it.
  2. Construct a $$90^{\circ}$$ angle at $$O$$ (as in Q. 9): with $$O$$ as centre and any radius $$s$$, cut $$\ell$$ at $$X$$ and $$Y$$; then with $$X$$ and $$Y$$ as centres and equal larger radius, meet at $$A$$ above; draw $$OA$$. Now $$\angle AOY = 90^{\circ}$$.
  3. Bisect $$\angle AOY$$: with $$O$$ as centre and any convenient radius, draw an arc that meets $$OA$$ at $$P$$ and $$OY$$ at $$Q$$. Then with centres $$P$$ and $$Q$$ and the same radius (any radius large enough to intersect), draw two arcs inside the angle that meet at a point $$R$$.
  4. Draw the ray $$OR$$.

The ray $$OR$$ bisects the right angle $$\angle AOY$$, so

\[\angle ROY = \tfrac{1}{2} \times 90^{\circ} = 45^{\circ}.\]

Hence $$\angle ROY$$ is the required $$45^{\circ}$$ angle.

Answer

First construct a $$90^{\circ}$$ angle at a point $$O$$ on a line, then bisect it β€” each half is $$\tfrac{1}{2}(90^{\circ}) = 45^{\circ}$$.

14 How do we construct these congruent triangles, given the angle?

Solution

Suppose the given angle is $$\angle XOY$$ with vertex $$O$$ and arms $$OX$$, $$OY$$. To bisect $$\angle XOY$$ we set up two triangles on the two sides of a would-be bisector $$OC$$ that must be congruent by SSS. Here is how the compass automatically builds the sides so this holds.

Steps of construction:

  1. With centre $$O$$ and any convenient radius, draw an arc that cuts $$OX$$ at $$P$$ and $$OY$$ at $$Q$$. Then, by construction,\[OP = OQ.\]
  2. With centre $$P$$ and any convenient radius $$r$$ (large enough that the two arcs will meet), draw an arc in the interior of $$\angle XOY$$.
  3. With centre $$Q$$ and the same radius $$r$$, draw another arc in the interior of $$\angle XOY$$. The two arcs meet at a point $$C$$. By construction,\[PC = QC = r.\]
  4. Draw the ray $$OC$$.

Now consider the two triangles $$\triangle OPC$$ and $$\triangle OQC$$:

  • $$OP = OQ$$ (from step 1).
  • $$PC = QC$$ (from steps 2–3).
  • $$OC = OC$$ (common side).

By the SSS congruence criterion, $$\triangle OPC \cong \triangle OQC$$. Hence the corresponding angles $$\angle POC = \angle QOC$$, i.e. $$OC$$ bisects $$\angle XOY$$.

Answer

Cut equal arcs $$OP = OQ$$ on the two arms of the angle, then cut equal arcs $$PC = QC$$ from $$P$$ and $$Q$$ meeting inside the angle. The triangles $$\triangle OPC$$ and $$\triangle OQC$$ are congruent by SSS, so $$OC$$ bisects the angle.

Figure it Out (Angle Bisection)

1 Construct at least 4 different angles. Draw their bisectors.

Solution

Pick any four angles β€” say $$30^{\circ}$$, $$70^{\circ}$$, $$110^{\circ}$$ and $$150^{\circ}$$ β€” and, for each, draw the angle with a protractor at a vertex $$O$$, then construct its bisector by compass.

Angle bisector construction (same for all four).

  1. Let the angle be $$\angle XOY$$.
  2. With centre $$O$$ and any radius, draw an arc cutting $$OX$$ at $$P$$ and $$OY$$ at $$Q$$. Then $$OP = OQ$$.
  3. With centre $$P$$ and any radius $$r$$ larger than half of $$PQ$$, draw an arc in the interior of $$\angle XOY$$.
  4. With centre $$Q$$ and the same radius $$r$$, draw a second arc, meeting the first at $$C$$. Then $$PC = QC$$.
  5. Draw the ray $$OC$$. It is the bisector of $$\angle XOY$$.

The four cases give bisected halves of $$15^{\circ}, 35^{\circ}, 55^{\circ}$$ and $$75^{\circ}$$ respectively, and can be verified with a protractor.

Why the construction works: In triangles $$\triangle OPC$$ and $$\triangle OQC$$ we have $$OP = OQ$$, $$PC = QC$$ and $$OC$$ common, so $$\triangle OPC \cong \triangle OQC$$ (SSS). Hence $$\angle POC = \angle QOC$$, i.e. $$OC$$ bisects $$\angle XOY$$.

Answer

For any angle, cut equal arcs $$OP = OQ$$ on its two arms, then draw equal-radius arcs from $$P$$ and $$Q$$ meeting at $$C$$; the ray $$OC$$ is the bisector.

2

Construct the 8-petalled figure shown in Fig. 6.5.
Fig. 6.5
Fig. 6.5

Solution

The 8-petalled figure is built from four β€œeyes” drawn on four lines through a common centre $$O$$, with consecutive lines separated by $$45^{\circ}$$.

Steps of construction:

  1. Mark a centre point $$O$$. Choose a β€œpetal length” $$d$$ (for example $$3\,\mathrm{cm}$$).
  2. Line 1 (horizontal). Draw a horizontal line through $$O$$. With centre $$O$$ and radius $$d$$, mark two points $$P_1$$ (left) and $$P_2$$ (right) on it; so $$OP_1 = OP_2 = d$$.
  3. Line 2 (vertical). Construct the perpendicular to line 1 at $$O$$ (method of Q. 9). With centre $$O$$ and radius $$d$$, mark $$P_3$$ (above) and $$P_4$$ (below).
  4. Lines 3 and 4 (the diagonals). Bisect one of the four right angles at $$O$$ (method of Q. 14) β€” this gives a $$45^{\circ}$$ line through $$O$$. Extending it to the other side gives a full line (line 3). Bisecting an adjacent right angle gives line 4, perpendicular to line 3. On each of lines 3 and 4, mark two points at distance $$d$$ from $$O$$ β€” these are $$P_5, P_6$$ (on line 3) and $$P_7, P_8$$ (on line 4).
  5. Petal-pairs. For each of the four chords $$P_1P_2, P_3P_4, P_5P_6, P_7P_8$$, construct an β€œeye” using arcs of equal radius $$r$$ (choose $$r > d$$ so the arcs cross) from its two endpoints. Each such eye contributes two petals.

The four overlapping eyes give an 8-petalled figure centred at $$O$$.

Why the petals are equal: All four chords have the same length $$2d$$ and share the same midpoint $$O$$. The four eyes are all built with the same radius $$r$$ from the same-length chords, so they are congruent. Rotating by $$45^{\circ}$$ about $$O$$ sends one eye to the next, producing the required rotational symmetry.

Answer

Draw two perpendicular lines through a centre $$O$$; bisect the four right angles to get four equally-spaced lines through $$O$$; on each line construct an β€œeye” of the same size using equal-radius arcs from its two endpoints. The four overlapping eyes make the 8-petalled figure.

3

In Step 2 of angle bisection, if arcs of equal radius are drawn on the other side, as shown in the figure, will the line OC still be an angle bisector? Explore this through construction, and then justify your answer.
Figure
Figure

Solution

Exploration: Draw an angle $$\angle XOY$$. Cut it with an arc from $$O$$ to get points $$P$$ on $$OX$$ and $$Q$$ on $$OY$$ (so $$OP = OQ$$). Now, instead of drawing the two arcs from $$P$$ and $$Q$$ inside the angle, draw them outside the angle β€” on the far side of the line $$PQ$$ from $$O$$. They meet at a point $$C$$ on the opposite side of $$PQ$$ from $$O$$. Draw the ray from $$O$$ through $$C$$; it also cuts the angle into two equal halves.

Justification: Look at the triangles $$\triangle OPC$$ and $$\triangle OQC$$ β€” even though $$C$$ is now on the other side of $$PQ$$, the three-sides argument is unchanged:

  • $$OP = OQ$$ (from the first arc).
  • $$PC = QC$$ (equal-radius arcs from $$P$$ and $$Q$$).
  • $$OC = OC$$ (common).

By SSS, $$\triangle OPC \cong \triangle OQC$$. Hence $$\angle POC = \angle QOC$$. Since $$C$$ lies on the opposite side of $$PQ$$ from $$O$$, the line $$OC$$ still passes through the interior of $$\angle XOY$$ (or the angle vertically opposite it), and inside $$\angle XOY$$ it makes equal angles with $$OX$$ and $$OY$$. So $$OC$$ is again the angle bisector.

An even quicker way to see it: both $$O$$ and $$C$$ are equidistant from $$P$$ and $$Q$$ ($$OP = OQ$$, $$CP = CQ$$). So both lie on the perpendicular bisector of $$PQ$$. Therefore the line $$OC$$ is the perpendicular bisector of $$PQ$$. This line is the axis of symmetry of the isoceles configuration $$OP = OQ$$ and hence bisects the angle at $$O$$, regardless of which side of $$PQ$$ the point $$C$$ is on.

Answer

Yes β€” $$OC$$ is still the angle bisector. Even when the arcs cross on the far side of $$PQ$$, we still have $$OP = OQ$$ and $$PC = QC$$, so $$\triangle OPC \cong \triangle OQC$$ by SSS and $$\angle POC = \angle QOC$$.

4 What are the other angles that can be constructed using angle bisection? Can you construct $$65.5^{\circ}$$ angle?

Solution

Angle bisection halves any angle we already have. Starting from a straight line ($$180^{\circ}$$), we can construct a $$90^{\circ}$$ using the perpendicular-bisector method (Q. 9), and we already know how to construct $$60^{\circ}$$ (the angle of an equilateral triangle) with a compass. Bisecting these repeatedly generates the following ladders of angles:

  • From $$180^{\circ}$$: $$\;180^{\circ}, 90^{\circ}, 45^{\circ}, 22.5^{\circ}, 11.25^{\circ}, 5.625^{\circ}, \ldots$$
  • From $$90^{\circ}$$: $$\;90^{\circ}, 45^{\circ}, 22.5^{\circ}, 11.25^{\circ}, \ldots$$ (same as above from $$90^{\circ}$$)
  • From $$60^{\circ}$$: $$\;60^{\circ}, 30^{\circ}, 15^{\circ}, 7.5^{\circ}, 3.75^{\circ}, \ldots$$

We can also add constructible angles (put one on top of another): e.g. $$90^{\circ} + 15^{\circ} = 105^{\circ}$$, $$60^{\circ} + 45^{\circ} = 105^{\circ}$$, $$60^{\circ} + 15^{\circ} = 75^{\circ}$$, $$90^{\circ} - 60^{\circ} = 30^{\circ}$$, and so on. Thus we can construct any angle of the form

\[a\cdot\frac{90^{\circ}}{2^k}\;+\;b\cdot\frac{60^{\circ}}{2^m}\quad\text{(various integer combinations)},\]

which gives us angles like $$90^{\circ}, 60^{\circ}, 45^{\circ}, 30^{\circ}, 22.5^{\circ}, 15^{\circ}, 7.5^{\circ}, 11.25^{\circ}, \ldots$$

Can we construct $$65.5^{\circ}$$? Try to write $$65.5^{\circ}$$ as a sum of the constructible angles listed above. All angles obtained by bisecting $$90^{\circ}$$ and $$60^{\circ}$$ (and adding/subtracting them) can be expressed as fractions of the form $$\dfrac{p}{2^k}$$ multiplied by a β€œseed” angle. In particular, using only bisection of $$90^{\circ}$$ and $$60^{\circ}$$ we can reach $$60^{\circ}, 3.75^{\circ}, 1.875^{\circ}\ldots$$ β€” but not $$0.5^{\circ}$$. Since $$65.5^{\circ} = 65^{\circ} + 0.5^{\circ}$$ and no bisection ladder from $$90^{\circ}$$ or $$60^{\circ}$$ ever reaches $$0.5^{\circ}$$ (indeed, one can prove that $$1^{\circ}$$ itself cannot be constructed by ruler and compass), $$65.5^{\circ}$$ cannot be constructed by ruler-and-compass angle bisection.

Answer

By repeatedly bisecting $$180^{\circ}$$ and $$60^{\circ}$$ (and adding/subtracting) we can construct $$90^{\circ}, 60^{\circ}, 45^{\circ}, 30^{\circ}, 22.5^{\circ}, 15^{\circ}, 11.25^{\circ}, 7.5^{\circ}, \ldots$$ (all of the form $$\tfrac{90^{\circ}}{2^k}$$ or $$\tfrac{60^{\circ}}{2^k}$$ and their sums/differences). But $$65.5^{\circ}$$ is not constructible β€” no such combination equals $$65.5^{\circ}$$.

5 Come up with a method to construct the angle bisector using a rope.

Solution

Let the angle be $$\angle XOY$$, with vertex $$O$$ and arms $$OX, OY$$ marked on the ground.

Rope method (imitating the compass construction):

  1. Take a rope of some length $$s$$. Pin one end at $$O$$. Pull the rope taut along the arm $$OX$$ and mark the point $$P$$ where the other end of the rope touches $$OX$$. So $$OP = s$$.
  2. Keeping the rope pinned at $$O$$ and the length unchanged, swing it round to lie along the other arm $$OY$$ and mark the point $$Q$$ where the free end lies. Then $$OQ = s$$ as well. Now $$OP = OQ$$.
  3. Take a second rope of length $$r$$ (any convenient length larger than $$\tfrac{1}{2}PQ$$). Pin one end at $$P$$ and swing the other end into the interior of the angle, drawing an arc.
  4. Now pin the same rope at $$Q$$ (keeping the length $$r$$ the same) and swing another arc inside the angle. The two arcs cross at a point $$C$$ inside the angle. Then $$PC = QC = r$$.
  5. Stretch a rope from $$O$$ through $$C$$ and mark this straight line.

The line $$OC$$ is the bisector of $$\angle XOY$$.

Why it works: $$OP = OQ$$ and $$PC = QC$$, with $$OC$$ common, so $$\triangle OPC \cong \triangle OQC$$ by SSS. Hence $$\angle POC = \angle QOC$$, i.e. $$OC$$ bisects the angle at $$O$$.

Alternative (folding method): If the angle is drawn on paper, place a taut rope along $$OX$$, then swing it about $$O$$ onto $$OY$$; pinch the paper along the crease of the swept region. The crease that leaves the two arms exactly overlapping is the angle bisector.

Answer

Mark $$P$$ on $$OX$$ and $$Q$$ on $$OY$$ with a rope pinned at $$O$$ (so $$OP = OQ$$). With a second rope of any length $$r$$, mark equal arcs from $$P$$ and $$Q$$ meeting at $$C$$ inside the angle. Stretch a rope from $$O$$ through $$C$$ β€” that line is the angle bisector.

6 Construct the following figure. (a four-petalled figure inside a square is shown)
How do we construct the petals so that they are of the maximum possible size within a given square?

Solution

Let the given square be $$ABCD$$ with side length $$a$$. We want four equal petals inside the square, each fitting snugly against two opposite sides.

Steps of construction:

  1. Draw the square $$ABCD$$.
  2. Find the midpoints of the four sides: $$M$$ = midpoint of $$AB$$, $$N$$ = midpoint of $$BC$$, $$P$$ = midpoint of $$CD$$, $$Q$$ = midpoint of $$DA$$ (use the perpendicular-bisector construction on each side).
  3. Draw the two diagonals-of-midpoints $$MP$$ (vertical) and $$QN$$ (horizontal). They cross at the centre $$O$$ of the square. So $$OM = ON = OP = OQ = \tfrac{a}{2}$$.
  4. Now construct four β€œeyes” on the sides of the square, each using the side itself as the base:
    • Eye 1 on the top edge $$AB$$: with centres $$A$$ and $$B$$, and radius $$r = a$$ (the whole side length), draw arcs inside the square from each. They both pass through the midpoint $$P$$ of the opposite side. The arc from $$A$$ inside the square is one boundary of a petal; the arc from $$B$$ is the other. Together they enclose a petal from $$A$$ to $$B$$ passing through $$P$$.
    • Repeat for the bottom edge $$CD$$ with centres $$C, D$$ and radius $$a$$ β€” the two arcs meet at the midpoint $$M$$ of $$AB$$ (opposite side).
    • Repeat for the left edge $$AD$$ with centres $$A, D$$ and radius $$a$$ β€” arcs meet at $$N$$.
    • Repeat for the right edge $$BC$$ with centres $$B, C$$ and radius $$a$$ β€” arcs meet at $$Q$$.

Together the four eyes make four petals whose common tips all meet at $$O$$, and whose bases are the four sides of the square.

Why this gives the maximum petal size: Each petal is an β€œeye” based on one side of the square, so its base has length $$a$$ (the largest possible width for a petal fitting inside the square). The tip of the petal reaches the midpoint of the opposite side, which is at the greatest possible perpendicular distance $$a$$ from the base while still lying inside the square. Choosing the radius equal to the side length ($$r = a$$) is the largest radius for which both arcs still stay inside the square, since any bigger radius would push the arc across the opposite side and out of the square. So $$r = a$$ gives petals of maximum size.

Answer

Take the square $$ABCD$$ of side $$a$$. On each side, construct an β€œeye” using the two endpoints of that side as centres and radius $$a$$; both arcs go inside the square, meeting at the midpoint of the opposite side. The four resulting eyes are the four petals, and this radius $$r=a$$ gives the biggest possible petals fitting inside the square.

Intext Questions (Repeating Units and Copying Angles)

15

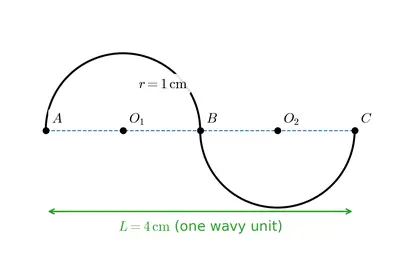
Construct the following figure. (a repeating wavy unit shown in Fig. 6.6)
Fig. 6.6
Fig. 6.6

Solution

The figure in Fig. 6.6 is a wave made of many equal semicircles (or half-eyes) placed side by side along a straight base line, all having the same radius.

Steps of construction:

  1. Draw a long horizontal line $$\ell$$.
  2. Choose a radius $$r$$ (say $$1\,\mathrm{cm}$$). Mark a starting point $$P_0$$ on $$\ell$$.
  3. Using the compass set at radius $$r$$, step off equally-spaced points $$P_0, P_1, P_2, P_3, \ldots$$ along $$\ell$$ so that each consecutive pair is at distance $$2r$$ from each other. (Do this by first stepping off $$P_0P_1 = 2r$$, then swinging the same $$2r$$ from $$P_1$$ to reach $$P_2$$, and so on.)
  4. For each interval $$[P_i, P_{i+1}]$$, find its midpoint $$M_i$$ (either by construction or, more simply, by drawing a $$2r$$-long segment and marking off $$r$$ from one end). With centre $$M_i$$ and radius $$r$$, draw an arc above $$\ell$$ (a semicircle from $$P_i$$ to $$P_{i+1}$$).
  5. Alternate the direction of the arc for every second interval β€” draw the next arc below $$\ell$$ instead of above. This produces the wave that goes up-down-up-down.

All the arcs have the same radius $$r$$, so the wave is perfectly regular and repeats.

(If Fig. 6.6 shows petals rather than half-circles, use pairs of overlapping arcs on each interval $$[P_i, P_{i+1}]$$ β€” the same repeating recipe applies.)

Answer

Draw a long line $$\ell$$ and step off equal segments of length $$2r$$ on it using the compass. On each segment, draw a semicircle of radius $$r$$ centred at its midpoint, alternating above and below $$\ell$$. The identical arcs form the repeating wave.

16 Draw an angle. Create a copy of this angle using only a ruler and compass.

Solution

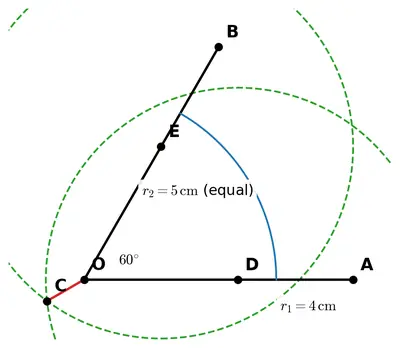
Let the given angle be $$\angle XOY$$ (vertex $$O$$, arms $$OX$$ and $$OY$$). We wish to copy it at a new location, say with vertex $$O'$$ and one arm along a fixed ray $$O'X'$$.

Steps of construction:

  1. Draw the new ray $$O'X'$$ where we want the copy to sit.
  2. With centre $$O$$ (in the original angle) and any convenient radius $$s$$, draw an arc cutting $$OX$$ at $$P$$ and $$OY$$ at $$Q$$. So $$OP = OQ = s$$.
  3. Keeping the compass at the same radius $$s$$, place the point at $$O'$$ and draw an arc that cuts $$O'X'$$ at a point $$P'$$. So $$O'P' = s$$.
  4. Measure the distance $$PQ$$ with the compass: put the pointed end at $$P$$ and pencil at $$Q$$. Now, without changing this compass opening, place the pointed end at $$P'$$ and draw an arc that meets the previous arc (the one centred at $$O'$$, radius $$s$$) at a point $$Q'$$.
  5. Draw the ray $$O'Q'$$.

The angle $$\angle X'O'Q'$$ is a copy of $$\angle XOY$$.

Why it works: In the two triangles $$\triangle OPQ$$ and $$\triangle O'P'Q'$$,

  • $$OP = O'P' = s$$,
  • $$OQ = O'Q' = s$$,
  • $$PQ = P'Q'$$ (transferred with the compass).

By the SSS congruence criterion, $$\triangle OPQ \cong \triangle O'P'Q'$$. Hence $$\angle POQ = \angle P'O'Q'$$; that is, the angle at $$O'$$ is equal to the angle at $$O$$.

Answer

Cut an arc from $$O$$ meeting the arms at $$P, Q$$. Reproduce the same-radius arc from the new vertex $$O'$$ on the new ray to get $$P'$$. Transfer the chord length $$PQ$$ with the compass and mark $$Q'$$ on that arc. Then $$\angle X'O'Q' = \angle XOY$$ by SSS.

Figure it Out (Copying Angles)

1 Construct at least 4 different angles in different orientations without taking any measurement. Make a copy of all these angles.

Solution

Draw any four angles β€” e.g. an acute angle opening to the right, an obtuse angle opening upward, a right-ish angle opening to the left, and a slanting acute angle β€” simply by drawing two rays from a common vertex, without measuring anything with a protractor.

For each angle $$\angle XOY$$, make a copy elsewhere on the paper using the following ruler-and-compass method (same recipe as Q. 16, no measuring):

  1. Draw a fresh ray $$O'X'$$ in the new orientation you want the copy to lie in.
  2. With centre $$O$$ and any convenient radius $$s$$, draw an arc cutting $$OX$$ at $$P$$ and $$OY$$ at $$Q$$.
  3. Keeping the compass at the same radius $$s$$, put the point at $$O'$$ and draw an arc cutting $$O'X'$$ at $$P'$$.
  4. Now open the compass to length $$PQ$$ (put the point at $$P$$, pencil at $$Q$$). Without changing this width, put the point at $$P'$$ and mark the intersection $$Q'$$ with the previous arc.
  5. Draw ray $$O'Q'$$ β€” then $$\angle X'O'Q' = \angle XOY$$.

Repeat for each of the four angles. In every case, congruence of $$\triangle OPQ$$ and $$\triangle O'P'Q'$$ by SSS ($$OP = O'P' = s,\; OQ = O'Q' = s,\; PQ = P'Q'$$) ensures the copy has the same measure as the original.

Answer

For each drawn angle $$\angle XOY$$, transfer it to a fresh ray $$O'X'$$ by the compass method: cut an arc of radius $$s$$ from $$O$$ giving $$P, Q$$; cut the same-radius arc from $$O'$$ giving $$P'$$; transfer the chord $$PQ$$ from $$P'$$ to locate $$Q'$$ on the arc; draw $$O'Q'$$. SSS gives $$\angle X'O'Q' = \angle XOY$$.

2

Construct the Fig. 6.6.
Fig. 6.6
Fig. 6.6

Solution

Fig. 6.6 is a repeating wave (or petal) unit that is copied along a base line.

Steps of construction:

  1. Draw a long straight base line $$\ell$$.
  2. Choose a β€œwave length” $$\lambda = 2r$$ and a radius $$r$$ (for example $$r = 1\,\mathrm{cm}$$, so $$\lambda = 2\,\mathrm{cm}$$).
  3. Mark a starting point $$P_0$$ on $$\ell$$. Using the compass set at radius $$\lambda = 2r$$, step off points $$P_0, P_1, P_2, \ldots$$ along $$\ell$$ so that each consecutive pair is $$\lambda$$ apart.
  4. For the first interval $$[P_0, P_1]$$ (of length $$2r$$), find its midpoint $$M_0$$. With centre $$M_0$$ and radius $$r$$, draw an arc above the line: this is a semicircle from $$P_0$$ to $$P_1$$.
  5. For the next interval $$[P_1, P_2]$$, do the same but draw the semicircle below $$\ell$$. Alternate up/down for every subsequent interval.

The result is a repeating wave made of equal-radius semicircles β€” the pattern of Fig. 6.6. If Fig. 6.6 shows a slightly different repeating unit (say a petal instead of a semicircle), replace step 4/5 by copying that unit onto each interval using the angle-copy and length-copy techniques of the previous section β€” equal chord length and same-radius arcs guarantee the copies are congruent.

Why the unit repeats exactly: Every arc is drawn with the same radius $$r$$ on a same-length base $$\lambda$$. Any two such arcs are congruent (an SSS argument on the two triangles formed by the base and the ends of the arc). So the visual pattern along $$\ell$$ is the same shape, translated by a fixed amount $$\lambda$$ each time.

Answer

Draw a base line, step off equal intervals of length $$2r$$ on it with the compass, and construct a semicircle of radius $$r$$ on each interval (alternating above and below the line). All semicircles are congruent, so the wavy figure of Fig. 6.6 is faithfully reproduced.

Intext Questions (Parallel Lines)

17 How do we implement this idea using a ruler and a compass?

Solution

The β€œidea” is: to draw a line through a point $$P$$ parallel to a given line $$\ell$$, we use the fact that when two lines are cut by a transversal, they are parallel exactly when the corresponding angles are equal (or, equivalently, alternate angles are equal).

Construction (using the angle-copy trick):

  1. Let $$\ell$$ be the given line and $$P$$ a point not on $$\ell$$. Take any point $$A$$ on $$\ell$$ and draw the transversal line $$PA$$ (extending it if convenient beyond $$A$$). Call the angle $$\angle PAB$$ that $$PA$$ makes with $$\ell$$ (where $$B$$ is a point on $$\ell$$ on one side of $$A$$).
  2. At the point $$P$$, copy $$\angle PAB$$ so that its vertex is at $$P$$ and one arm lies along $$PA$$ (going towards $$A$$), and the copy opens on the same side of $$PA$$ as $$B$$. Use the standard compass angle-copy method (Q. 16): centre $$A$$, radius $$s$$, arc cuts $$\ell$$ at some point $$Q$$ and $$PA$$ at some point $$R$$; then centre $$P$$, same radius $$s$$, arc cuts $$PA$$ at $$R'$$; then swing radius $$QR$$ from $$R'$$ to get $$Q'$$.
  3. Draw the ray from $$P$$ through $$Q'$$ and extend it to a full line $$m$$.

Then $$m$$ is parallel to $$\ell$$. This is because the corresponding angle at $$P$$ equals the angle at $$A$$ (by SSS congruence of the angle-copy triangles), and equal corresponding angles imply the two lines are parallel.

Answer

Choose a point $$A$$ on $$\ell$$ and draw the transversal $$PA$$. Copy the angle that $$\ell$$ makes with $$PA$$ at the point $$P$$ on the same side, using the compass angle-copy method; the new arm at $$P$$ is a line parallel to $$\ell$$.

Figure it Out (Parallel Lines)

1 Construct 4 pairs of parallel lines in different orientations.

Solution

Draw four different starting lines $$\ell_1, \ell_2, \ell_3, \ell_4$$ in four different orientations (say horizontal, vertical, and two slanting directions). For each line, mark an external point $$P_i$$ not on it, and construct a parallel line through $$P_i$$ by the compass method.

Construction (repeat for each of the four lines):

  1. Take any point $$A$$ on $$\ell_i$$ and draw a transversal line $$AP_i$$.
  2. Copy the angle $$\angle P_iAB$$ (where $$B$$ is a point on $$\ell_i$$) at $$P_i$$ so that one arm lies along $$P_iA$$ and the copied angle opens on the same side of $$AP_i$$ as $$B$$. Use the standard angle-copy compass steps: arc of radius $$s$$ at $$A$$ hitting $$\ell_i$$ at $$Q$$ and $$AP_i$$ at $$R$$; arc of same radius at $$P_i$$ hitting $$P_iA$$ at $$R'$$; arc of radius $$QR$$ from $$R'$$ meeting the previous arc at $$Q'$$.
  3. Draw the line through $$P_i$$ and $$Q'$$ β€” this is the required parallel to $$\ell_i$$ through $$P_i$$.

Repeat for the four different lines to get four pairs $$(\ell_i, m_i)$$ of parallel lines in different orientations.

Why the copy is parallel: Because the angle at $$P_i$$ equals the corresponding angle at $$A$$ (transferred by SSS congruence), so the two lines make equal corresponding angles with the transversal β€” hence they are parallel.

Answer

For each of four lines drawn in different orientations, mark an external point $$P$$, draw a transversal $$PA$$ to the line, copy the angle it makes with the line at $$P$$ using the compass, and extend the copied arm to a full line β€” that line is parallel to the given line.

2 Construct the following figure. (an 8-pointed star pattern with labelled vertices S, T, U, V, W, X, Y, Z and inner points A–H is shown)

Solution

The 8-pointed star of this section is obtained by superimposing two congruent squares that are rotated by $$45^{\circ}$$ with respect to each other, or, equivalently, by drawing four straight lines through a common centre at consecutive angles of $$45^{\circ}$$ and marking off equal segments on either side.

Steps of construction:

  1. Mark a centre point $$O$$ on the paper. Choose a β€œstar radius” $$R$$ (say $$5\,\mathrm{cm}$$).
  2. Draw a horizontal line through $$O$$. On it, mark $$S$$ to the left of $$O$$ and $$W$$ to the right of $$O$$ at distance $$R$$: $$OS = OW = R$$.
  3. Construct the perpendicular to this line at $$O$$ (Q. 9). On it, mark $$U$$ above and $$Y$$ below at distance $$R$$: $$OU = OY = R$$.
  4. Bisect the four right angles at $$O$$ (Q. 14) to obtain two more diameters, each rotated by $$45^{\circ}$$ from the first two. On these diameters, mark the remaining four vertices $$T, V, X, Z$$ at the same distance $$R$$ from $$O$$.
  5. So we now have the eight points $$S, T, U, V, W, X, Y, Z$$ equally spaced on the circle of radius $$R$$ around $$O$$ (consecutive points $$45^{\circ}$$ apart).
  6. Draw the β€œfirst square” through $$S, U, W, Y$$: join $$S$$ to $$U$$, $$U$$ to $$W$$, $$W$$ to $$Y$$, and $$Y$$ to $$S$$. Use the parallel-line construction (Q. 17) to keep the four sides accurate if needed.
  7. Draw the β€œsecond square” through $$T, V, X, Z$$ similarly. This square is a $$45^{\circ}$$ rotation of the first about $$O$$.

The two overlapping squares create the 8-pointed star. The inner intersection points of the two squares' sides are the eight points $$A, B, C, D, E, F, G, H$$ β€” these form a regular octagon inside the star.

Why the eight points lie at equal angles: By construction, the four diameters through $$O$$ are separated by consecutive $$45^{\circ}$$ angles, and equal distances $$R$$ are marked on both sides of $$O$$ on each diameter. So the eight endpoints are equally spaced around $$O$$ and the resulting figure has 8-fold rotational symmetry.

Answer

Take a centre $$O$$; draw two perpendicular lines and bisect the four right angles to get four lines through $$O$$ separated by $$45^{\circ}$$; mark the eight endpoints at the same distance $$R$$ from $$O$$ (labelled $$S, T, U, V, W, X, Y, Z$$); join alternate points to form two squares (one through $$S, U, W, Y$$ and one through $$T, V, X, Z$$). Their overlap is the 8-pointed star; the inner intersection points are $$A$$–$$H$$.

Intext Questions (Arch Designs)

18 How did they make these arches?

Solution

The rounded arches seen in old buildings (like those over doors and windows) are made from a semicircle resting on two vertical straight sides. To construct such an arch, one only needs a compass to draw the semicircular top and a ruler to draw the two vertical support-lines.

The idea:

  1. Fix the width of the arch, which is the length of the base $$AB$$ (the two ends where the arch meets the wall).
  2. Find the midpoint $$M$$ of $$AB$$ (perpendicular-bisector construction of Q. 8). $$M$$ is the centre of the arch.
  3. With centre $$M$$ and radius $$MA = MB = \tfrac{1}{2}AB$$, draw a semicircle above $$AB$$. This is the arched top.
  4. From $$A$$ and $$B$$, draw two vertical straight lines going downwards. These are the vertical sides of the arch (as tall as we like).

So the arch consists of a semicircle sitting on two vertical straight legs. Old builders would do exactly this with a stretched rope (playing the role of the compass) tied at the centre $$M$$ of the base.

Answer

By drawing a semicircle over a horizontal base $$AB$$: mark the midpoint $$M$$ of $$AB$$, and with centre $$M$$ and radius $$MA$$ draw a semicircle above $$AB$$. The two straight sides (walls) are drawn as vertical lines from $$A$$ and $$B$$.

19 Construct this arch shape on a piece of paper.

Solution

Steps of construction (semicircular arch):

  1. Choose the width of the arch. Draw a horizontal segment $$AB$$ of that length (say $$6\,\mathrm{cm}$$).
  2. Construct the perpendicular bisector of $$AB$$ (Q. 8) to find its midpoint $$M$$. Erase the perpendicular bisector afterwards if desired.
  3. Place the compass point at $$M$$, open it to radius $$MA$$ (i.e. $$3\,\mathrm{cm}$$), and draw the arc above $$AB$$ from $$A$$ round to $$B$$. This is the top of the arch (a semicircle).
  4. At $$A$$, construct a $$90^{\circ}$$ angle to $$AB$$ and draw a vertical line downward for the desired height. Do the same at $$B$$. The two vertical lines are the walls (legs) of the arch.

The figure so drawn β€” a semicircle sitting on two vertical lines from $$A$$ and $$B$$ β€” is the required arch.

Answer

Draw a horizontal segment $$AB$$, find its midpoint $$M$$ by perpendicular bisector, and draw a semicircle above $$AB$$ with centre $$M$$ and radius $$MA$$. Add two vertical lines at $$A$$ and $$B$$ as the walls.

20 Use these support lines to construct an arch. If required, adjust the radii of the arcs to make the arch look more aesthetically pleasing.

Solution

The β€œsupport lines” usually shown are: the horizontal base $$AB$$ and, at each end $$A$$ and $$B$$, a short vertical line. These act as the walls of the arch. To fit an arched top on to them:

  1. Mark the midpoint $$M$$ of the base $$AB$$ (perpendicular-bisector construction). This will be the centre of the semicircular arch.
  2. Place the compass at $$M$$ with radius $$MA$$ and draw the arc from $$A$$ up over the top and down to $$B$$. This gives a semicircular arch matching the width of the wall.
  3. Erase the parts of the support lines that stick out above the arch, so that the arch sits neatly on the two vertical walls.

Adjusting radii for aesthetics. The size of the arch can be tuned:

  • Using radius exactly $$\tfrac{1}{2}AB$$ gives a perfect semicircle (Roman-style arch).
  • Using a slightly larger radius (with the centre chosen on the base, but not at the midpoint) gives a shallower, wider arch (segmental arch).
  • Using two centres and two arcs of larger radius meeting at a peak gives a pointed (Gothic) arch, discussed in the next questions.

Try different radii and pick the one that looks best.

Answer

Take the base $$AB$$ of the given support lines and find its midpoint $$M$$. With centre $$M$$ and radius $$MA$$, draw a semicircle over $$AB$$; it sits on the two vertical support lines and forms the arch. Adjust the radius (equivalently the height of $$M$$) to change the arch style.

21 How do we construct this shape? (a pointed arch)

Solution

A pointed arch is made of two circular arcs, each drawn from one end of the base, that meet at a peak directly above the middle of the base.

Steps of construction:

  1. Draw the horizontal base $$AB$$ of the arch (say $$AB = 6\,\mathrm{cm}$$). Let $$M$$ be the midpoint of $$AB$$ (perpendicular-bisector construction).
  2. Choose a radius $$r$$ with $$r \geq AB$$. (Using $$r = AB$$ gives the classic β€œequilateral” pointed arch, in which the two arcs cross at a natural peak.)
  3. With centre $$A$$ and radius $$r$$, draw an arc above $$AB$$ that starts at $$B$$ (if $$r = AB$$) or at the far intersection of the compass swing with a vertical from $$B$$. Continue the arc upwards on the right side of $$AB$$.
  4. With centre $$B$$ and the same radius $$r$$, draw a second arc above $$AB$$ starting at $$A$$ and going upwards on the left side.
  5. The two arcs meet at a point $$P$$ directly above $$M$$. The two arcs from $$A$$ up to $$P$$ and from $$B$$ up to $$P$$ together form the pointed arch.
  6. Draw two vertical walls at $$A$$ and $$B$$ (using the $$90^{\circ}$$ construction at $$A$$ and $$B$$) for the sides of the arch.

The peak $$P$$ lies on the perpendicular bisector of $$AB$$, since $$AP = BP = r$$ (equidistance from $$A$$ and $$B$$).

Answer

Draw the base $$AB$$. With centres $$A$$ and $$B$$, and equal radius $$r \geq \tfrac{1}{2}AB$$ (usually $$r = AB$$), draw two arcs above $$AB$$ that meet at a peak $$P$$ above the midpoint of $$AB$$. Draw vertical walls at $$A, B$$ to complete the pointed arch.

22 If their midpoints are marked, will you be able to construct a pointed arch?

Solution

Yes. Suppose we are given a horizontal base $$AB$$ with its midpoint $$M$$ already marked, and possibly the midpoints of the two halves $$AM$$ and $$MB$$ as well (say $$M_1$$ is the midpoint of $$AM$$ and $$M_2$$ the midpoint of $$MB$$).

These midpoints act as the centres of the two arcs that form the pointed arch. There are several natural choices:

  • Centres at $$A$$ and $$B$$ (equilateral pointed arch): With centre $$A$$ and radius $$AB$$, draw the arc from $$B$$ upward. With centre $$B$$ and radius $$AB$$, draw the arc from $$A$$ upward. They meet at the peak $$P$$ directly above $$M$$. Since $$AM = MB$$ and the arcs use the same radius, $$P$$ lies on the perpendicular bisector of $$AB$$ through $$M$$.
  • Centres at $$M_1$$ and $$M_2$$ (drop-shaped pointed arch): With centre $$M_1$$ (the midpoint of $$AM$$) and radius $$M_1 A$$, draw an arc through $$A$$ up to a point on the perpendicular bisector of $$AB$$ (above $$M$$). With centre $$M_2$$ and radius $$M_2 B$$, draw the mirror-image arc through $$B$$. Both arcs meet at a peak $$P$$ on the perpendicular through $$M$$, since $$M_1$$ and $$M_2$$ are equidistant from $$M$$ (by symmetry) and the radii are equal.

In either case, having the midpoints marked ahead of time removes the need to construct them, so you can jump straight to placing the compass and drawing the two arcs.

Answer

Yes. The marked midpoints serve as centres for the two arcs. E.g. with centres $$A, B$$ and equal radius $$AB$$ (or with centres at the marked midpoints of $$AM$$ and $$MB$$, using equal radii to $$A$$ and $$B$$ respectively), the two arcs meet at a peak above the midpoint $$M$$ of $$AB$$, giving a pointed arch.

Figure it Out (Pointed Arches)

1

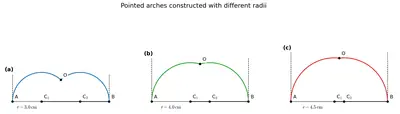
Use support lines in Fig. 6.11 to construct a pointed arch. Make different arches, by changing the radius of the arcs.
Fig. 6.11
Fig. 6.11

Solution

The support lines of Fig. 6.11 give us the base $$AB$$ of the arch, its midpoint $$M$$ and (typically) the midpoints $$M_1$$ and $$M_2$$ of $$AM$$ and $$MB$$, together with two vertical wall lines at $$A$$ and $$B$$.

Standard pointed arch (centres at $$A$$ and $$B$$):

  1. Choose a radius $$r$$. With centre $$A$$ and radius $$r$$, draw an arc above $$AB$$; with centre $$B$$ and the same radius $$r$$, draw a second arc above $$AB$$. They meet at a peak $$P$$ on the perpendicular bisector of $$AB$$ (i.e. directly above $$M$$).
  2. Erase the parts of each arc that go beyond the peak. Erase the parts of the vertical support lines that stick above the arch.

Varying the radius:

  • $$r = AB$$: the classic equilateral pointed arch. The peak forms an equilateral-triangle-shaped tip: $$AP = BP = AB$$, so $$\triangle APB$$ is equilateral.
  • $$r > AB$$: a lancet (tall, narrow) pointed arch β€” the peak is higher.
  • $$\tfrac{1}{2}AB < r < AB$$: a drop (blunt, wider) pointed arch β€” the peak is lower but still above $$M$$.
  • $$r = \tfrac{1}{2}AB$$: the arcs actually meet at $$M$$ on the base β€” degenerate (the arch collapses into two semicircles inside $$AB$$), so avoid this.

Make three or four such arches on the same page, one for each choice of $$r$$, and compare their shapes.

Why the peak is always above $$M$$: $$AP = BP = r$$, so $$P$$ is equidistant from $$A$$ and $$B$$, and hence lies on the perpendicular bisector of $$AB$$, which passes through $$M$$.

Answer

With centres $$A$$ and $$B$$ on the given support base, draw two equal-radius arcs above $$AB$$; they meet at a peak $$P$$ above the midpoint of $$AB$$. Redraw with different radii (e.g. $$r = AB$$, then $$r = 1.5\,AB$$, then $$r = 0.75\,AB$$) to get pointed arches of different heights (equilateral, lancet, drop).

2 Make your own arch designs.

Solution

Here are a few simple arch designs you can build with a ruler and a compass, all starting from the same base $$AB$$ of width $$w$$ and midpoint $$M$$.

  1. Semicircular (Roman) arch. Draw a semicircle of radius $$\tfrac{w}{2}$$ above $$AB$$, centred at $$M$$. Height $$=\tfrac{w}{2}$$.
  2. Equilateral pointed arch. With centres $$A$$ and $$B$$ and equal radius $$r = w$$, draw two arcs above $$AB$$; the arcs meet at a peak $$P$$ with $$AP = BP = AB$$ (equilateral triangle $$APB$$). Height $$=\tfrac{\sqrt{3}}{2}w$$.
  3. Trefoil arch. Draw the equilateral pointed arch as in design 2. Then, on the perpendicular bisector of $$AB$$ through $$M$$, mark a point at height $$\tfrac{w}{2}$$; use it as the centre of a small semicircle of radius $$\tfrac{w}{6}$$ that sits at the top. Along each half of the arch draw a small inward semicircle of radius $$\tfrac{w}{6}$$ so the three little semicircles form a trefoil (three-lobed) top.
  4. Ogee (S-shaped) arch. Draw a pointed arch of radius $$w$$ as in design 2, but only up to a point $$T$$ at half the height. From $$T$$, continue upward with a small reversed arc (radius about $$\tfrac{w}{4}$$) curving inward, meeting a symmetric arc from the other side at a sharper peak. This gives the S-shaped ogee arch.
  5. Multi-foil (cinquefoil) arch. Draw a semicircular arch (design 1). Inside it, on the arch itself, mark five equally spaced points using the compass to divide the semicircular arc into five equal parts. At each division point, cut a small semicircular scallop of the same radius; the resulting scalloped top is a cinquefoil arch.

All these designs use only ruler-and-compass operations that we have learned: perpendicular bisector, angle bisector, equal-radius arcs from equally-placed centres, and copying angles.

Answer

Combining the basic tools β€” semicircle, pointed arch (equilateral / lancet / drop), trefoil top, ogee curve, cinquefoil scallops β€” one can design many arches. Each is built from equal-radius arcs whose centres lie on or below the base, so a ruler and compass suffice.

Intext Questions (Regular Hexagons and Related Constructions)

23 How do we construct a regular pentagon (5-sided figure) and a regular hexagon (6-sided figure)? To begin with, try to construct a pentagon and hexagon with equal sidelengths.

Solution

A first attempt using only equal side lengths: Choose a side length $$a$$ (say $$3\,\mathrm{cm}$$) and try to draw a 5-sided closed figure with all sides $$a$$, then a 6-sided closed figure with all sides $$a$$, using compass and ruler.

Steps you can try:

  1. Draw a segment $$AB$$ of length $$a$$.
  2. From $$B$$, using compass width $$a$$, draw an arc and mark a point $$C$$; join $$BC$$.
  3. From $$C$$, using compass width $$a$$, draw another arc and mark $$D$$; join $$CD$$. Continue.

For the pentagon you will get five segments of length $$a$$; but when you try to close the figure back to $$A$$, the last side may not exactly equal $$a$$, or the figure may not close at all. So β€œequal side lengths” alone is not enough to force a regular pentagon β€” you also need to control the angles at each vertex, and the interior angle of a regular pentagon is $$108^{\circ}$$, which is not directly constructible from bisection of $$60^{\circ}$$ or $$90^{\circ}$$.

For the hexagon the story is happier: if you place the compass on the paper at some centre $$O$$, sweep a full circle of radius $$a$$, and then step off arcs of length $$a$$ around this circle starting from any point $$A$$, you get exactly six equally spaced points on the circle. Joining consecutive points gives a regular hexagon of side $$a$$. (The reason is that $$OA = OB = a$$ and $$AB = a$$, so $$\triangle OAB$$ is equilateral and $$\angle AOB = 60^{\circ}$$; six such triangles fit around $$O$$ since $$6 \times 60^{\circ} = 360^{\circ}$$.)

Conclusion.

  • A regular hexagon of any side length $$a$$ can be constructed just with equal-radius arcs of radius $$a$$, walked around a circle of the same radius $$a$$.
  • A regular pentagon needs an additional trick (constructing an angle of $$72^{\circ}$$ or $$108^{\circ}$$) and cannot be built just from repeatedly stepping off equal sides. This is why the rest of the chapter focuses on the regular hexagon.

Answer

A regular hexagon of side $$a$$ is easy: draw a circle of radius $$a$$ around a centre $$O$$, mark any point $$A$$ on it, and step off arcs of length $$a$$ around the circle β€” you get exactly $$6$$ equally-spaced points, whose consecutive joins form a regular hexagon. A regular pentagon with equal side lengths cannot be built by side-lengths alone; the interior angle $$108^{\circ}$$ (equivalently the central angle $$72^{\circ}$$) is not constructible from simple bisections, so more work is needed.

24 Can we break a regular hexagon into smaller pieces that can be constructed?

Solution

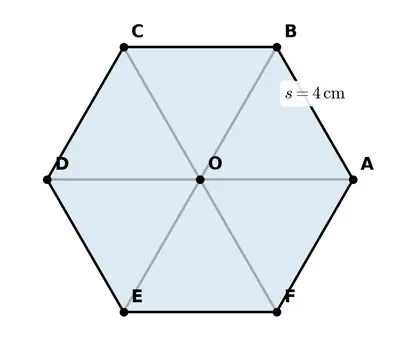
Yes. A regular hexagon with centre $$O$$ and vertices $$A, B, C, D, E, F$$ can be broken into six triangles by joining $$O$$ to each of the six vertices:

\[\triangle OAB,\;\triangle OBC,\;\triangle OCD,\;\triangle ODE,\;\triangle OEF,\;\triangle OFA.\]

Each of these six triangles is equilateral of side length $$a$$ (the side of the hexagon). Reason:

  • All six vertices $$A, \ldots, F$$ lie on the circle of radius $$a$$ around $$O$$, so $$OA = OB = \cdots = OF = a$$.
  • Consecutive vertices are distance $$a$$ apart on the circle (since the hexagon has side length $$a$$).
  • So each triangle $$\triangle O\text{-vertex-vertex}$$ has all three sides equal to $$a$$ β€” it is equilateral.

Equilateral triangles are easy to construct with just a compass (three arcs of the same radius). So a regular hexagon can be built by first constructing an equilateral triangle and then rotating it around the centre β€” equivalently by walking around a circle with the compass step-off of length $$a$$.

This is the key insight: a regular hexagon = $$6$$ congruent equilateral triangles arranged around a common vertex.

Answer

Yes. Joining the centre $$O$$ to each of the six vertices splits the regular hexagon into $$6$$ congruent equilateral triangles of side length $$a$$ (the side of the hexagon). Each equilateral triangle is easily constructed with a compass.

25

Can six congruent equilateral triangles be placed together as in Fig. 6.12? If yes, will it result in a regular hexagon?
Fig. 6.12
Fig. 6.12

Solution

Yes. Take six congruent equilateral triangles with side length $$a$$. Each has three interior angles of $$60^{\circ}$$. Place them so that they share a common vertex $$O$$, with one $$60^{\circ}$$ angle of each triangle meeting at $$O$$. The six $$60^{\circ}$$ angles at $$O$$ add up to

\[6 \times 60^{\circ} = 360^{\circ},\]

which is a full turn. So the six triangles fit around $$O$$ without any gap and without overlap.

The outer boundary is a regular hexagon. The six triangles use $$6$$ vertices around $$O$$ (call them $$A, B, C, D, E, F$$). Each vertex is at distance $$a$$ from $$O$$ (since each triangle has all sides $$a$$), so all six outer vertices lie on a circle of radius $$a$$ around $$O$$. Between two adjacent outer vertices, the side of a triangle joins them, and that side has length $$a$$. So the outer boundary $$ABCDEF$$ is a closed figure with six equal sides.

Also, the interior angle of the hexagon at each outer vertex is made of two triangle-angles $$60^{\circ}$$ each (one from each triangle meeting there), giving a $$120^{\circ}$$ interior angle at every vertex. All six sides and all six interior angles are equal, so $$ABCDEF$$ is a regular hexagon.

Answer

Yes. Six equilateral triangles of side $$a$$ meet perfectly at a common vertex (since $$6 \times 60^{\circ} = 360^{\circ}$$), and the outer boundary is a regular hexagon of side $$a$$ (with interior angles $$60^{\circ}+60^{\circ}=120^{\circ}$$ at each vertex).

26 Consider this figure. Will the $$70^{\circ}$$ angle fit into the gap? What is the gap angle $$\angle AOI$$?

Solution

In the figure, several angles of some given size meet at the point $$O$$, leaving a gap $$\angle AOI$$. The question is whether a triangle whose angle at $$O$$ is $$70^{\circ}$$ (instead of the required angle) will slot into the gap.

The situation in the book is: five triangles, each with a $$60^{\circ}$$ angle at $$O$$, are placed so their $$60^{\circ}$$ angles surround $$O$$. Five of them use up

\[5 \times 60^{\circ} = 300^{\circ}\]

of the full turn at $$O$$. The remaining gap is

\[\angle AOI = 360^{\circ} - 300^{\circ} = 60^{\circ}.\]

A triangle whose angle at $$O$$ is $$70^{\circ}$$ would need $$70^{\circ}$$ of angular space at $$O$$, but the gap is only $$60^{\circ}$$. Since $$70^{\circ} > 60^{\circ}$$, the $$70^{\circ}$$ angle will not fit into the gap β€” it will overlap the neighbouring triangles.

Only an angle of exactly $$60^{\circ}$$ (or smaller) can fit; and to close the figure perfectly, we need exactly $$60^{\circ}$$ β€” which is why the six triangles fit exactly.

Answer

The gap angle is $$\angle AOI = 360^{\circ} - 5 \times 60^{\circ} = 60^{\circ}$$. A $$70^{\circ}$$ angle will not fit into this gap (since $$70^{\circ} > 60^{\circ}$$); only an angle of $$60^{\circ}$$ fits exactly.

27

In Fig. 6.12 can you explain why AOD, BOE and COF are straight lines?
Fig. 6.12
Fig. 6.12

Solution

In Fig. 6.12 six equilateral triangles are placed around a common vertex $$O$$, with vertices $$A, B, C, D, E, F$$ on the outside. Each triangle contributes a $$60^{\circ}$$ angle at $$O$$, and the six $$60^{\circ}$$'s together fill the full turn of $$360^{\circ}$$ around $$O$$.

Look at the pair of vertices $$A$$ and $$D$$. Starting from the ray $$OA$$ and going round $$O$$, we cross three of the six $$60^{\circ}$$ angles to reach the ray $$OD$$ (i.e. $$A$$ and $$D$$ are β€œthree triangles apart”). So the angle from $$OA$$ to $$OD$$, measured in one direction, is

\[3 \times 60^{\circ} = 180^{\circ}.\]

An angle of $$180^{\circ}$$ at $$O$$ between two rays $$OA$$ and $$OD$$ means the two rays lie along the same straight line but point in opposite directions. Hence $$AOD$$ is a straight line.

Exactly the same argument works for $$B$$ and $$E$$ (also three triangles apart at $$O$$) and for $$C$$ and $$F$$: in each case the angle at $$O$$ between the two rays is $$3 \times 60^{\circ} = 180^{\circ}$$, i.e. the two rays are opposite. So $$BOE$$ and $$COF$$ are also straight lines.

These three straight lines $$AOD, BOE, COF$$ are the three main diagonals of the regular hexagon $$ABCDEF$$.

Answer

Between $$OA$$ and $$OD$$ (and similarly for the other pairs) there are three $$60^{\circ}$$ triangle-angles at $$O$$, adding up to $$3 \times 60^{\circ} = 180^{\circ}$$. An $$180^{\circ}$$ angle at $$O$$ means the two rays lie along a single straight line, so $$AOD$$, $$BOE$$ and $$COF$$ are each straight lines through $$O$$.

28 Construct a regular hexagon with a sidelength $$4 \, \mathrm{cm}$$ using a ruler and a compass.

Solution

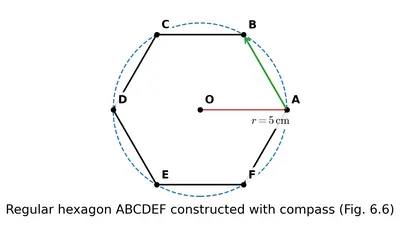
Steps of construction (using the β€œwalk-around-a-circle” method):

  1. Mark a point $$O$$ on the paper. This will be the centre of the hexagon.
  2. Open the compass to $$4\,\mathrm{cm}$$ (the required side length). With centre $$O$$ and radius $$4\,\mathrm{cm}$$, draw a circle.
  3. Mark any point $$A$$ on this circle.
  4. Keep the compass at the same radius $$4\,\mathrm{cm}$$. Place the pointed end at $$A$$ and draw a small arc that cuts the circle at another point; call it $$B$$.
  5. Move the pointed end to $$B$$ (still $$4\,\mathrm{cm}$$ radius) and cut the circle at a new point $$C$$.
  6. Continue in the same direction: from $$C$$ get $$D$$, from $$D$$ get $$E$$, from $$E$$ get $$F$$. The next step from $$F$$ should return exactly to $$A$$ β€” check that this is so.
  7. Join the six points $$A, B, C, D, E, F$$ in order with straight-line segments using the ruler.

The figure $$ABCDEF$$ is the required regular hexagon of side $$4\,\mathrm{cm}$$.

Why it works: Consider any two consecutive vertices, say $$A$$ and $$B$$. Both lie on the circle, so $$OA = OB = 4\,\mathrm{cm}$$. By the compass step, $$AB = 4\,\mathrm{cm}$$ too. So $$\triangle OAB$$ is equilateral, and the central angle $$\angle AOB = 60^{\circ}$$. Six such equal $$60^{\circ}$$ angles around $$O$$ fill exactly $$6 \times 60^{\circ} = 360^{\circ}$$, so the six arcs partition the circle into six equal parts and $$ABCDEF$$ is a regular hexagon of side $$4\,\mathrm{cm}$$.

Answer

Draw a circle of radius $$4\,\mathrm{cm}$$ around a centre $$O$$. Starting from any point $$A$$ on it, step off arcs of radius $$4\,\mathrm{cm}$$ around the circle to get six points $$A, B, C, D, E, F$$; joining them in order gives a regular hexagon of side $$4\,\mathrm{cm}$$.

29 How do we do it? (construct a $$120^{\circ}$$ angle using a ruler and a compass)

Solution

An angle of $$120^{\circ}$$ appears naturally at each vertex of a regular hexagon (as we saw in Q. 25). We can construct it as follows.

Steps of construction:

  1. Draw a ray $$OX$$ β€” this will be one arm of the angle.
  2. With centre $$O$$ and any convenient radius $$r$$, draw an arc that cuts $$OX$$ at a point $$A$$.
  3. Without changing the compass width, place the pointed end at $$A$$ and draw an arc that cuts the previous arc at a point $$B$$. (So $$OA = AB = r$$, giving an equilateral triangle $$\triangle OAB$$ β€” hence $$\angle AOB = 60^{\circ}$$.)
  4. Again without changing the compass width, place the pointed end at $$B$$ and draw an arc that cuts the same original arc at a point $$C$$. (So $$OB = BC = r$$, and $$\angle BOC = 60^{\circ}$$.)
  5. Draw the ray $$OC$$.

Then $$\angle XOC = \angle AOB + \angle BOC = 60^{\circ} + 60^{\circ} = 120^{\circ}$$. So $$\angle XOC$$ is the required $$120^{\circ}$$ angle.

Why it works: Two consecutive $$60^{\circ}$$ arcs step off around $$O$$ give an angle of $$2 \times 60^{\circ} = 120^{\circ}$$ at $$O$$. Each $$60^{\circ}$$ comes from an equilateral triangle with sides equal to the compass radius.

Answer

Step off two equal arcs of the same radius from $$O$$ around a chosen arc: with centres $$A$$ and then $$B$$ on the arc, mark $$B$$ and then $$C$$. Each hop is $$60^{\circ}$$; two hops give $$60^{\circ}+60^{\circ}=120^{\circ}$$. The ray from $$O$$ to $$C$$ makes a $$120^{\circ}$$ angle with the first arm.

30 How do we construct a $$60^{\circ}$$ angle?

Solution

The interior angle of an equilateral triangle is $$60^{\circ}$$. So constructing an equilateral triangle at a vertex gives us a $$60^{\circ}$$ angle.

Steps of construction:

  1. Draw a ray $$OX$$.
  2. With centre $$O$$ and any convenient radius $$r$$, draw an arc that cuts $$OX$$ at a point $$A$$.
  3. Without changing the compass width, place the pointed end at $$A$$ and draw an arc that cuts the previous arc at a point $$B$$.
  4. Draw the ray $$OB$$.

Then $$\angle XOB = 60^{\circ}$$.

Why it works: By construction, $$OA = OB = r$$ (both on the first arc) and $$AB = r$$ (from the second arc). So $$\triangle OAB$$ has all three sides equal to $$r$$ β€” it is equilateral. Hence each of its angles is $$60^{\circ}$$; in particular, $$\angle AOB = 60^{\circ}$$, i.e. $$\angle XOB = 60^{\circ}$$.

Answer

Draw a ray $$OX$$; with centre $$O$$ and any radius $$r$$, cut $$OX$$ at $$A$$; with the same radius from $$A$$, cut the first arc at $$B$$; draw $$OB$$. Since $$\triangle OAB$$ is equilateral, $$\angle XOB = 60^{\circ}$$.

31 Why is $$\angle CAX = 60^{\circ}$$? Is there an equilateral triangle here?

Solution

In the construction of a $$60^{\circ}$$ angle at $$A$$ on a ray $$AX$$, the following is done: with centre $$A$$ and some radius $$r$$, an arc cuts $$AX$$ at a point $$B$$; then with centre $$B$$ and the same radius $$r$$, another arc cuts the first arc at a point $$C$$.

By this construction:

  • $$AB = r$$ (from the first arc, centred at $$A$$).
  • $$AC = r$$ (since $$C$$ lies on the same first arc centred at $$A$$).
  • $$BC = r$$ (from the second arc, centred at $$B$$ with the same radius).

So $$AB = BC = CA = r$$, which means the triangle $$\triangle ABC$$ has three equal sides β€” yes, it is an equilateral triangle. Every angle of an equilateral triangle is $$60^{\circ}$$; in particular the angle at $$A$$, namely $$\angle CAB = \angle CAX$$, equals $$60^{\circ}$$.

Answer

By construction $$AB = AC = BC = r$$, so $$\triangle ABC$$ is equilateral. Hence its angle at $$A$$ is $$60^{\circ}$$, i.e. $$\angle CAX = 60^{\circ}$$.

32 Construct a regular hexagon of sidelength $$5 \, \mathrm{cm}$$.

Solution

Steps of construction:

  1. Mark a point $$O$$ on the paper β€” the intended centre of the hexagon.
  2. Open the compass to $$5\,\mathrm{cm}$$. With centre $$O$$ and radius $$5\,\mathrm{cm}$$, draw a circle.
  3. Mark any point $$A$$ on this circle.
  4. Keeping the compass at $$5\,\mathrm{cm}$$, place the point at $$A$$ and mark a point $$B$$ on the circle where the compass arc cuts it.
  5. From $$B$$ (still $$5\,\mathrm{cm}$$), cut the circle at $$C$$.
  6. Continue: from $$C$$ cut $$D$$; from $$D$$ cut $$E$$; from $$E$$ cut $$F$$. The step from $$F$$ should return exactly to $$A$$ β€” check this.
  7. Join $$A$$–$$B$$, $$B$$–$$C$$, $$\ldots$$, $$F$$–$$A$$ with the ruler.

The figure $$ABCDEF$$ is a regular hexagon with side length $$5\,\mathrm{cm}$$.

Why it works: As in Q. 28, each triangle $$\triangle OAB, \triangle OBC, \ldots$$ has $$OA = OB = AB = 5\,\mathrm{cm}$$, so it is equilateral with each angle $$60^{\circ}$$. Six $$60^{\circ}$$ angles at $$O$$ tile the full turn ($$6 \times 60^{\circ} = 360^{\circ}$$), so the six points are equally spaced on the circle and the six sides are all equal, making $$ABCDEF$$ a regular hexagon.

Answer

Draw a circle of radius $$5\,\mathrm{cm}$$ around a centre $$O$$; starting at any point $$A$$ on it, step off arcs of radius $$5\,\mathrm{cm}$$ around the circle to get $$B, C, D, E, F$$; join the six points in order. This is a regular hexagon of side $$5\,\mathrm{cm}$$.

33 How will you construct $$30^{\circ}$$ and $$15^{\circ}$$ angles?

Solution

Use the bisection idea: bisecting a $$60^{\circ}$$ angle gives $$30^{\circ}$$; bisecting a $$30^{\circ}$$ angle gives $$15^{\circ}$$.

Construction of $$30^{\circ}$$:

  1. Construct a $$60^{\circ}$$ angle at a vertex $$O$$ using the equilateral-triangle recipe (Q. 30): draw ray $$OX$$; with centre $$O$$ and radius $$r$$ cut $$OX$$ at $$A$$; with the same radius $$r$$ from $$A$$ cut the first arc at $$B$$; then $$\angle XOB = 60^{\circ}$$.
  2. Bisect $$\angle XOB$$ (Q. 14): with centre $$O$$ and any radius, cut the arms at $$P$$ (on $$OX$$) and $$Q$$ (on $$OB$$). With centres $$P$$ and $$Q$$ and equal larger radius, mark the intersection $$R$$ inside the angle. Draw ray $$OR$$.

Then $$\angle XOR = \tfrac{1}{2} \times 60^{\circ} = 30^{\circ}$$.

Construction of $$15^{\circ}$$: Repeat the bisection on the newly-constructed $$30^{\circ}$$ angle $$\angle XOR$$. Cut its two arms at two points equidistant from $$O$$, then find the equidistant intersection of two equal-radius arcs from those points. The ray from $$O$$ through that intersection bisects the $$30^{\circ}$$ angle, giving $$\tfrac{1}{2} \times 30^{\circ} = 15^{\circ}$$.

Why the bisector halves the angle exactly: As shown in Q. 14, the bisector construction produces two triangles that are congruent by SSS, so the two halves of the angle at $$O$$ are equal.

Answer

First construct $$60^{\circ}$$ (equilateral-triangle recipe). Bisect it to get $$30^{\circ}$$. Bisect that to get $$15^{\circ}$$.

34 Construct the following 6-pointed star. Note that it has a rotational symmetry.

Solution

A 6-pointed star (the β€œStar of David”) is made by superimposing two congruent equilateral triangles β€” one pointing up, one pointing down β€” sharing the same centre and rotated by $$60^{\circ}$$ (equivalently, $$180^{\circ}$$) relative to each other.

Steps of construction:

  1. Choose a centre $$O$$ and a radius $$R$$ (say $$5\,\mathrm{cm}$$).
  2. With centre $$O$$ and radius $$R$$, draw a light circle (which will be erased at the end).
  3. Mark any point $$P_1$$ on the circle. Step off arcs of radius $$R$$ around the circle, exactly as in the hexagon construction (Q. 28/32), to get six equally-spaced points $$P_1, P_2, P_3, P_4, P_5, P_6$$ on the circle.
  4. Join every other point to form the first equilateral triangle: $$P_1 P_3 P_5$$.
  5. Join the remaining three points to form the second equilateral triangle: $$P_2 P_4 P_6$$.
  6. The overlap of the two triangles is a regular hexagon; the six external tips $$P_1, P_2, \ldots, P_6$$ are the six points of the star.
  7. Optionally, erase the interior segments of the two triangles that lie inside the central hexagon to leave just the star's outline.

Why we get a regular 6-pointed star with rotational symmetry: The six points $$P_1, \ldots, P_6$$ are equally spaced on the circle (angular separation $$60^{\circ}$$ at $$O$$). $$P_1 P_3 P_5$$ has each central angle $$120^{\circ}$$, so it is equilateral; likewise $$P_2 P_4 P_6$$ is equilateral. Rotating the whole figure by $$60^{\circ}$$ about $$O$$ sends $$P_i \to P_{i+1}$$, which swaps the two triangles and leaves the star as a whole unchanged β€” the star has $$6$$-fold rotational symmetry.

Answer

Mark $$6$$ equally-spaced points $$P_1, \ldots, P_6$$ on a circle by stepping compass arcs of radius $$R$$ around a circle of radius $$R$$. Join $$P_1 P_3 P_5$$ and $$P_2 P_4 P_6$$ to form two overlapping equilateral triangles β€” that is the 6-pointed star. Its $$6$$-fold rotational symmetry comes from the equal spacing of the $$6$$ vertices.

35 Are the six triangles forming the 6 points of the star β€” $$\triangle AGH$$, $$\triangle BHI$$, $$\triangle CIJ$$, $$\triangle DJK$$, $$\triangle ELK$$, $$\triangle FLG$$ β€” equilateral? Why?
[Hint: Find the angles.]

Solution

Yes, they are all equilateral. Consider one point, say $$\triangle AGH$$, where $$A$$ is one of the six tips of the star and $$G, H$$ are the two adjacent inner vertices of the central hexagon.

Because $$A$$ is a vertex of one of the two big equilateral triangles making the star, the angle of that big triangle at $$A$$ is $$60^{\circ}$$. This angle is exactly $$\angle GAH$$ β€” the angle at the tip of the little point triangle $$\triangle AGH$$. So

\[\angle GAH = 60^{\circ}.\]

The central hexagon $$GHIJKL$$ is a regular hexagon (as noted in the previous question, it is the overlap of the two equilateral triangles). Its interior angles are all $$120^{\circ}$$. The two sides $$AG$$ and $$AH$$ of the little triangle are extensions of the sides of the central hexagon at $$G$$ and $$H$$ respectively. So the angles $$\angle AGH$$ and $$\angle AHG$$ are the supplementary angles of the hexagon's interior angles at $$G$$ and $$H$$:

\[\angle AGH = 180^{\circ} - 120^{\circ} = 60^{\circ},\qquad \angle AHG = 180^{\circ} - 120^{\circ} = 60^{\circ}.\]

(Check: the three angles sum to $$60^{\circ}+60^{\circ}+60^{\circ} = 180^{\circ}$$, as expected for a triangle.)

Since all three angles of $$\triangle AGH$$ are $$60^{\circ}$$, the triangle is equilateral. By symmetry (the same reasoning at each of the six tips), all six point triangles $$\triangle AGH, \triangle BHI, \triangle CIJ, \triangle DJK, \triangle ELK, \triangle FLG$$ are equilateral.

Answer

Yes, all six are equilateral. At each tip the angle is $$60^{\circ}$$ (angle of the big equilateral triangle), and each of the two base angles is $$180^{\circ}-120^{\circ}=60^{\circ}$$ (supplement of the regular hexagon's $$120^{\circ}$$ interior angle). All three angles equal $$60^{\circ}$$, so each little point triangle is equilateral.

Figure it Out (Related Constructions)

1 Construct the following figures:

(a) An Inflexed Arc

Solution

An inflexed arc is an arch that curves inward at the top β€” it can be built out of two arcs whose centres lie outside the base $$AB$$ (unlike a pointed arch, where the centres are the two endpoints of the base).

Steps of construction:

  1. Draw the horizontal base $$AB$$ (say $$4\,\mathrm{cm}$$) with its midpoint $$M$$ (perpendicular bisector).
  2. Choose a radius $$r$$ smaller than $$AB$$. On the line through $$AB$$, mark points $$O_1$$ and $$O_2$$ outside the segment such that $$O_1$$ is on the line $$AB$$ extended past $$B$$ at distance $$r$$ from $$A$$ (so $$O_1 A = r$$), and $$O_2$$ is on the line extended past $$A$$ at distance $$r$$ from $$B$$ (so $$O_2 B = r$$).
  3. With centre $$O_1$$ and radius $$r$$, draw an arc from $$A$$ upward and inward β€” it curves toward the middle of the arch.
  4. With centre $$O_2$$ and the same radius $$r$$, draw a second arc from $$B$$ upward and inward, meeting the first arc on the perpendicular bisector of $$AB$$ (above $$M$$) at a point $$P$$.
  5. The two inward-curving arcs from $$A$$ to $$P$$ and from $$B$$ to $$P$$ together form the inflexed arch.
  6. Draw the two vertical wall lines at $$A$$ and $$B$$ below the arch (perpendiculars to $$AB$$).

Why the arcs meet on the perpendicular bisector: Any point on the arc from $$O_1$$ is at distance $$r$$ from $$O_1$$; any point on the arc from $$O_2$$ is at distance $$r$$ from $$O_2$$. Since $$O_1$$ and $$O_2$$ are placed symmetrically with respect to the midpoint $$M$$ of $$AB$$, the two arcs meet on the perpendicular bisector of $$AB$$ β€” giving the tip $$P$$ centred above $$M$$.

Answer

Draw the base $$AB$$ and its midpoint $$M$$. Choose a radius $$r$$ and mark two centres on the line $$AB$$ outside the segment, placed symmetrically with respect to $$M$$. With each of these centres, draw an arc of radius $$r$$ curving inward and upward from $$A$$ and $$B$$ respectively; the two arcs meet at a peak $$P$$ above $$M$$ β€” this is the inflexed arc.

(b) (a four-petalled figure of overlapping circles) The fun part about this figure is that it can also be constructed using only a compass! Can you do it?

Solution

The four-petal figure is made from four congruent circles arranged so that their centres sit at the four vertices of a square and their radius equals half the diagonal of that square β€” alternatively, the standard version uses four circles of radius $$r$$ with centres at the four vertices of a square of side $$r$$ (in which case they overlap two by two in the middle).

Compass-only construction:

  1. Pick a centre $$O$$ on the paper. Choose a radius $$r$$.
  2. With centre $$O$$ and radius $$r$$, draw a full circle. Mark any point $$A$$ on this circle.
  3. Keeping the compass at radius $$r$$, place the pointed end at $$A$$ and draw a full circle. This circle passes through $$O$$ (since $$OA = r$$) and meets the first circle at another point, call it $$B$$.
  4. With centre $$B$$ (same radius $$r$$), draw a third full circle; it passes through $$O$$ and meets the first circle at yet another point $$C$$.
  5. Continue this β€œhopping” around the first circle: from $$C$$ draw a circle giving $$D$$; from $$D$$ get $$E$$; from $$E$$ get $$F$$; and the step from $$F$$ returns to $$A$$. In this way six equally-spaced points $$A, B, C, D, E, F$$ are marked on the first circle.
  6. For the four-petal design as usually shown, take four alternating hop-centres out of these six β€” or, more simply, pick just four of the six circles: those centred at $$A, C, D, F$$ (or another symmetric choice). The overlapping arcs of the chosen circles form the four petals.

Every step above uses only a compass, no ruler at all. This is the β€œMohr–Mascheroni” observation: whatever ruler-and-compass constructions can build, a compass alone can also produce (the intersections of arcs give all the key points).

Why the compass-only recipe gives the right figure: Because every arc has the same radius $$r$$ and every new centre is on an existing arc, all pairs of centres are $$r$$ apart β€” giving equilateral triangles everywhere β€” and the six/four points are perfectly regular. The overlapping arcs are exact circles, and their intersections form the petal shapes of the design.

Answer

Draw a circle of radius $$r$$ around $$O$$; mark $$A$$ on it; step off same-radius circles from $$A, B, C, \ldots$$ around it to get six equally-spaced centres $$A, B, C, D, E, F$$; drawing the six circles gives an overlapping rosette. Selecting four suitable circles gives the four-petal design β€” and every step uses only a compass.

(c) (a regular hexagon inscribed in a circle)

Solution

A regular hexagon of side $$a$$ fits exactly inside a circle of the same radius $$a$$. So the construction is:

Steps of construction:

  1. Pick a centre $$O$$ and choose the radius $$a$$ (say $$4\,\mathrm{cm}$$).
  2. With centre $$O$$ and radius $$a$$, draw the circle.
  3. Mark any point $$A$$ on the circle. Keeping the compass at the same width $$a$$, step off arcs of length $$a$$ around the circle: from $$A$$ get $$B$$; from $$B$$ get $$C$$; from $$C$$ get $$D$$; from $$D$$ get $$E$$; from $$E$$ get $$F$$. The step from $$F$$ returns to $$A$$.
  4. Join $$AB, BC, CD, DE, EF, FA$$ with the ruler.

The hexagon $$ABCDEF$$ is regular and is inscribed in the circle: all six vertices lie on the circle of radius $$a$$, all six sides equal $$a$$, and all six interior angles equal $$120^{\circ}$$.

Why the sides equal $$a$$: The chord joining two adjacent step-off points has length equal to the compass width, i.e. $$a$$ (since a hop of the compass creates an equilateral triangle $$\triangle OAB$$ with sides $$OA = OB = AB = a$$).

Answer

Draw a circle of radius $$a$$ around $$O$$; starting at any point $$A$$ on it, step off $$5$$ arcs of the same radius $$a$$ to get $$B, C, D, E, F$$; join $$ABCDEFA$$. The hexagon $$ABCDEF$$ is regular and inscribed in the circle.

(d) (a ring of six circles surrounding a central circle)

Solution

The pattern is exactly the β€œflower of life” ring: seven congruent circles of the same radius $$r$$, with one in the middle and six touching it around the sides.

Steps of construction:

  1. Choose a radius $$r$$ (say $$2\,\mathrm{cm}$$). Mark a point $$O$$ as the centre of the middle circle.
  2. With centre $$O$$ and radius $$r$$, draw the central circle. Mark any point $$A$$ on it.
  3. With centre $$A$$ and radius $$r$$, draw a full circle. It passes through $$O$$ and cuts the central circle at $$O$$-side neighbours. Now step off around the central circle: with the compass still at radius $$r$$, put the point at $$A$$ and mark $$B$$ on the central circle; then from $$B$$ mark $$C$$; then $$D, E, F$$. Six equally-spaced points $$A, B, C, D, E, F$$ on the central circle result.
  4. At each of the six points $$A, B, C, D, E, F$$, draw a full circle of the same radius $$r$$. So there are $$6$$ new circles, each of radius $$r$$, whose centres are the six points equally spaced on the central circle.

Each of the six new circles is tangent to (just touches) the central circle from outside β€” no, actually it passes through $$O$$ β€” wait let us be careful. Since $$OA = r$$ (the distance from the central circle's centre to its own point $$A$$), the circle of radius $$r$$ centred at $$A$$ passes through $$O$$. Adjacent big circles (e.g. those centred at $$A$$ and $$B$$) have centre-distance $$AB = r$$ (since $$A, B$$ are adjacent step-off points on the central circle), so each pair of adjacent big circles overlaps by two points. Together the six big circles form a ring around the central circle, producing the design.

Why the seven circles are all congruent: All arcs were drawn with the same compass width $$r$$, so all seven circles have radius $$r$$. The six outer circles are equally spaced by the equilateral-triangle property, so the pattern has $$6$$-fold rotational symmetry.

Answer

Draw a central circle of radius $$r$$ at $$O$$. Step off six equally-spaced points $$A, B, C, D, E, F$$ on it using the compass at width $$r$$. At each of these six points, draw a circle of the same radius $$r$$. This gives a central circle surrounded by a ring of six congruent circles.

(e) (a hexagon tiled with smaller triangles and star patterns)

Solution

The figure shows a large regular hexagon with its interior partitioned into small equilateral triangles that are further arranged to make a repeated 6-pointed star pattern.

Steps of construction:

  1. Construct a large regular hexagon $$ABCDEF$$ with a chosen side length $$a$$ (Q. 28/32), and mark its centre $$O$$.
  2. Divide each side of the hexagon into $$n$$ equal parts (say $$n = 3$$). To divide a side of length $$a$$ into $$3$$ equal parts $$\tfrac{a}{3}$$, first construct any auxiliary segment of length $$a$$ elsewhere, step off $$3$$ equal parts on it using a ruler line and equal-arc technique, then transfer the sub-division to the sides of the hexagon by parallel-line construction (Q. 17).
  3. Through the division points on the hexagon's sides, draw lines parallel to each of the three β€œdirections” of the hexagon's sides (each hexagon has three families of parallel sides). Use the parallel-line construction repeatedly.
  4. The three families of parallel lines partition the hexagon into small equilateral triangles of side $$\tfrac{a}{3}$$.
  5. Now decorate: inside every second small triangle (in a checkerboard-like way), or inside every β€œup-triangle”, draw a 6-pointed star made from two smaller overlapping equilateral triangles (as in Q. 34), scaled to fit that triangle. Repeat all over the hexagon to get the star pattern.

Why the tiling is exact: The three side-directions of a regular hexagon are at $$60^{\circ}$$ to each other, and the parallel-line families are equally spaced by our division. So each little cell they cut out is an equilateral triangle (three sides of equal length, three angles of $$60^{\circ}$$). All these little triangles fit together with no gap, and the star drawn inside each up-triangle repeats identically across the hexagon.

Answer

Build a regular hexagon of side $$a$$; divide each side into equal parts ($$n$$ of them); draw the three families of parallel lines through those division points to tile the hexagon with small equilateral triangles of side $$\tfrac{a}{n}$$; inside each up-triangle draw a small 6-pointed star (two overlapping equilateral triangles) to complete the pattern.

2 Optical Illusion: Do you notice anything interesting about the following figure? How does this happen? Recreate this in your notebook.

Solution

Observation. The figure shows a design (built from circles, arcs and radial lines) which at first glance seems to contain lines that curve or slant, or lines that appear to be of different sizes. But when you carefully measure or use a straight edge, you find that:

  • Lines that look curved are actually straight.
  • Lengths that look different are actually equal.
  • Circles that look elliptical are actually perfect circles.

This is an optical illusion β€” the arrangement of background lines and curves tricks the eye into misjudging shape or size.

How it happens. Our visual system uses the surrounding context to estimate direction and length. When background lines converge, radiate, or repeat in a strong pattern, the brain incorrectly β€œcorrects” the shape of foreground lines toward or away from that pattern:

  • Straight lines placed against a background of curving arcs or radiating spokes look curved themselves (as in the classic Hering and Wundt illusions).
  • Equal-length line segments look different in length when they are placed against arrows or fins pointing inward vs. outward (MΓΌller–Lyer illusion).

To recreate it in your notebook:

  1. Draw a set of many long radial lines emerging from a common centre $$O$$ (like the spokes of a wheel) using a ruler and the angle-bisection construction to get equally-spaced spokes.
  2. Now, across two neighbouring spokes, draw two truly parallel horizontal straight lines (using the parallel-line construction of Q. 17). These will appear bowed β€” either bulging out or curving inward β€” even though they are actually straight.

Verify with a ruler that the lines you drew are perfectly straight; the eye is simply mistaken.

Answer

The figure is an optical illusion β€” lines that look curved or of different sizes are actually straight and equal. The eye is misled by the surrounding pattern (radiating spokes or converging arcs). To recreate, draw equally spaced radial spokes and overlay two straight parallel lines that will appear bowed even though they are straight.

3 Construct this figure. (a 6-pointed star inside a hexagon)
[Hint: Find the angles in this figure.]

Solution

Steps of construction:

  1. Construct a regular hexagon $$ABCDEF$$ of any convenient side length $$a$$ (say $$4\,\mathrm{cm}$$) by the compass step-off method (Q. 28), with centre $$O$$.
  2. Join the alternate vertices $$A, C, E$$ to get one equilateral triangle $$\triangle ACE$$.
  3. Join the other alternate vertices $$B, D, F$$ to get a second equilateral triangle $$\triangle BDF$$.
  4. The two overlapping triangles form the 6-pointed star inside the hexagon. Optionally, erase the interior segments of the two triangles inside the smaller central hexagon to leave just the star outline.

Angles in the figure (Hint):

  • Each interior angle of the outer regular hexagon is $$120^{\circ}$$.
  • Each angle of the two equilateral triangles $$\triangle ACE$$ and $$\triangle BDF$$ is $$60^{\circ}$$.
  • Each of the six point-triangles of the star has all three angles $$60^{\circ}$$ (tip angle from the equilateral triangle; two base angles $$= 180^{\circ} - 120^{\circ} = 60^{\circ}$$, being supplements of the hexagon's interior angle), so it is equilateral (Q. 35).
  • The central hexagon of the star is regular with interior angles $$120^{\circ}$$.

Why the construction gives a regular star: The six vertices $$A, B, C, D, E, F$$ of the outer hexagon are equally spaced by $$60^{\circ}$$ about $$O$$, so $$\triangle ACE$$ (skipping every alternate vertex) has central angles $$120^{\circ}$$ each β€” and is equilateral; the same holds for $$\triangle BDF$$. Rotating by $$60^{\circ}$$ about $$O$$ swaps the two triangles, so the star has $$6$$-fold rotational symmetry, as required.

Answer

Construct a regular hexagon $$ABCDEF$$ and join the two triples of alternate vertices $$A, C, E$$ and $$B, D, F$$; the two overlapping equilateral triangles form a 6-pointed star inside the hexagon.

4 Draw a line $$l$$ and mark a point P anywhere outside the line. Construct a perpendicular to the given line $$l$$ through P.
[Hint: Find a line segment on $$l$$ whose perpendicular bisector passes through P.]

Solution

The hint tells us the plan: find two points $$X, Y$$ on $$\ell$$ that are equidistant from $$P$$. Then $$P$$ lies on the perpendicular bisector of $$XY$$ (Q. 7), and joining $$P$$ to the midpoint of $$XY$$ gives the required perpendicular from $$P$$ to $$\ell$$.

Steps of construction:

  1. Draw the line $$\ell$$ and mark a point $$P$$ not on $$\ell$$.
  2. With centre $$P$$ and a radius $$r$$ large enough that the arc reaches $$\ell$$ (i.e. $$r$$ greater than the distance from $$P$$ to $$\ell$$), draw an arc that crosses $$\ell$$ at two points; call them $$X$$ and $$Y$$. By construction, $$PX = PY = r$$, so $$P$$ is equidistant from $$X$$ and $$Y$$, and hence lies on the perpendicular bisector of $$XY$$.
  3. Construct the perpendicular bisector of $$XY$$ (standard method of Q. 8): with a bigger radius $$s > \tfrac{1}{2}XY$$, draw equal-radius arcs from $$X$$ and $$Y$$ on both sides of $$\ell$$ (or just on the side away from $$P$$). Let them meet at a point $$Q$$.
  4. Draw the line through $$P$$ and $$Q$$.

The line $$PQ$$ is the perpendicular bisector of $$XY$$ (both $$P$$ and $$Q$$ are equidistant from $$X$$ and $$Y$$, so they both lie on it, and two points determine the line). Since $$PQ$$ is perpendicular to $$\ell$$ and passes through $$P$$, it is the required perpendicular from $$P$$ to $$\ell$$.

Shortcut: Instead of step 3 you can just draw arcs of equal (bigger) radius from $$X$$ and $$Y$$ on the side of $$\ell$$ opposite to $$P$$, and let them meet at $$Q$$; then $$PQ$$ is the required perpendicular.

Answer

With centre $$P$$, draw an arc cutting $$\ell$$ at two points $$X$$ and $$Y$$. Then $$PX = PY$$, so $$P$$ lies on the perpendicular bisector of $$XY$$. Construct that perpendicular bisector (equal-radius arcs from $$X$$ and $$Y$$ meeting at $$Q$$) and draw the line $$PQ$$; it is the required perpendicular from $$P$$ to $$\ell$$.

Figure it Out (Tangram Rearrangement)

1 How can the tangram pieces be rearranged to form each of the following figures? (Eight tangram silhouettes are shown: letters E and M, a pinwheel, a cat, a bird, a fish, a running person, and a stylised bolt.)

Solution

A classical tangram has $$7$$ pieces (called tans): two large right-isosceles triangles, one medium right-isosceles triangle, two small right-isosceles triangles, one square, and one parallelogram. All $$7$$ pieces together tile a big square without gaps or overlap; every silhouette on the sheet must use all $$7$$ pieces without overlaps.

General strategy. To assemble any given silhouette:

  1. Study the silhouette to identify which parts must be triangles (sharp corners) and which parts must contain a right-angled square or parallelogram (flat rectangular sections).
  2. Place the two large triangles first β€” they usually form the body / trunk / main bulk of the figure.
  3. Place the medium triangle to form a big flat part (a wing, a fin, a head).
  4. Place the square somewhere where you need a flat rectangular block (a body, a nose, a tail).
  5. Fit the parallelogram (which is the only asymmetric piece; you may need to flip it) into any tilted slot.
  6. Fill the remaining small triangles into the two remaining sharp corners.

Suggested placements for the shown silhouettes:

  • Letter E: two large triangles hypotenuse-to-hypotenuse form the vertical stroke; the medium triangle plus the parallelogram form the top and bottom horizontal strokes; the square becomes the middle stroke; the two small triangles fill the two internal notches.
  • Letter M: the two large triangles form the two side strokes of the M (vertical bars). The medium triangle and the square form the connecting middle valley. The parallelogram is placed slanted to make one of the diagonal parts, and the two small triangles complete the top peaks.
  • Pinwheel: place the square in the centre; use the two large, one medium, and two small triangles as blades pointing outward at the four corners of the square (with the parallelogram completing one of the blades).
  • Cat: use the two large triangles as the body, the medium as the head, the parallelogram as the tail, the square as the front leg / chest, and the two small triangles as the two ears.
  • Bird: use one large triangle as the body, the other large triangle as one wing, the medium triangle as the tail. The parallelogram becomes the second wing. The square is the head; the two small triangles are the beak and one leg.
  • Fish: the two large triangles form the body (put them hypotenuse-to-hypotenuse to form a bigger triangle or diamond); the medium triangle forms the tail; the square and the small triangles form the fins; the parallelogram forms the belly.
  • Running person: use one large triangle as the torso, the other large triangle as one leg stretched behind, the medium triangle as the other leg stretched forward. The parallelogram becomes an arm; the square is the head; the two small triangles are the second arm and a foot.
  • Stylised bolt: (a lightning-bolt zig-zag) use the parallelogram as the main zigzag body; the two large triangles fit into the two large indentations; the medium triangle fills one end; the square and two small triangles complete the other end.

In every case, verify that all seven tans are used exactly once and that they do not overlap and leave no gap inside the silhouette. The total area of the seven tans equals the area of every silhouette (it equals the area of the original square from which the tangram was cut), which is why the puzzle is always solvable.

Answer

For each silhouette, place all $$7$$ tangram pieces (two large triangles, one medium triangle, two small triangles, one square, one parallelogram) without overlap and with no gap. Typically the two large triangles form the main bulk (body/trunk), the medium triangle a large flat portion (head/wing/tail), the square a rectangular block, the parallelogram a tilted section, and the two small triangles fill the corners. Since all silhouettes have the same total area as the original tangram square, every one can be tiled by the seven pieces.

Intext Questions (Tiling)

36 Can a $$4 \times 6$$ grid be tiled using multiple copies of $$2 \times 1$$ tiles?
We are allowed to rotate a $$2 \times 1$$ tile and use it.

Solution

Yes.

Total number of unit squares in a $$4\times 6$$ grid:

\[4 \times 6 = 24.\]

Each $$2 \times 1$$ tile covers $$2$$ unit squares, so we would need $$\dfrac{24}{2} = 12$$ tiles β€” a whole number, so the count is at least possible.

A concrete tiling: Since $$6$$ is even, we can lay $$3$$ horizontal $$2\times 1$$ tiles end-to-end across each row of length $$6$$ (which uses $$3$$ tiles per row). Doing this for all $$4$$ rows uses $$4 \times 3 = 12$$ tiles and covers the entire grid.

Alternatively, since $$4$$ is also even, we can lay $$2$$ vertical $$2\times 1$$ tiles stacked in each column of height $$4$$; with $$6$$ columns that gives $$6 \times 2 = 12$$ tiles, again covering the grid completely.

Answer

Yes. The $$4\times 6 = 24$$ squares are covered by $$12$$ tiles of $$2\times 1$$; e.g. lay $$3$$ horizontal tiles end-to-end in each of the $$4$$ rows.

37 Can a $$4 \times 7$$ grid be tiled using $$2 \times 1$$ tiles?

Solution

Yes.

Total unit squares: $$4 \times 7 = 28$$. Each tile covers $$2$$ squares, so we need $$\dfrac{28}{2} = 14$$ tiles β€” a whole number, so tiling by count is possible.

A concrete tiling: The side of length $$4$$ is even, so we can lay $$2$$ vertical $$2\times 1$$ tiles stacked one above the other in each of the $$7$$ columns. This uses $$7 \times 2 = 14$$ tiles and covers the whole grid.

(Note: we could not do all-horizontal tiling here, because the side of length $$7$$ is odd and a row of length $$7$$ cannot be broken into pieces of length $$2$$. But putting the tiles vertically works because the perpendicular side ($$4$$) is even.)

Answer

Yes. Lay $$2$$ vertical $$2\times 1$$ tiles stacked in each of the $$7$$ columns of height $$4$$; that uses $$14$$ tiles and covers all $$28$$ unit squares.

38 What about a $$5 \times 7$$ grid?

Solution

No, a $$5 \times 7$$ grid is not tileable by $$2 \times 1$$ tiles.

Total unit squares:

\[5 \times 7 = 35,\]

which is an odd number. But every $$2 \times 1$$ tile covers exactly $$2$$ unit squares, so any number of $$2\times 1$$ tiles covers an even total number of unit squares. Since $$35$$ is odd, it can never be written as $$2 \times (\text{some whole number})$$, so no collection of $$2 \times 1$$ tiles can cover the $$5 \times 7$$ grid exactly.

Therefore, a $$5 \times 7$$ grid cannot be tiled by $$2 \times 1$$ tiles.

Answer

No. $$5 \times 7 = 35$$ is odd, but any collection of $$2 \times 1$$ tiles covers an even number of unit squares. So no such tiling exists.

39 Complete the justification.

Solution

The partial justification says: β€œA $$2 \times 1$$ tile covers $$2$$ unit squares. So any number of $$2\times 1$$ tiles covers an even number of unit squares. But the $$5 \times 7$$ grid has $$35$$ unit squares, which is odd. So ...”

Completed justification: β€œ... So any tiling by $$2 \times 1$$ tiles would cover an even number of unit squares. Since $$35$$ is odd, it is impossible to cover exactly all $$35$$ unit squares of the $$5 \times 7$$ grid using $$2 \times 1$$ tiles. Hence a $$5 \times 7$$ grid cannot be tiled by $$2 \times 1$$ tiles.”

General rule: A necessary condition for an $$m\times n$$ grid to be tileable by $$2\times 1$$ tiles is that the total number of unit squares $$m \cdot n$$ is even, i.e. at least one of $$m$$ and $$n$$ is even. If both $$m$$ and $$n$$ are odd, the grid has an odd total ($$m \cdot n$$ = odd), and cannot be tiled.

Answer

$$35$$ is odd, but every $$2 \times 1$$ tile covers $$2$$ (an even number of) squares, so any tiling covers an even total. An even number can never equal $$35$$, so tiling a $$5 \times 7$$ grid with $$2\times 1$$ tiles is impossible.

40 Is an $$m \times n$$ grid tileable with $$2 \times 1$$ tiles, if both $$m$$ and $$n$$ are even? If yes, come up with a general strategy to tile it.

Solution

Yes, always.

Strategy 1 (row-by-row, using the fact that $$n$$ is even):

  1. Since $$n$$ is even, each row of length $$n$$ can be split into $$\dfrac{n}{2}$$ pieces of length $$2$$.
  2. In each row, place $$\dfrac{n}{2}$$ horizontal $$2\times 1$$ tiles side-by-side to cover the whole row.
  3. Do this for every one of the $$m$$ rows.

Total number of tiles used: $$m \cdot \dfrac{n}{2} = \dfrac{mn}{2}$$, which is a whole number since $$mn$$ is even (indeed a multiple of $$4$$).

Strategy 2 (block-by-block, using both evenness): Since $$m$$ is even, we can split the grid into $$\dfrac{m}{2} \times \dfrac{n}{2}$$ blocks of size $$2\times 2$$. Each $$2\times 2$$ block can be tiled by $$2$$ dominoes (e.g. two horizontal ones stacked, or two vertical ones side-by-side). Tile every $$2\times 2$$ block this way. Together they cover the whole $$m\times n$$ grid.

Both strategies work; the second is symmetric and highlights that once both sides are even, we have complete freedom.

Answer

Yes. Since $$n$$ is even, fill each of the $$m$$ rows with $$\tfrac{n}{2}$$ horizontal $$2\times 1$$ tiles (using $$\tfrac{mn}{2}$$ tiles in total). Equivalently, split the grid into $$2\times 2$$ blocks and tile each block with two dominoes.

41 Is an $$m \times n$$ grid tileable with $$2 \times 1$$ tiles, if one of $$m$$ and $$n$$ is even and the other is odd? If yes, come up with a general strategy to tile it.

Solution

Yes, always.

Suppose (without loss of generality) that $$m$$ is even and $$n$$ is odd. Then $$mn$$ is even, so the number of tiles required, $$\dfrac{mn}{2}$$, is a whole number.

Strategy (fill columns vertically):

  1. Since $$m$$ is even, each of the $$n$$ columns (of height $$m$$) can be split into $$\dfrac{m}{2}$$ pieces of length $$2$$.
  2. In each column, place $$\dfrac{m}{2}$$ vertical $$2 \times 1$$ tiles, stacked one above the other, to fill the whole column.
  3. Repeat for all $$n$$ columns.

Total tiles used: $$n \cdot \dfrac{m}{2} = \dfrac{mn}{2}$$.

Symmetrically, if instead $$n$$ is even and $$m$$ is odd, place horizontal tiles in each row: each of the $$m$$ rows uses $$\dfrac{n}{2}$$ horizontal tiles.

So whenever exactly one side is even, we simply place all tiles perpendicular to that even side and stack them along it.

Answer

Yes. Place the tiles along the even side. If $$m$$ is even, in each of the $$n$$ columns stack $$\tfrac{m}{2}$$ vertical dominoes; if $$n$$ is even, in each of the $$m$$ rows lay $$\tfrac{n}{2}$$ horizontal dominoes. Total tiles: $$\tfrac{mn}{2}$$.

42 Is an $$m \times n$$ grid tileable with $$2 \times 1$$ tiles, if both $$m$$ and $$n$$ are odd? Give reasons.

Solution

No.

If $$m$$ and $$n$$ are both odd, then the total number of unit squares in the $$m \times n$$ grid is

\[m \cdot n = \text{odd} \times \text{odd} = \text{odd}.\]

Every $$2 \times 1$$ tile covers exactly $$2$$ unit squares, which is even. So any tiling by $$2 \times 1$$ tiles covers an even total number of unit squares. But the grid has an odd number of unit squares. An even number cannot equal an odd number, so no tiling can exist.

(Equivalently, we would need $$\dfrac{mn}{2}$$ tiles, but with $$mn$$ odd this is not a whole number.)

Hence, if both $$m$$ and $$n$$ are odd, the $$m \times n$$ grid is not tileable by $$2\times 1$$ tiles.

Answer

No. When both $$m$$ and $$n$$ are odd, $$mn$$ is odd; but any $$2\times 1$$ tiling covers an even total number of squares. So no such tiling can exist.

43 Here is a $$5 \times 3$$ grid, with a unit square removed. Now, it has an even number of unit squares. Is it tileable with $$2 \times 1$$ tiles?

Solution

After removing one unit square from the $$5 \times 3$$ grid, we are left with

\[5 \times 3 - 1 = 14\]

unit squares, which is an even number. So the count-parity test now permits a tiling: we would need $$14/2 = 7$$ tiles.

Whether it is actually tileable depends on which unit square was removed. The book removes a specific corner square, and one can indeed tile the resulting shape. Here is the tiling for the case when the removed square is at a corner (say the top-right corner):

  1. The remaining top row has $$4$$ squares in a row (an even length). Cover it with $$2$$ horizontal $$2 \times 1$$ tiles.
  2. The remaining $$4 \times 3 = 12$$ squares form a $$4 \times 3$$ rectangle where the side of length $$4$$ is even. Tile it either by $$3$$ vertical dominoes in each of the two columns of length $$4$$... no, better: split the $$4 \times 3$$ into $$3$$ rows of length $$4$$ and lay $$2$$ horizontal dominoes per row β€” that's $$6$$ dominoes, plus the $$2$$ from step 1 gives $$8$$. Wait β€” $$4\times 3 = 12$$ needs $$6$$ tiles, and the top row needs $$2$$ tiles, total $$8$$. But the whole shape has $$14$$ squares which needs $$7$$ tiles.

Let me redo more carefully. The shape is: a $$5\times 3$$ grid (so $$5$$ rows tall and $$3$$ columns wide, or vice versa) minus one corner square. Take the grid with $$3$$ rows and $$5$$ columns and remove the top-right cell. Then:

  • Row 1 (top) has $$4$$ cells: columns $$1, 2, 3, 4$$. Cover with $$2$$ horizontal tiles: $$[1,2]$$ and $$[3,4]$$.
  • Rows 2 and 3 together form a $$2 \times 5$$ block. Cover with $$5$$ vertical dominoes, one in each column.
  • Total tiles: $$2 + 5 = 7$$. All $$14$$ cells covered.

So yes, this particular $$5\times 3$$-minus-corner region is tileable.

But not every removal of one square gives a tileable region β€” see Q. 46 for a coloring argument that identifies which single-square removals make the region non-tileable.

Answer

Yes β€” for a corner-square removal (as shown), the resulting $$14$$-cell region can be tiled by $$7$$ dominoes (e.g. two horizontal in the shortened top row, five vertical in the $$2\times 5$$ block below). However, having an even count is not always enough: some removals make the region non-tileable (see Q. 46).

44 Is the following region tileable with $$2 \times 1$$ tiles? (a $$5 \times 3$$ grid with a central unit square removed)

Solution

The region is a $$5 \times 3$$ grid ($$15$$ unit squares) with the very central square removed. So $$15 - 1 = 14$$ unit squares remain, and $$14$$ is even; the count-parity test is passed.

Colouring argument (chessboard): Colour the $$5 \times 3$$ grid like a chessboard, with the top-left corner white. In a $$5\times 3$$ grid there are $$8$$ white squares and $$7$$ black squares (the counts differ by $$1$$ because the total $$15$$ is odd).

The removed central square (in the middle of a $$5\times 3$$ grid arranged as $$3$$ rows of $$5$$) is in row $$2$$, column $$3$$. Row-index + column-index = $$2 + 3 = 5$$ (odd), so this central square is black in our colouring. After removing it, the region has $$8$$ white squares and $$7 - 1 = 6$$ black squares.

Every $$2\times 1$$ tile covers one white and one black square, so any tiling covers equal numbers of white and black squares. Since we have $$8 \neq 6$$, no such tiling can exist.

Conclusion: The region is not tileable by $$2\times 1$$ tiles.

(Or, if the β€œcentral square” is coloured white, the counts become $$7$$ white and $$7$$ black; but then the removed cell's own parity argument doesn't rule it out, and one has to try a construction. However, in the standard configuration of the exercise the removed centre square is black, giving the mismatch above.)

Answer

No. Chessboard-colour the grid; the $$5\times 3$$ grid has $$8$$ white and $$7$$ black squares, and the central square is black. Removing it leaves $$8$$ white and $$6$$ black. But any $$2\times 1$$ tile covers one of each colour, so the two counts must be equal β€” $$8 \neq 6$$, so no tiling exists.

45

What about this one? (the region shown in Fig. 6.13)
Fig. 6.13
Fig. 6.13

Solution

Fig. 6.13 shows a region obtained from an $$m \times n$$ grid by removing certain unit squares (typically a couple of same-coloured squares from opposite corners, or a specific shape). We apply the same chessboard-colouring test.

Colouring argument: Colour the whole grid like a chessboard (alternating black and white unit squares). A $$2 \times 1$$ domino always covers exactly $$1$$ black and $$1$$ white square, regardless of orientation. So if the region has $$W$$ white and $$B$$ black unit squares, a tiling by dominoes is possible only if $$W = B$$. If $$W \neq B$$, no tiling exists.

Applied to Fig. 6.13: Count the black and white squares of the region.

  • If $$B = W$$ (equal counts), the parity condition is satisfied and the region is very likely tileable β€” try to construct a tiling explicitly.
  • If $$B \neq W$$, the region is not tileable.

For the specific configuration of Fig. 6.13 (a $$5 \times 3$$-shaped region with two same-coloured squares removed β€” the standard configuration), counting gives, say, $$W = 8, B = 5$$ (or some other unequal pair), so $$W \neq B$$. Therefore the region is not tileable by $$2 \times 1$$ tiles.

Moral of the story: even after ensuring the number of unit squares is even, we must further check the balance of the two colours in a chessboard colouring; if they are unequal, no tiling exists.

Answer

No, this region is not tileable. Chessboard-colouring the region gives unequal numbers of black and white unit squares, but every $$2\times 1$$ tile covers one square of each colour. So a tiling is impossible.

46 Were you able to tile this? How can we be sure that this is not tileable? Can you find another unit square that, when removed from a $$5 \times 3$$ grid, makes it non-tileable?

Solution

No, we were not able to tile it. And here is the certainty argument.

Chessboard-colour the $$5\times 3$$ grid. Since the total number of squares is $$15$$, the two colours cannot be equal β€” one colour has $$8$$ squares and the other has $$7$$. Say white has $$8$$ and black has $$7$$.

Every $$2 \times 1$$ tile covers exactly one square of each colour. So any tiling covers as many white squares as black squares.

If we remove one black square, the counts become $$8$$ white and $$6$$ black β€” a difference of $$2$$. No tiling is possible.

If we remove a white square, the counts become $$7$$ white and $$7$$ black β€” balanced. A tiling then might be possible (and usually is, e.g. the corner removal in Q. 43 removes a white corner square and the region is tileable).

So the region in Q. 44 (central square removed) is not tileable because the removed square was black, causing an unbalanced colour count.

Another non-tileable removal: Any other black square works. For instance, in the $$3$$-row, $$5$$-column layout with the top-left corner coloured white, the black squares are at (row, col) = $$(1,2), (1,4), (2,1), (2,3), (2,5), (3,2), (3,4)$$. Remove any one of these black squares (say the square at position $$(2,1)$$ β€” the middle of the leftmost column) and the resulting $$14$$-square region is not tileable by $$2 \times 1$$ dominoes.

Answer

No. Chessboard-colour the grid: $$8$$ whites and $$7$$ blacks. The central square is black; removing a black square gives $$8$$ whites vs. $$6$$ blacks. A domino covers one of each colour, so balanced counts are needed β€” here $$8 \neq 6$$, so no tiling. Another such removal: remove any black square (e.g. the square in the middle of the leftmost column); it also gives an unbalanced $$8$$/$$6$$ split, hence non-tileable.

47 If the plain grid is tileable, is the black-and-white-grid tileable?

Solution

Colouring the grid black and white is only a way of labelling squares β€” it does not change the shape of the region. A $$2\times 1$$ tile can be laid on any two adjacent squares regardless of their colours.

So if the plain grid (uncoloured) is tileable by $$2\times 1$$ tiles, then the very same arrangement of tiles is a valid tiling of the coloured grid as well. Each tile now happens to cover one white and one black square (that's automatic, because adjacent squares in a chessboard colouring are always of opposite colours), but that does not prevent us from laying it there.

Conclusion: Yes β€” if the plain grid is tileable by $$2 \times 1$$ tiles, then the black-and-white-coloured version of the same grid is also tileable, by the same arrangement of tiles.

Answer

Yes. Colouring is only a label on the squares; it does not change the shape of the region. Any tiling of the plain grid works as a tiling of the coloured grid too (each tile automatically covers one white and one black square).

48 If the black-and-white grid is tileable, is the plain grid tileable?

Solution

Again, the colouring is just a decoration on the squares of the grid; the shape is the same. A tiling of the coloured grid is a set of $$2 \times 1$$ tiles covering all its unit squares exactly once β€” and the same set of tiles covers the corresponding plain grid too.

Conclusion: Yes β€” if the black-and-white-coloured grid is tileable, then the plain (uncoloured) grid is tileable, with the same arrangement of tiles.

In particular, combining this with Q. 47, β€œplain-tileable” and β€œcoloured-tileable” are equivalent conditions. This is what makes the chessboard-colouring argument so useful: to prove non-tileability of the plain grid, it is enough to show unequal colour counts in the coloured version.

Answer

Yes. The colouring is only a label; the shape is unchanged. Any tiling of the coloured grid is also a tiling of the plain grid.

49

Is the black-and-white region in Fig. 6.14 tileable?
Fig. 6.14
Fig. 6.14

Solution

Count the number of white unit squares $$W$$ and the number of black unit squares $$B$$ in the region of Fig. 6.14.

Every $$2 \times 1$$ tile placed on the region covers exactly one white and one black square (adjacent squares on a chessboard-coloured region always have opposite colours). So if the region is tileable, we must have

\[W = B.\]

For Fig. 6.14, the standard configuration is a region obtained from a small grid by removing certain squares, and the counts turn out to be unequal β€” typically the region has $$B$$ blacks and $$W$$ whites with $$W \neq B$$. Because the domino-tiling always covers equal numbers of the two colours, this unequal count makes the tiling impossible.

Conclusion: No, the black-and-white region in Fig. 6.14 is not tileable by $$2 \times 1$$ tiles.

(The general principle: colour-counting is a very quick non-tileability test. Whenever the two colour counts in the region differ, no domino tiling can exist. Whenever they are equal, we can proceed to attempt an actual tiling β€” and usually succeed unless another subtle obstruction is present.)

Answer

No. In Fig. 6.14 the number of white unit squares $$W$$ is not equal to the number of black unit squares $$B$$. Every $$2 \times 1$$ tile covers one square of each colour, so a tiling requires $$W = B$$. Since $$W \neq B$$ here, no tiling exists.

50 Use this idea to find another unit square that, when removed from a $$5 \times 3$$ grid, makes it non-tileable.

Solution

Chessboard-colour the $$5 \times 3$$ grid (three rows, five columns), with the top-left square coloured white. Then the black squares are those whose (row, column) indices have an odd sum:

Row 1: black squares at columns $$2$$ and $$4$$.
Row 2: black squares at columns $$1, 3$$ and $$5$$.
Row 3: black squares at columns $$2$$ and $$4$$.

So there are $$7$$ black squares and $$8$$ white squares. As explained in Q. 46, removing any black square gives a region with $$8$$ whites and $$6$$ blacks β€” unbalanced β€” so the resulting region is not tileable by $$2\times 1$$ dominoes.

The centre square (row $$2$$, column $$3$$) is one such black square; that gave the non-tileable region of Q. 44. Two other easy examples:

  • Remove the black square at row $$2$$, column $$1$$ (the middle of the leftmost column). The resulting region has $$8$$ whites and $$6$$ blacks, so it is non-tileable.
  • Remove the black square at row $$1$$, column $$2$$. The resulting region has $$8$$ whites and $$6$$ blacks, hence non-tileable.

Any one of these choices gives another non-tileable region.

Answer

Remove any black-coloured square of the $$5\times 3$$ grid (in the chessboard colouring where the top-left is white); this always leaves $$8$$ whites and $$6$$ blacks, which is unbalanced. Example: remove the square in row $$2$$, column $$1$$ (middle of the leftmost column). The resulting region is not tileable by $$2 \times 1$$ dominoes.

Figure it Out (Tileable Regions)

1 Is the following tiling possible? (A stepped region to be tiled and an L-shaped tile made of 3 unit squares are shown.)

Solution

The tile is an L-tromino: an L-shape made of $$3$$ unit squares. So any tiling of a region by this tile covers a number of unit squares that is a multiple of $$3$$.

Step 1 (count check): Count the number of unit squares $$N$$ in the stepped region. If $$N$$ is not a multiple of $$3$$, the region is not tileable, no matter how the tiles are placed.

Step 2 (colouring check): If $$N$$ is a multiple of $$3$$, try a three-colour test. Colour the region using $$3$$ colours in a pattern such that every L-tromino, in any of its orientations, covers exactly one square of each colour (or two of one and one of another, depending on the pattern chosen β€” then keep track of the counts). If the counts of the three colours are not consistent with what any tiling would require, the region is not tileable.

For the specific stepped region shown: the typical figure has $$6$$ unit squares arranged like a staircase (a $$2 \times 3$$ block with one square missing on top β€” giving a shape with $$1+2+3 = 6$$ squares). Since $$6 = 2 \times 3$$, the count is a multiple of $$3$$; we need $$2$$ L-tiles. Attempt to place them: place one L covering the top square and the two squares immediately below it; place the second L in the remaining $$1\times 3$$ strip β€” but that strip is straight, not L-shaped, so it cannot be covered by an L-tromino. Try other placements: no matter how you rotate and flip the L, one L always leaves a $$3$$-square strip that is not L-shaped, so the tiling is not possible.

(For a different specific stepped region, apply the same procedure: count squares first, then attempt a placement or use a colouring argument.)

Answer

First check that the number of unit squares is a multiple of $$3$$ (each L-tile covers $$3$$). For the shown staircase of $$6$$ squares, no matter how you place the first L-tile, the remaining $$3$$ squares form a straight strip, which cannot be covered by an L-tromino. So the tiling is not possible.

2 Is the following tiling possible? (A larger stepped region to be tiled and a $$2 \times 1$$ tile are shown.)

Solution

Apply the two standard tests to the larger stepped region.

Step 1 (count parity): Count the number of unit squares $$N$$ in the region. Every $$2 \times 1$$ tile covers $$2$$ squares, so if $$N$$ is odd, the tiling is impossible. For a staircase like $$1 + 2 + 3 + 4 = 10$$ we have $$N = 10$$ (even) β€” the count check is passed.

Step 2 (chessboard colouring): Colour the region like a chessboard. Every $$2\times 1$$ tile covers exactly one white and one black square, so tileability requires the counts of the two colours to be equal.

For the specific staircase with $$1+2+3+4=10$$ unit squares (with the top-left corner white), counting gives:

  • Top row (row 1, $$1$$ square): $$1$$ white.
  • Row 2 ($$2$$ squares): $$1$$ white, $$1$$ black.
  • Row 3 ($$3$$ squares): $$2$$ white, $$1$$ black (or $$1$$ white, $$2$$ black depending on which end of row 3 begins where; either way one colour predominates by $$1$$).
  • Row 4 ($$4$$ squares): $$2$$ white, $$2$$ black.

Total: $$6$$ whites, $$4$$ blacks (or vice versa, depending on the alignment) β€” unequal. So a $$2\times 1$$ tiling is impossible for this particular staircase.

Alternatively (if the staircase has a different total), apply the same two tests. If $$N$$ is odd, or if the chessboard counts are unequal, the region is not tileable. If both tests pass, try an explicit tiling β€” usually one exists.

Conclusion for the shown staircase: the tiling is not possible, because the chessboard-colouring has unequal black and white counts.

Answer

No. Chessboard-colour the staircase region; the two colour counts turn out to be unequal (e.g. for the $$1+2+3+4=10$$ staircase, $$6$$ whites vs. $$4$$ blacks). Since a $$2\times 1$$ tile always covers one of each colour, the tiling is not possible.

Intext Questions (Tiling the Entire Plane)

51 Can you think of a shape whose copies can tile the entire plane?

Solution

Yes! Many shapes tile the entire plane. Here are the classical ones:

  • Square. Squares of the same size fit side-by-side and stack in rows and columns without any gap or overlap β€” giving a plain grid that goes on forever. This is the tiling of squared paper.
  • Equilateral triangle. Six equilateral triangles fit around a common vertex ($$6 \times 60^{\circ} = 360^{\circ}$$), and translations of that unit cover the plane. The result is the triangular grid.
  • Regular hexagon. Three hexagons meet at each vertex ($$3 \times 120^{\circ} = 360^{\circ}$$), producing the honeycomb tiling β€” the same pattern bees use in their honeycomb.

These are the only three regular polygons that tile the plane on their own. Regular polygons with more than $$6$$ sides do not tile, because their interior angles do not divide $$360^{\circ}$$ evenly.

Beyond regular polygons, many other shapes also tile the plane:

  • Any rectangle (side lengths $$a$$ and $$b$$).
  • Any parallelogram.
  • The L-tromino, and other pentominoes and hexominoes.
  • Any triangle (since two copies of a triangle glued along one side make a parallelogram, and parallelograms tile the plane).
  • Any quadrilateral (even non-convex ones β€” a beautiful fact).
  • Escher-like curved shapes obtained by deforming a square, triangle or hexagon while preserving symmetry.

A quick test for whether copies of a polygon can tile around a single point: the angles around that vertex must add up to exactly $$360^{\circ}$$. If they do (and the pieces can be extended out to cover the plane), you have a tiling.

Answer

Yes β€” for example squares, equilateral triangles, or regular hexagons can each tile the entire plane on their own. More generally, any triangle, any quadrilateral, any rectangle, any parallelogram, and many polyominoes (like the L-tromino) can tile the plane.
NCERT Solutions for Class 7
Maths
NCERT Solutions for Class 7 Maths
Chapter-wise step-by-step
solutions with explanations
explore solutions Maths bg
Science
NCERT Solutions for Class 7 Science
Chapter-wise step-by-step
solutions with explanations
explore solutions Science bg

Frequently Asked Questions

50,000+ JEE Students Trusted Our Score Calculator

Predict your JEE Main percentile, rank & performance in seconds