Join WhatsApp Icon JEE WhatsApp Group
NCERT Solutions for Class 6 Science

Chapter 8: A Journey through States of Water

Download Solutions PDF
Daily JEE Updates, Tips & Important Alerts
Join 30,000+ students and stay updated with JEE notifications and preparation insights.
Join Now!
Free PDF
Complete NCERT Solution PDF for Chapter 8: A Journey through States of Water

NCERT Solutions For Class 6 Science Chapter 8 A Journey through States of Water helps students understand the different states of water and the changes that occur between them. The page provides well-structured NCERT Solutions that explain all important concepts from the Class 6 Science textbook in a simple and effective manner. NCERT Solutions For Class 6 Science help students learn about solid, liquid, and gaseous states of water, changes of state, evaporation, condensation, and the water cycle. The chapter explains how temperature influences the transformation of water in different forms around us. These solutions are useful for strengthening concepts, solving textbook questions, and preparing for school exams. Students can also download the chapter PDF for quick access during revision. The detailed explanations make learning about water and its properties easier and more engaging.

Download Solutions PDF

In-Text Questions

1

On a bright summer afternoon, Aavi and Thirav enjoy their shikanji (lemonade). After looking at the ice in the lemonade, Thirav wonders about the nature of ice and water.

Thirav says: "Ice feels hard to touch and we can hold it in our hands, whereas, water cannot be held in the same way. So, they must be different substances."

Aavi says: "No, these are the same substances."

Aavi has a counterview to Thirav. What do you think? Why?

Solution

Step 1 : Recall the meaning of a “substance”
In science we call something a different substance only when its chemical make-up changes. For water this chemical formula is $$\mathrm{H_2O}$$.

Step 2 : What really changes when ice turns into water?
When ice is heated to $$0\,{}^\circ\mathrm{C}$$ it melts. The rigid arrangement of the molecules breaks and the same $$\mathrm{H_2O}$$ molecules can now slide past one another. Thus only the physical state (solid → liquid) changes. No new substance is created.

Step 3 : Reversible change shows it is still the same material
If we put the glass of water in a freezer it becomes ice again. Because the change can go back and forth simply by warming or cooling, we know that the substance itself has not altered; only its state has.

Step 4 : Why does ice feel hard while water does not?
• In a solid (ice) the particles are tightly locked, giving it a fixed shape and making it hard.
• In a liquid (water) the particles can move around; therefore it takes the shape of the container and cannot be held like a block.
These are physical differences caused by particle arrangement, not by different substances.

Step 5 : Conclude whose statement is correct
Since both ice and liquid water consist of the same $$\mathrm{H_2O}$$ molecules, Aavi’s view is right: they are the same substance present in two different states of matter.

Answer

Aavi is correct. Ice and liquid water are both $$\mathrm{H_2O}$$; only the physical state (solid vs. liquid) changes, not the substance itself.

2

Aavi says: "We can put water in the freezer of a refrigerator and check if it gets converted into ice."

Thirav says: "Yes, I know when water is left in the freezer, it gets converted into ice but probably something gets added to the ice in the freezer."

Do you think Thirav is right? How can you find out?

Solution

Step 1 : Recall what happens in a freezer
A freezer keeps its inside temperature well below $$0\,{}^{\circ}\mathrm{C}$$. At such a low temperature liquid water loses heat, its molecules slow down and arrange themselves in an orderly pattern. The liquid therefore solidifies to form ice.

Step 2 : Is anything new formed?
Only the state of the substance changes (from liquid to solid). The particles themselves stay exactly the same: each molecule is still $$\mathrm{H_2O}$$. Hence freezing is a physical change; no new substance is created and none is added.

Step 3 : How to check this in an experiment

  1. Take a small plastic cup and pour some tap water into it. Weigh the cup + water on a kitchen balance and note the reading $$m_1\;(\text{cup + liquid water}).$$
  2. Place the cup in the freezer until all the water turns into ice.
  3. Without removing any ice, weigh the cup + ice. Call this reading $$m_2$$.

If something really had been added inside the freezer, the second mass would be larger. In practice you will find $$m_1 = m_2$$ (apart from a tiny difference caused by a few drops that may have evaporated). This shows that nothing extra went into the cup; only heat energy was taken away.

Step 4 : Other simple checks

  • Let the ice melt back to water and taste or smell it—​it is the same as the original water.
  • Measure its volume with a measuring cylinder before freezing and after melting; the volume returns to the original value (ice merely expands when solid, then contracts back on melting).

Conclusion
Thirav’s guess is not correct. The freezer does not add any new material; it only removes heat so that water changes into its solid form--ice.

Answer

No. Freezing is only a change of state; the substance remains $$\mathrm{H_2O}$$. We can confirm this by weighing the cup before and after freezing—the masses are equal, so nothing has been added.

3

Activity 8.1: Let us observe

  • Put an ice cube in a cup, leave it on the table and observe.

Ice gets converted into water.

What can you conclude from the observations? Does this mean that ice and water are the same substance?

Solution

Given activity

  • Take an ice cube (solid water).
  • Keep it in a cup on a table at ordinary room temperature.
  • Wait and watch what happens.

Observation

After some time the ice cube disappears and in its place we now see liquid water collected at the bottom of the cup. The mass of liquid obtained is (almost) the same as the mass of ice taken; only its form has changed.

Explanation step by step

  1. Ice is the solid state of the substance we call water.
  2. Room-temperature surroundings supply heat energy to the ice cube.
  3. When the temperature of ice reaches its melting point, $$0^\circ\,\mathrm{C}$$, the supplied heat breaks the forces holding the water molecules in fixed positions.
  4. The molecules become free to move past one another; the solid therefore changes into the liquid state.
  5. No new molecules appear and no molecules are destroyed; only the state of matter has changed from solid to liquid. Because of this, the process is called melting (or fusion).

Conclusion

  • The experiment shows that ice and the liquid we finally obtain consist of the same substance.
  • They differ only in physical state: ice = solid water, water = liquid water.
  • Therefore a change of state (solid ↔ liquid) is a physical change, not a chemical one. It can be reversed by cooling the water back below $$0^\circ\,\mathrm{C}$$ so that it freezes again.

So, yes—ice and water are simply two physical forms of exactly the same substance, $$\mathrm{H_2O}$$.

Answer

Melting shows that ice is only the solid form of water. No new substance is formed; both ice and the liquid obtained are the same substance, $$\mathrm{H_2O}$$, present in two different physical states.

4 Have you ever noticed water in the puddles disappearing? Where does it go? Discuss with your friends.

Solution

Step 1 – Observe what happens to a puddle.
After it rains, small pools of water collect in pits on the ground. If you look at the same spot a few hours or a day later, the liquid water is gone.

Step 2 – Recall the three common states of water.

  • Solid – ice
  • Liquid – ordinary water
  • Gas – invisible water vapour present in air

Step 3 – Connect the disappearance with a change of state.
Heat from the Sun (and sometimes from warm air or the ground) supplies energy to the liquid water molecules in the puddle. When a molecule gains enough energy, it can leave the surface and enter the air as water vapour. In symbols we write

$$\mathrm{H_2O\,(l) \;\longrightarrow\; H_2O\,(g)}$$

This change from liquid to gas below the boiling point is called evaporation.

Step 4 – Where does the water go?
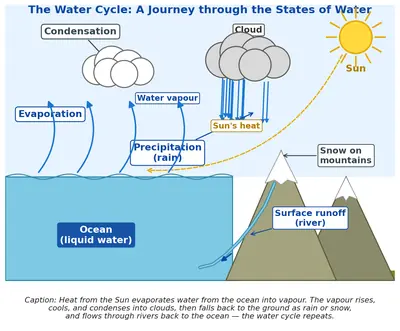
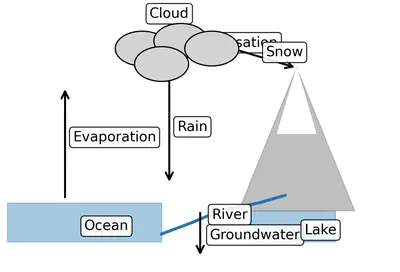
The water becomes part of the air around us. Although we cannot see water vapour, a small amount of it is always mixed with the other gases in the atmosphere. Later, higher in the sky where it is cooler, the vapour can condense to form clouds and, eventually, come back as rain. Thus, the “missing” water is still on Earth; it has only changed its state and location.

Step 5 – Factors that speed up evaporation (extra information for discussion)

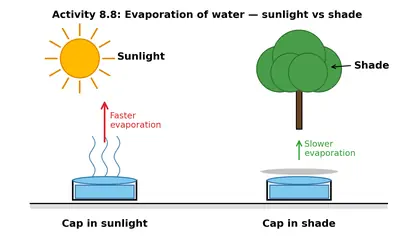
  • Temperature: Warmer days make puddles vanish faster.
  • Wind: Moving air carries the vapour away, allowing more liquid water to escape.
  • Surface area: A shallow, wide puddle dries quicker than a deep, narrow one.

Conclusion.
Water in a puddle disappears because it evaporates, turning into invisible water vapour that mixes with the air.

Answer

The water does not vanish; it evaporates. Heat from the Sun changes liquid water $$\mathrm{H_2O\,(l)}$$ into invisible water vapour $$\mathrm{H_2O\,(g)}$$, which mixes with the air and later can form clouds and rain again.

5 Where else have you seen water disappearing? Can you think of a possible reason why this happens?

Solution

Step 1 – Spotting other situations where water “vanishes”

  • Wet clothes hung on a line become dry after some time.
  • A puddle on a cemented playground slowly gets smaller and finally disappears.
  • Drops of water accidentally spilled on a steel plate go away even though the plate cannot soak them up.
  • A bowl of water kept on a sunny windowsill loses water day by day, even though no one drinks it.
  • Morning dew on grass or the windshield of a car is gone once the Sun comes out.

Step 2 – What is common in all these cases?

  • The liquid water is exposed to air.
  • Heat is available – from sunlight, warm surroundings or moving air (wind).
  • Nothing is carrying the water away visibly; it simply becomes invisible.

Step 3 – Explaining the disappearance

Particles (molecules) of water in the liquid state are always moving. A few of them at the surface pick up extra energy from the surroundings – mainly heat. When a molecule collects enough energy, the attractive force that keeps it in the liquid weakens and it escapes into the air as a gas called water vapour. This process is named evaporation.

We can write the change in a simple way:

$$ \text{Liquid water} + \text{heat energy} \; \longrightarrow \; \text{water vapour (gas)} $$

Step 4 – Why heat or wind speeds it up

  • Higher temperature → more energy → quicker escape of molecules.
  • Wind carries the freshly formed vapour away, leaving “room” for more molecules to leave the liquid.
  • Larger surface area (spread-out water, thin wet cloth) gives more molecules a chance to escape.

Conclusion

Whenever you see water disappear from an open surface, it has not “gone” anywhere solid or underground. It has simply changed its state from liquid to gas by evaporation, a process driven by heat present in the surroundings.

Answer

Water also “disappears” from wet clothes, puddles, spilled drops, bowls left in the sun, or morning dew. In each case the liquid absorbs heat from its surroundings, the fastest molecules escape into the air, and the water changes into invisible water vapour. This heat-driven change of state is called evaporation.

6 You might have observed that after washing the utensils, water left on the surface of the utensils, dries up after some time. Does the reason you thought earlier to explain water disappearance apply in this case also?

Solution

Step 1 – Recall what happens to small amounts of water kept in the open
In an earlier activity you saw that if a little water is left in a saucer, it gradually disappears. We explained its disappearance by evaporation – the change of liquid water $$\mathrm{H_2O}$$ into water vapour that mixes with the air.

Step 2 – Observe the present situation
After you rinse plates or a steel tumbler, a thin film of water is left on their surface. A few minutes later that film is gone and the utensil looks dry, even though the water could not flow away or soak into the metal.

Step 3 – Explain why the water goes away
Exactly as in the saucer case, the tiny layer of water on the utensil gains heat energy from its surroundings – warm kitchen air, sunlight coming through a window, or even the utensil itself if it was washed in warm water. The fast-moving surface molecules escape into the air. This process is again evaporation.

Step 4 – Check whether any other process could be responsible
• The metal of a utensil is solid and non-porous, so water cannot soak in.
• There is no hole through which water can drain out.
Therefore evaporation is the only reasonable cause.

Conclusion
The same reason you used earlier – evaporation of water into water vapour – explains why utensils become dry after washing.

Answer

Yes. The thin film of water on the utensils also disappears because it evaporates into water vapour and mixes with the air, just as in the earlier example.

7

Aavi wonders if water has seeped through the surface of the utensils. Thirav thinks that water does not seep through the surface of the utensils. Design an activity to investigate whose idea is correct.

Solution

Activity – Does water really seep through utensils or is it condensation?

Objective : To find out whether the water drops that appear on the outer surface of a metal tumbler come from inside the vessel (seepage) or from the surrounding air (condensation).

Materials required

  • Two identical clean, dry stainless-steel tumblers
  • Ice-cold water (about 5 °C)
  • Hot water (about 60 – 70 °C)  — handle carefully
  • Dry paper napkins / tissue paper
  • Stop-watch or a clock
  • Room thermometer (optional)

Procedure

  1. Wipe the outer surface of both tumblers thoroughly with tissue so that they are completely dry.
  2. Label them as Tumbler A and Tumbler B.
  3. Fill Tumbler A almost to the brim with the ice-cold water and immediately wipe its outside once more.
  4. Fill Tumbler B almost to the brim with the hot water and again wipe its outside dry.
  5. Place both tumblers on the table, at least 10 cm apart, and start the stop-watch.
  6. Observe the outer walls of both tumblers carefully for the next 5 minutes. Touch the walls gently every minute with a fingertip or a clean piece of tissue and note whether they feel wet.
  7. After exactly 5 minutes, press a fresh tissue lightly against the outer surface of each tumbler and see if the tissue becomes damp or remains dry.

Observations

  • Within 1 – 2 minutes tiny water droplets are seen on the outside of Tumbler A (the one with ice-cold water). The tissue becomes wet.
  • The outside of Tumbler B (with hot water) stays dry throughout the 5 minutes. The tissue remains dry.

Explanation

  • Air always contains invisible water vapour.
  • The metal wall of Tumbler A becomes very cold. Water vapour in the surrounding air condenses on this cold surface forming liquid droplets. The water collected outside therefore comes from the air, not from inside the tumbler.
  • If water could really seep through steel, we would have seen drops on the hot-water tumbler as well, but none appear. Hence no seepage occurs.

Conclusion

The droplets on the outer surface of a cold utensil are produced by condensation; water does not seep through the metal. Therefore, Thirav is correct and Aavi’s doubt is resolved.

Answer

The activity shows that only the utensil containing ice-cold water develops droplets outside, due to condensation of water vapour from the air, while the hot-water utensil stays dry. Thus water does not seep through the metal; Thirav is correct.

8

Activity 8.2: Let us investigate

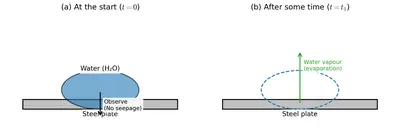
  • Take a tablespoon of water on a steel plate as shown in Fig. 8.1.
  • Observe whether water seeps through to the other side of the plate or not.
  • Keep observing this at regular intervals until the water completely disappears.

What do you infer? Is this activity enough to come to the conclusion that water does not seep through a steel plate?

Fig. 8.1
Fig. 8.1

Solution

Step 1 : Performing the activity
We place about one tablespoon of water on the upper surface of a clean, horizontal steel plate. The lower surface of the plate is left open to air so that we can watch it from below.

Step 2 : Careful observations

  • Immediately after pouring, we do not see any drop of water on the underside of the plate.
  • At intervals of a few minutes we look again. Still no water is seen below.
  • After some time (say 20 – 30 minutes, depending on the temperature of the day) the entire puddle on the upper surface disappears, but the lower surface remains completely dry.

Step 3 : Explaining what happened

  • The water did not pass through the plate. If it had, the underside would have become wet at least for some time.
  • Instead, the water changed into invisible water-vapour and mixed with air. This change from the liquid state to the gaseous state at any temperature is called evaporation.
  • A steel plate is a solid sheet without pores, so it behaves like a barrier to water.

Step 4 : Drawing an inference
From the single observation we can reasonably say that in this particular case water evaporated instead of seeping; therefore, for ordinary conditions a steel sheet appears to be impermeable to water.

Step 5 : Is one test enough?

  • A scientist never jumps to a final conclusion after just one trial. The plate we used might have been free from holes, but another steel object could, in principle, have cracks or joints.
  • To arrive at a firm scientific statement we should repeat the experiment with different steel plates, at different temperatures, and for longer times. Only after many consistent results should we conclude that solid, intact steel does not let liquid water pass through it.

Hence, the activity strongly suggests, but by itself does not prove beyond doubt, that water cannot seep through a steel plate.

Answer

We observe no water on the underside while the drop on top slowly disappears; the water has evaporated, not seeped through. The test indicates that an intact steel plate is impermeable to liquid water, but a single trial is not sufficient for a final conclusion—several repetitions with different plates are needed for complete certainty.

9 If water does not seep through the steel plate, then, where has the water gone?

Solution

Observation: When a little water is kept on a clean, flat steel plate and left undisturbed for some time, the water level gradually goes down until the plate looks completely dry. Yet steel has no pores through which water could seep.

Step 1 – No seepage possible
Steel is a solid metal sheet. Its particles are packed so tightly that there are practically no gaps large enough for liquid water molecules to pass through. Therefore the disappearance of water cannot be due to seepage.

Step 2 – Source of energy
While the plate is exposed to the surroundings (sunlight, warm air or even the normal room temperature), heat energy is constantly supplied to the water.

Step 3 – Change of state
As the water gains heat, some surface molecules acquire enough kinetic energy to overcome the force of attraction between them and leave the liquid surface.

This change of state can be written symbolically as  $$\mathrm{H_2O(l)} \;\xrightarrow{\text{heat}}\; \mathrm{H_2O(g)}$$

The process is called evaporation. It takes place at all temperatures, though it is faster when the surroundings are warmer, the surface area is larger and the air above is not already saturated with moisture.

Step 4 – Dispersal into air
The water vapour formed mixes with the surrounding air and spreads out. Because it is now part of the invisible gaseous mixture of the atmosphere, we no longer see any liquid water on the plate.

Conclusion: The water did not seep through the steel plate; it evaporated to become water vapour and dispersed into the air.

Answer

The water changed into water vapour and mixed with the air — it evaporated, it did not seep through the steel plate.

10 While making dosa, we sprinkle some water on the hot pan and it disappears. Where does it go?

Solution

Step 1 – Recall the three states of water

  • Solid : ice
  • Liquid : ordinary water
  • Gas : water vapour (invisible, mixed with air)

Step 2 – What is happening on the hot dosa pan?

  • The surface of a dosa tawa is kept well above the boiling point of water, usually around $$200^{\circ}\,\mathrm{C}$$.
  • The boiling point of water at ordinary atmospheric pressure is only $$100^{\circ}\,\mathrm{C}$$.
  • Because the pan temperature $$>100^{\circ}\,\mathrm{C}$$, any water droplet that touches it immediately receives a large amount of heat energy.

Step 3 – Change of state (liquid → gas)

  • The heat supplied breaks the forces that hold the water molecules together in the liquid state.
  • This process is called vaporisation or evaporation. The liquid converts into gaseous water vapour.
  • The vapour quickly mixes with the surrounding air, so our eyes can no longer see the original droplet. (Sometimes a faint mist is visible for an instant; those are tiny droplets that soon disperse.)

Step 4 – Conclusion

The sprinkled water does not “vanish”. It only changes its state from liquid to gas. Thus it goes into the air above the pan as invisible water vapour.

Answer

The water instantly turns into water vapour (gas) and mixes with the air; it has changed state, not disappeared.

11

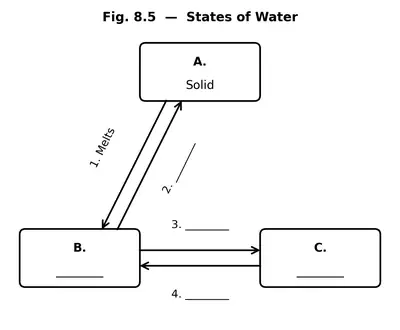
Let us draw

Draw a detailed sketch (with labels and caption) about what happens to the water.

Figure
Figure

Solution

Complete, step-by-step instructions to make the required sketch

  1. Prepare the page
    Leave a 2 cm margin at the bottom. That is where the caption will go.

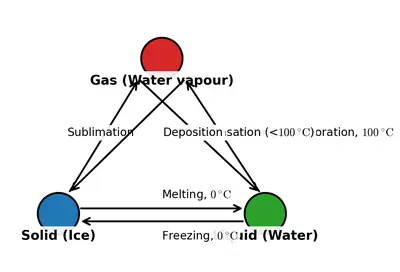
  2. Mark three equally-spaced positions that form an upright triangle
    Top corner for water vapour, left corner for liquid water, right corner for ice. Lightly rule the triangle in pencil so that the arrows will be neat.

  3. Draw each state of $$\mathrm{H_2O}$$

    • Top corner – Water vapour (gas)
      Sketch a light, cloud-like puff with tiny wavy arrows pointing upward. Inside, write “Water vapour (gas)”.

    • Left corner – Liquid water
      Draw a beaker half-filled with water. Shade the water lightly and write “Liquid water”.

    • Right corner – Ice (solid)
      Draw 2–3 neat ice cubes in a small dish. Add droplets outside to hint they are cold. Label “Ice (solid)”.

  4. Add the four process arrows

    FromToArrow label
    IceLiquid waterMelting
    (heat supplied)
    Liquid waterIceFreezing
    (heat removed)
    Liquid waterWater vapourEvaporation/Boiling
    (more heat)
    Water vapourLiquid waterCondensation
    (cooling)

    Draw broad arrows along the triangle sides and write the labels neatly beside each arrow. Indicate “heat” with a small red sun symbol and “cooling” with blue snow-flake symbols.

  5. Add extra information
    Next to the vapour corner, write “Invisible gaseous state that forms clouds”. Under the beaker write “Seen everywhere around us”. Under the ice cube write “Solid state below 0 °C”.

  6. Give the diagram a title
    At the very top, centre the title: “Inter-conversion of the Three States of Water”.

  7. Write the caption
    In the 2 cm margin at the bottom, write:
    Figure 1 – Water ( $$\mathrm{H_2O}$$ ) changes its state when heat is supplied or removed.

  8. Ink, colour and finish
    Trace final lines in black ink, erase pencil guidelines, and use light blue for liquid water, white/sky-blue for ice cubes, and very pale grey for vapour clouds.

Result
The completed sketch clearly shows how the same substance, $$\mathrm{H_2O}$$, exists in three physical states and changes from one to another on heating or cooling.

Answer

Required diagram: triangle with the three states of water (Ice, Liquid water, Water vapour) at the corners; arrows labelled Melting, Freezing, Evaporation/Boiling and Condensation show the changes of state. Caption: Figure 1 – Water ( $$\mathrm{H_2O}$$ ) changes its state when heat is supplied or removed.

12 The process of evaporation takes place continuously, even at room temperature. Can you think of other examples of evaporation?

Solution

Step 1 – Recall what evaporation means
Evaporation is the slow change of a liquid into its vapour from the surface of the liquid. It can occur at any temperature, even the ordinary room temperature of about $$25^{\circ}\text{C}$$; the higher the temperature or the faster the breeze, the faster the process, but it never truly stops.

Step 2 – Look for everyday situations where a liquid disappears without boiling

  • Wet clothes hung for drying lose the water trapped in their fibres; the water particles escape into the air and the clothes become dry.
  • Puddles or water spilled on a floor become smaller and finally vanish although the floor is never heated.
  • Sweat on our skin evaporates continuously; the heat taken away in this process keeps our body cool.
  • An open bowl or glass of water left on a table shows a lower water level after some hours or a day.
  • Sea-water in shallow salt-pans slowly dries up; the water evaporates and salt crystals are left behind.
  • Naphthalene or camphor tablets kept in cupboards shrink with time because these solids, like liquids, can pass into vapour at room temperature (a related process called sublimation).

Step 3 – State the conclusion
All the above examples prove that evaporation is going on around us all the time, even when the temperature is well below the boiling point of water.

Answer

Examples of evaporation at room temperature include drying of wet clothes, disappearance of spilled water or puddles, sweat drying from our skin, fall in the water level of an uncovered bowl or glass, drying of sea-water in salt-pans to give salt, and the gradual shrinking of naphthalene or camphor tablets.

13 Now what do you think is the reason for the disappearance of water from the puddles? Is it due to: (i) seeping of water into the ground or (ii) evaporation of water or (iii) both of these?

Solution

Step 1 – Recall what can happen to standing water
If a small pool (puddle) of water is left in the open, only two natural processes can remove it.

  • Seeping (infiltration): Water trickles down through the tiny spaces (pores) in the soil and rocks.
  • Evaporation: Water at the surface gains heat energy from the surroundings (sunlight, warm air, a warm road, etc.) and changes into invisible water vapour that mixes with the air.

Step 2 – Check whether both processes are really possible
• When a puddle is on ordinary soil, the ground is porous, so some water can go downwards.
• The same puddle also loses water upward because warm air, wind and sunshine are always present in the open; they speed up evaporation.
• Even on a cemented or tarred road, where seeping is almost impossible, the puddle still vanishes after some time. This proves that evaporation must be taking place.
• On the other hand, if the puddle lies on soft soil and the day is cool or cloudy, the water level still falls, showing that seeping also works.

Step 3 – Draw the logical conclusion
Because there are real-life situations that demonstrate each of the two processes, the safest and most complete explanation is that the disappearance of the puddle happens due to both seeping and evaporation acting together. The exact share of each process depends on the type of ground, temperature, sunshine, wind, etc., but neither of them can be ruled out in general.

Step 4 – Match with the options given
Option (iii) says “both of these”. That matches our reasoning.

Therefore, the correct choice is option (iii).

Answer

(iii) Both seeping into the ground and evaporation of water cause the puddles to disappear.

14 Hand sanitiser disappears as you rub it on your hands. What happens to it?

Solution

Step 1 – Recall the three common states of matter
All substances around us can exist as solid, liquid or gas. In this chapter we learnt that matter can change its state when it is given or loses heat.
For example: ice (solid) → water (liquid) → water vapour (gas).

Step 2 – What is hand sanitiser made of?
A typical sanitiser is mainly a liquid called alcohol (usually ethanol $$\mathrm{C_2H_5OH}$$ or isopropyl alcohol). It also has a little water, glycerine and a gel to make it thick. Alcohol molecules are held together only weakly, so the liquid can leave the surface very easily.

Step 3 – Rubbing supplies heat
When we pour sanitiser on our palm and rub, two things happen:

  • The warmth of our skin (about $$36\,{}^{\circ}\mathrm{C}$$) gives heat to the liquid.
  • Rubbing spreads the liquid into a very thin layer, increasing its surface area.

Both make it easier for the liquid alcohol molecules to escape into the air.

Step 4 – Change of state: evaporation
The process is evaporation  –  a liquid changing to a gas at temperatures below its boiling point. We can write it simply as:

$$\text{liquid alcohol} \;\longrightarrow \;\text{alcohol vapour (gas)}$$

The vapour mixes with the surrounding air, so we cannot see it; therefore the sanitiser seems to “disappear”. Any tiny amount of glycerine that remains keeps our skin soft.

Step 5 – The cooling sensation
During evaporation the alcohol molecules take away heat from our skin as latent heat of vaporisation. That is why our hands feel cool for a few seconds.

Conclusion
Hand sanitiser does not vanish; it simply changes its physical state from a liquid to an invisible gas and mixes with the air. No new substance is formed, so it is a physical change.

Answer

It evaporates – the alcohol in the sanitiser quickly changes from liquid to an invisible vapour, mixes with the air and therefore seems to disappear.

15

Activity 8.3: Let us experiment

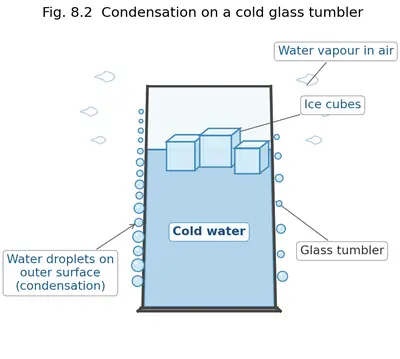
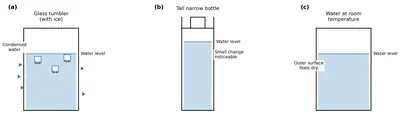
  • Take cold water in a glass tumbler.
  • Add a few ice cubes into it as shown in Fig. 8.2.
  • Leave it undisturbed for five minutes and observe it.
  • Record your observations and the questions that arise in your mind in Table 8.1. You can also touch the outer surface of the glass tumbler to feel if there is any change.

One observation that arises in Aavi's mind is, "There are some water droplets (tiny drops) appearing on the outer surface of the glass tumbler." Initially, water droplets are deposited and these droplets combine together to form bigger drops. You can also try the above process with a metal container. You may be curious about where the water droplets come from.

Suggest possible reasons explaining the appearance of water droplets on the outer surface of the glass tumbler.

Fig. 8.2
Fig. 8.2

Solution

Step 1 – What exactly is seen?
After about five minutes a mist first appears on the outside of the glass. The mist quickly turns into many tiny liquid drops. Several of these tiny drops unite to form larger drops that finally trickle down the wall of the tumbler.

Step 2 – Where could this liquid have come from?

  • The water that we poured into the tumbler is inside the glass; the glass wall has no holes, so the water cannot “leak” through it.
  • The drops, therefore, must come from outside the tumbler – that is, from the surrounding air.

Step 3 – Hidden water in air
Air is not empty; besides gases like $$\mathrm{N_2}$$ and $$\mathrm{O_2}$$ it always contains invisible water vapour. Warm air can hold more vapour than cold air.

Step 4 – What does the ice do?
The ice lowers the temperature of the water inside and, through the glass wall, also lowers the temperature of the outer surface of the tumbler. The part of the air that touches this surface therefore cools down suddenly.

Step 5 – Condensation begins
When that thin layer of air is cooled, it can no longer keep all the water vapour it was holding. The “extra” vapour changes back into liquid form. This change of water vapour to liquid water on cooling is called condensation.

Step 6 – Formation of visible drops
The first molecules of liquid water sit as a faint mist. More vapour joins them, the droplets grow, neighbouring droplets touch and merge, and finally gravity pulls the larger drops downward—exactly what we observe.

Step 7 – Why does wiping not stop it?
If you wipe the glass dry and wait a moment, fresh droplets appear. That shows the liquid is being supplied continuously from the water vapour in the air, not from inside the tumbler.

Step 8 – Similar everyday examples

  • Dew on grass in the early morning.
  • A mirror fogging up when you breathe on it.

Conclusion
The water droplets found on the outer surface of the chilled tumbler are produced by condensation of water vapour present in the surrounding air when that air is cooled by the cold glass wall. They are not droplets that have seeped through the glass.

Answer

Water vapour present in the surrounding air cools when it touches the ice-cold outer surface of the tumbler. On cooling, the vapour condenses into liquid water, first as a fine mist and then as visible droplets. Thus the drops come from the air, not from the water inside the glass.

16

Discuss with your friends. Write down the possible reasons in Fig. 8.3.
Fig. 8.3
Fig. 8.3

Solution

Understanding the situation shown in Fig. 8.3

In the three sketches of Fig. 8.3 we notice that

  • people are standing in a queue with buckets and pots;
  • a tanker is supplying water to the locality;
  • the hand-pump in the open field has completely dried up;
  • some children can be seen walking a long distance carrying cans of water.

All the scenes point to one common problem — scarcity of water. The shortage can be linked to several physical and human factors. Discussing each factor one by one helps us reach the possible reasons.

  1. Low or irregular rainfall
    The main natural source of fresh water is rain. If a region receives rainfall much below the normal value (for example only $$350\,\text{mm}$$ instead of the expected $$800\,\text{mm}$$) rivers, ponds and wells are unable to get recharged. Drought like conditions appear and hand-pumps or wells shown in the figure go dry.
  2. Over-extraction of ground-water
    Nowadays deep tube-wells fitted with powerful electric pumps can lift large quantities of underground water. When water is drawn out faster than it is replenished by rain, the water-table goes down and existing shallow wells as seen in the picture stop yielding water.
  3. Growing population and rising demand
    More people mean more water is required for drinking, cooking, bathing, washing and for cultivation of food grains. If supply systems are not expanded in proportion, the available water becomes insufficient and people have to depend on tankers.
  4. Wastage and leakage in supply pipelines
    Sometimes enough water is pumped from the sources, but broken or leaking pipes allow a sizeable fraction (as high as $$30\%$$ in many cities) to get lost before it reaches the users. This man-made loss converts an adequate supply into a scarce supply.
  5. Pollution of surface water bodies
    Discharge of untreated sewage and industrial effluents makes river or lake water unfit for use. Although the water is physically present, it cannot be given to people without expensive treatment, so a tanker has to be called.
  6. Deforestation and soil erosion
    Cutting down forests decreases the amount of rain water that seeps into the ground. Instead, it runs off quickly causing floods first and scarcity later. In the long run the overall storage capacity of the area falls.
  7. Poor harvesting of rain-water
    If the rain that really falls is not collected in tanks, ponds or by rooftop harvesting, it simply flows into drains and finally into the sea. Building small check-dams and recharge pits could prevent this needless loss.

Conclusion
Any one or a combination of the above reasons can explain the scenes in Fig. 8.3. The discussion also tells us that the problem is solvable if we:

  • use water carefully,
  • repair leaks,
  • grow more trees, and
  • harvest every drop of rain.

Answer

Low rainfall or drought, over-drawing of ground-water, fast-growing population, leakage/wastage in supply lines, pollution of rivers and ponds, deforestation and poor rain-water harvesting — any or all of these can lead to the water scarcity shown in Fig. 8.3.

17

You may have various possible reasons. You may agree or disagree with the reasons of others. Aavi and Thirav argued with a chain of reasons. What do you think about the possible reasons mentioned in Fig. 8.4?

  • Aavi: "I think that some of the water may have seeped out of the glass tumbler."
  • Thirav: "No, it cannot seep out. The level of water in the glass tumbler has not decreased."
  • Aavi: "It might have decreased, but may not be significant enough to be seen."
  • Thirav: "With a tall and narrow bottle, even a slight change in the level of water is noticeable."
  • Thirav: "We can take water at room temperature in another tumbler and find out whether any water seeps out."
Fig. 8.4
Fig. 8.4

Solution

Step 1 – What is being observed?
When ice-cold water is poured in a glass tumbler, tiny drops of liquid water soon appear on the outer surface of the glass.

Step 2 – Could the drops have seeped through the glass?
Aavi guesses that water from inside might be oozing out. For this to be true, the water level inside the tumbler must go down.

Step 3 – Checking the water level (Thirav’s first reply)
After some time the inner level of water is observed carefully. No fall in the level can be detected with the naked eye. Glass is a continuous, non-porous solid, so ordinary liquid water cannot percolate through it.

Step 4 – “Perhaps the fall is too small to notice” (Aavi’s counter-point)
If the change really were too small to see in a wide tumbler, one should notice it in a tall, narrow bottle because the same volume loss would give a larger change in height.

Step 5 – Tall-bottle test (Thirav’s second reply)
Fill a long, slim glass bottle with the same ice-cold water, mark the initial water level with a permanent marker, and wait. The outer surface again becomes wet, yet the marked level inside the bottle remains unchanged. Hence no water is escaping through the walls.

Step 6 – Control experiment with room-temperature water
Now keep another tumbler containing water at ordinary room temperature next to the first one. Its outer surface stays perfectly dry. If seepage through glass were possible, both tumblers should show droplets, but only the cold one does. Therefore the droplets are not coming from inside.

Step 7 – Correct explanation: condensation of water vapour
Air always has invisible water vapour. The outside of the tumbler is cooled by the ice-cold water inside. When the warm, moist air touches this cold surface, it cools below the dew point; the water vapour present in the air loses heat and condenses into tiny liquid drops. These drops are what we see.

Step 8 – Verdict on each statement

  • Aavi 1 – “Some water may have seeped out”: Not correct; glass is non-porous and the inside level does not fall.
  • Thirav 1 – “No, it cannot seep out. The level has not decreased”: Correct.
  • Aavi 2 – “The level might have decreased but not enough to be seen”: A fair doubt, but experiments (Steps 4 and 5) show no decrease even in a narrow bottle.
  • Thirav 2 – “With a tall narrow bottle even a slight change is noticeable”: Right, and the experiment supports him.
  • Thirav 3 – “Take room-temperature water in another tumbler as a test”: A good control that confirms the condensation explanation.

Conclusion
The water seen on the outer surface of a glass containing ice-cold water comes from the water vapour present in the surrounding air. It is condensation, not seepage through the glass.

Answer

The droplets form by condensation of water vapour from the air; no water seeps through the glass. Hence Thirav’s objections are correct, while Aavi’s original guess is wrong.

18 Where else have you seen water droplets like this?

Solution

Step 1 – Recall the observation in the book
When a metal tumbler is filled with ice-cold water, tiny water droplets soon appear on its outer surface.

Step 2 – Identify the cause
The air around us always contains invisible water vapour. When this warm, moist air touches a surface that is colder than the air, the vapour loses heat, changes back into liquid water and settles there as droplets. This change of state from gas to liquid is called condensation.

Step 3 – Look for other situations where a cold surface meets moist air

  • Dew on grass or leaves at dawn: During the night the ground cools. Early in the morning the water vapour in the air condenses on the cold leaves and grass blades, forming sparkling droplets of dew.

  • Outer surface of a cold-drink bottle or can: As soon as you take a chilled bottle out of the refrigerator, the moist air around it condenses on the bottle and you see beads of water.

  • Inside surface of a vessel’s lid while cooking: Steam rising from boiling food strikes the cooler lid, turns back into liquid and appears as droplets that later fall back into the vessel.

  • Bathroom mirror after a hot shower: Warm, moisture-laden air from the shower meets the comparatively cooler mirror and forms a foggy layer of tiny water droplets.

  • Window panes of cars or buses on a cold winter morning: Moist air inside the vehicle condenses on the cold glass panes and makes them misty.

Step 4 – Conclude
Thus, any time humid air touches a surface that is cooler than the air, the water vapour in the air condenses into visible droplets. The examples above are all everyday instances of the same phenomenon.

Answer

On many other cool surfaces – for example, as dew on grass and leaves in the early morning, on the outside of a cold-drink bottle, on the inside of a vessel’s lid while cooking, on a bathroom mirror after a hot shower or on window panes of a bus on a chilly day – we see similar water droplets formed by condensation.

19 You might have seen dew drops on plants. Why do we see dew drops more in the morning? When we boil the water in a half-filled utensil and cover it with a steel plate, some water drops accumulate on the inner side of the steel plate. Where do these water drops come from? What do you think?

Solution

Step 1 · Recall the three states of water
Water can exist as solid (ice), liquid (water) and gas (water vapour). The change from gas to liquid is called condensation, while the change from liquid to gas is called evaporation.

Step 2 · Why does air always contain some water vapour?
All day long water from rivers, ponds, soil and even leaves keeps evaporating. The invisible gas that mixes with air is called water vapour. Hence the air around us is never perfectly dry; it always carries some amount of water vapour.

Step 3 · Dew drops on plants in the early morning

  • At night the Sun is absent, so the ground and the air touching it become cooler.
  • Cool air can hold less water vapour than warm air. We say its “capacity” to hold vapour decreases.
  • Because of the fall in temperature the extra water vapour present in the cool morning air condenses on any cool surface it meets—blades of grass, leaves, rooftops, etc.
  • The condensed liquid appears as tiny drops, which we call dew.

That is why we notice dew mainly in the early hours, before the Sun warms the surroundings again and makes the drops evaporate.

Step 4 · Experiment with a half-filled utensil

  1. We heat water kept in a utensil. Due to heating, water molecules gain energy and escape into the air as water vapour:$$\text{liquid water}\;\xrightarrow{\text{heat}}\;\text{water vapour}$$
  2. We immediately cover the utensil with a cold steel plate. The lower surface of that plate is much cooler than the hot rising vapour.
  3. When the hot vapour touches the cold plate, it loses heat. Loss of heat makes the gaseous molecules slow down and come close together, changing back into liquid water. This reverse change is again condensation.
  4. Hence tiny liquid drops are seen sticking to the inner surface of the steel plate. If we slightly tilt the plate, the drops run down, proving they are ordinary liquid water.

Step 5 · Conclusion
Both the dew on leaves and the drops under the steel plate form by the same process—condensation of water vapour on a cooler surface.

Answer

Dew and the drops under the plate are produced when warm water vapour meets a cooler surface and condenses into liquid water. Air near the cool ground at dawn causes dew; vapour from boiling water touching the cool steel plate gives the utensil experiment its drops.

20

Activity 8.4: Let us measure

Aavi and Thirav conduct an activity to find evidence for their reasons. You can also conduct the activity by following the steps given below. Record your data in Table 8.2.

  • Take a glass tumbler half-filled with water containing a few ice cubes. Cover it with a small steel plate. Weigh it on a digital weighing balance.
  • Observe the reading on the balance and record the weight after every five minutes.
  • Continue observing for 30 minutes. Record your observations in Table 8.2.

Predict what will happen to the mass of cold water kept on the digital weighing balance. Will it increase or decrease or remain the same?

Solution

Step 1 : Identify the system being weighed
The balance shows the total mass of everything resting on its pan, namely
(i) the glass tumbler, (ii) the water + ice inside it and (iii) the small steel plate kept as a cover.

Step 2 : Recall the two opposite processes that can change the mass

  • Condensation : Because the tumbler is very cold, invisible water vapour present in the surrounding air turns into liquid water drops on the outer surface of the glass and on the underside of the steel plate. These newly formed drops were not on the balance earlier, so they add mass to the system.
  • Evaporation : A small amount of liquid water from the top layer inside the tumbler can escape into air. This would remove mass from the system, but the steel plate almost blocks the escape path, therefore the loss is very little.

Step 3 : Reason out which process dominates
Immediately after the activity starts the water–ice mixture is much colder than the surrounding air, hence the rate of condensation on the outer surface is high. At the same time evaporation from the covered surface is negligible. Therefore the net effect is a gain in mass.

Mathematically we may write the net change after any time interval as
$$\Delta m = m_\text{condensed} - m_\text{evaporated}$$
Because $$m_\text{condensed} \gt m_\text{evaporated}$$ during the first 30 min, $$\Delta m$$ is positive, i.e. the reading on the balance increases.

Step 4 : Illustrative readings (example)

Time (min)Mass on balance (g)
0250.0
5250.7
10251.3
15251.8
20252.2
25252.5
30252.7

The difference after 30 min is
$$\Delta m = 252.7\;\text{g} - 250.0\;\text{g} = 2.7\;\text{g}$$
showing a clear increase.

Step 5 : Final prediction
Hence the mass of the cold water set-up on the digital balance will gradually increase for the first few tens of minutes until the water warms up and condensation almost stops.

Answer

The reading on the balance will increase because water vapour from the air condenses on the cold tumbler and cover, adding extra water (and therefore extra mass) to what is being weighed.

21 Do your findings match with your predictions? Explain your observations.

Solution

Step 1 – Recall of the predictions made before performing the activity

  • When the ice cubes would be kept in a tumbler at room temperature, we had predicted that they would melt; i.e. solid water would change into liquid water.
  • On gentle heating, we had predicted that the liquid water would start forming invisible water vapour, and that steam coming out of the beaker would turn into tiny liquid drops on any cool surface placed just above it.

Step 2 – Actual observations during the activity

  • The ice cubes gradually became smaller, collected water was seen at the bottom of the tumbler, and finally no solid ice remained.
  • On further heating, bubbles appeared inside the liquid, steam rose, and when a cool metal plate was held in the path of the steam, shining droplets accumulated on the underside of the plate.

Step 3 – Do the findings match the predictions?

Yes. Each stage that was predicted was observed exactly in the same order:

  1. Solid $$\mathrm{H_2O}$$ (ice) melted to give liquid water.
  2. Liquid water on heating evaporated to give water vapour (steam).
  3. Water vapour on touching a cold surface condensed back into liquid droplets.

Step 4 – Explanation of the observations

  • Melting: Ice absorbs heat energy from the surroundings. Its particles gain kinetic energy, move out of their fixed positions, and the rigid lattice of the solid collapses into the flowing arrangement of a liquid.
  • Evaporation / Boiling: Further heating supplies more energy. At about $$100\,{}^{\circ}\mathrm{C}$$ (at normal pressure) the liquid particles have enough energy to break free completely from one another and form a gas, so liquid water changes to steam.
  • Condensation: When this high-energy vapour touches a cold plate, it loses heat. The loss of energy reduces the particle motion, so the gas re-forms the close-packed arrangement of a liquid and appears as tiny water drops.

Step 5 – Conclusion

The experimental findings fully agree with the earlier predictions. The activity thus demonstrates that water can exist in three states and can change from one state to another by absorbing or releasing heat.

Answer

Yes. The ice melted into liquid water, the liquid boiled to form steam, and the steam condensed back into water droplets on the cold plate—exactly as predicted, because adding heat causes melting and evaporation while removing heat causes condensation.

22 There is an increase in the reading on the digital weighing balance. Can we conclude that water is not seeping through the wall of the tumbler? Can we also conclude that the water collected outside the tumbler is only due to condensation?

Solution

Step 1 : Note the first (initial) reading
The dry metal tumbler containing water (or ice-cold water) is kept on the digital balance.
First reading  = $$W_0\text{ g}$$.

Step 2 : Note the second reading some time later
Drops of liquid are now seen on the outer wall of the tumbler.
Second reading  = $$W_1\text{ g}$$ and the question tells us that $$W_1 > W_0$$.
Hence the increase in mass is
$$\Delta W = W_1 - W_0 > 0\;\text{g}$$.

Step 3 : What happens if water only seeps through the wall?
Suppose a mass $$m_s$$ of water leaks from the inside to the outside of the same tumbler.
The total mass on the balance is still
$$\text{tumbler}+\text{water inside}+\text{water that has leaked}$$.
Because the leaked water is still resting on the balance pan, the overall mass is unchanged, i.e.
$$W_1 = W_0 \;\;(\Delta W = 0).$$
Therefore mere seepage cannot make the reading rise.

Step 4 : What happens if water only condenses from the air?
Let $$m_c$$ grams of water vapour from the surrounding air turn into liquid water on the cold outer surface.
This water was not present on the balance earlier, so the new mass becomes
$$W_1 = W_0 + m_c \quad (m_c > 0),$$
and hence $$\Delta W = m_c > 0.$$ Thus condensation alone does produce an increase in the reading.

Step 5 : Can both processes occur together?
If seepage (mass $$m_s$$) and condensation (mass $$m_c$$) happen simultaneously, the final reading is still
$$W_1 = W_0 + m_c$$,
because seepage does not change the total mass on the balance. The rise of the pointer is therefore entirely due to the condensed water $$m_c$$.

Step 6 : Conclusions

  • The fact that $$W_1>W_0$$ proves that some water has been added from outside the tumbler (condensation).
  • However, the same observation does not prove that seepage is absent, because seepage would neither increase nor decrease the total mass.
  • For the same reason we cannot claim that the liquid found outside is only condensed water; a part of it could still have come through the wall.

Therefore
(i) we cannot conclude that water is not seeping through the wall, and
(ii) we cannot conclude that the outside water is exclusively due to condensation.

Answer

(i) No. (ii) No. The rise in weight only confirms condensation; it neither excludes the possibility of seepage nor proves that every drop outside is from condensation alone.

23

What more can you do to show that water is not seeping from the glass tumbler? How would you modify Activity 8.4 to find the answer?

Repeat Activity 8.4 with the following modifications—

  • Mark the water level on the glass tumbler with a permanent marker or a visible tape.

What do you observe?

Solution

Why a modification is needed
In Activity 8.4 drops were seen on the outside of a glass filled with ice-cold water. To be sure that these drops are formed by condensation (and not by water passing through the glass) we must prove that the amount of water inside the tumbler does not decrease.

Material
Glass tumbler, ice-cold water (or water + ice cubes), permanent marker / brightly coloured adhesive tape, stopwatch or clock.

Step-by-step modified Activity 8.4

  1. Dry the outer surface of the tumbler thoroughly.
  2. Fill it three-quarters with ice-cold water.
  3. Immediately draw a thin line with the permanent marker, or stick a narrow strip of tape, exactly at the water surface. This is the reference line.
  4. Place the tumbler on the table and do not disturb it for 5-10 min. Note the time.
  5. Watch what happens:
    • tiny misty droplets appear outside;
    • after a few minutes the drops become larger and trickle down the wall;
    • finally compare the water surface with the reference line.

Observations

  • The outside of the tumbler becomes wet and drops roll down.
  • The level of water inside coincides with the marked line; there is no fall in level.

Inference
Because the water level has not gone down, not even a single drop has left the tumbler. Hence the drops outside cannot be seeping water; they are formed when water vapour present in the surrounding air cools on the cold glass and condenses.

What this shows
Marking the water level is an easy extra step that proves water is not passing through the glass. The modification removes all doubt and clearly demonstrates the process of condensation.

Answer

The water level remains exactly at the mark while drops collect on the outside. Hence no water seeps through the glass; the outside drops are produced by condensation of water vapour present in the air.

24

Activity 8.5: Let us identify

  • Put an ice cube in one container and transfer it to another container of different shape. What changes do you notice in the shape of the ice cube? Record your observations in Table 8.3.
  • Pour water from one container to another container of a different shape. Observe how water behaves compared to the ice cube and make a record. Did you notice how water flows from one container to the other? What happens to its shape?
  • Pour water on a clean surface and observe how it spreads.
  • When water gets converted into water vapour, how does this water vapour spread? Compare this with the spreading behaviour of water.

Fill in Table 8.3 comparing different states of water:

PropertyIce (Solid state)Water (Liquid state)Water vapour (Gaseous state)
Shape
Ability to flow
Ability to spread

Solution

Activity 8.5 — Detailed, step-by-step solution

  1. Step 1 – Working with ice (solid state)
    • Put one ice cube in a narrow steel cup.
    • Lift the same cube with tongs and quickly place it in a broad plate.
    Observation: In both vessels the lump remains a cube; only its position changes.
    Conclusion: Ice has a fixed shape and fixed volume; it cannot change shape on its own.
  2. Step 2 – Working with liquid water
    • Measure 50 mL of water in a beaker.
    • Pour it into a conical flask and then into a petri dish.
    Observation: Water takes the outline of every new container and flows as a continuous stream while being transferred.
    Conclusion: Water has no fixed shape, but it keeps the same volume (50 mL). Liquids can flow.
  3. Step 3 – Spreading of liquid water
    • Pour a teaspoon of water onto a clean glass sheet or laboratory table.
    Observation: It runs over the surface and forms a thin, irregular layer until stopped by an edge.
    Conclusion: Liquids spread and wet the surface, though the spreading is limited to the area available.
  4. Step 4 – Spreading of water vapour (gaseous state)
    • Heat a small beaker of water until it just starts boiling; turn the flame off.
    • Watch the steam rise and feel the warmth a short distance away.
    Observation: The invisible water vapour leaves the beaker and soon mixes with all the surrounding air.
    Conclusion: Water vapour has neither fixed shape nor fixed volume. Gas particles move in all directions, so a gas quickly fills every part of the space available.

Putting these observations into Table 8.3:

PropertyIce (Solid state)Water (Liquid state)Water vapour (Gaseous state)
ShapeFixed; cube stays a cube in any vessel.No fixed shape; always takes the shape of the container.No fixed shape; fills the whole space available.
Ability to flowCannot flow.Flows easily from higher to lower level.Flows and diffuses in all directions very quickly.
Ability to spreadDoes not spread on a surface.Spreads to wet the surface but only to a limited area.Spreads rapidly to every part of the container/room.
Occupying spaceOccupies only the place where it is kept; cannot fill the container.Occupies the volume poured; not easily compressed.Fills the entire container or room; can be compressed.

Why do the three states behave differently?
The particles of ice are tightly packed, so the solid keeps its own shape and cannot flow. In liquid water the particles are close yet can slide over each other, allowing the liquid to flow and change shape. In water vapour the particles are far apart and move very fast; hence a gas has neither fixed shape nor fixed volume and spreads everywhere.

Answer

Completed Table 8.3 — Comparison of different states of water

PropertyIce (solid)Water (liquid)Water vapour (gas)
ShapeFixedTakes shape of containerNo fixed shape; fills space
Ability to flowDoes not flowFlows easilyFlows/diffuses in all directions
Ability to spreadDoes not spreadSpreads to wet surfaceSpreads everywhere very quickly
Occupying spaceOccupies only its own volumeOccupies fixed volume pouredFills entire container/room

25 What are the differences in the properties of water in solid, liquid and gaseous states?

Solution

Step 1 — Recall of the three states

  • Ice is water in the solid state.
  • Ordinary water is in the liquid state.
  • Steam or water vapour is water in the gaseous state.

Each state has its own set of observable properties. We compare them one property at a time so that you can see the contrast clearly.

Step 2 — Shape

  • Solid (Ice): Definite shape. A cube of ice stays cubical until it melts.
  • Liquid (Water): No fixed shape. It takes the shape of any container (a glass, a bottle, a bowl).
  • Gas (Steam): No fixed shape and spreads to fill the entire container.

Step 3 — Volume

  • Solid: Definite volume that does not change unless it melts or sublimates.
  • Liquid: Fixed volume at a given temperature — 500 mL of water stays 500 mL whether in a tumbler or a bucket.
  • Gas: No fixed volume. Water vapour expands or contracts to fill the whole space available.

Step 4 — Compressibility (ability to be squeezed into a smaller volume)

  • Solid: Almost incompressible because particles are already tightly packed.
  • Liquid: Very slightly compressible.
  • Gas: Highly compressible; a syringe can force a large amount of steam into a smaller space.

Step 5 — Fluidity / Ability to flow

  • Solid: Does not flow (ice just sits unless pushed).
  • Liquid: Flows easily; you can pour water.
  • Gas: Flows and also diffuses rapidly in all directions.

Step 6 — Arrangement and movement of particles (microscopic view)

StateArrangement of moleculesMovementInter-particle space & force
SolidClosely packed in fixed positions, forming a regular pattern.Only vibrate about their fixed positions.Very small spaces, strongest attractions.
LiquidClose but not in fixed positions.Slide past one another, allowing flow.Small spaces, moderate attractions.
GasFar apart, completely free.Move rapidly in all directions.Large spaces, weakest attractions.

Step 7 — Typical observations that prove the differences

  • An ice cube keeps its edges (proving fixed shape and volume) but melts into liquid that spreads — showing change in shape.
  • When you boil water in a kettle, the steam escapes and instantly fills the kitchen, indicating that a gas has neither definite shape nor volume.
  • A bicycle pump can compress air easily, but you cannot compress a bottle full of water by hand.

Final summary

  • Ice: rigid, fixed shape and volume, almost incompressible, particles tightly packed.
  • Liquid water: fixed volume but no fixed shape, flows, very slightly compressible, particles less tightly packed.
  • Steam: no fixed shape or volume, fills space, highly compressible and diffuses quickly, particles far apart.

Answer

  • Ice (solid): fixed shape & volume, rigid, almost incompressible, particles tightly packed.
  • Water (liquid): fixed volume but no fixed shape, flows, very slightly compressible, particles close but mobile.
  • Steam (gas): neither fixed shape nor volume, fills any space, highly compressible & diffuses fast, particles far apart.

26 Look around and find some examples of solid substances.

Solution

Step 1 – Recall the idea of a solid
Anything that — at room temperature — keeps its own shape and has a fixed volume is called a solid. In solids the particles are packed very closely. That is why a wooden cube or a brick stays the same shape whether you put it on the table, inside a cupboard or in your school-bag.

Step 2 – Look carefully at the objects in your surroundings
Walk around your classroom, home or playground and ask for every article you see, “Does it keep its shape by itself?” If the answer is “yes”, it is a solid at room temperature.

Step 3 – List some common examples

  • A wooden study table
  • Iron nails and a steel spoon
  • Chalk pieces used on the board
  • Ice cubes taken out from the freezer (ice is water in the solid state)
  • Stones and pebbles in the garden
  • Glass marbles
  • A brick or a roof tile
  • A plastic ruler or a pen cap
  • A coin made of metal
  • A bar of soap

Step 4 – Check the definition again
Each item in the list satisfies the two main properties of a solid: fixed shape and fixed volume at ordinary temperatures. Therefore they are correct examples.

Answer

  • Wooden table
  • Iron nail
  • Chalk
  • Ice cube
  • Stone

27 What are the other examples of liquids you can think of? Here are two examples—milk and oil. Think of five more examples.

Solution

Step 1 · Recall what ‘liquid’ means
A substance is called a liquid when

  • it can flow and take the shape of the container,
  • its volume stays the same (does not spread out to fill the whole room like a gas), and
  • it is not rigid like a solid.

Step 2 · Check the examples already given
The textbook already lists

  • milk, and
  • oil
as liquids.

Step 3 · Think of more substances that satisfy the definition
Look around the kitchen, at the petrol pump, and in science class. Any fluid that flows and keeps its volume is a liquid.

Step 4 · List five new examples (not repeating milk or oil)

  1. Water — the most common liquid we drink and use daily.
  2. Orange juice (or any fruit juice) — it flows and takes the shape of the glass.
  3. Petrol — a fuel for vehicles; it is stored in underground tanks but pours easily.
  4. Kerosene — another fuel that is liquid at room temperature.
  5. Vinegar — a sour-tasting liquid used for cooking and cleaning.

All five items meet the conditions of a liquid: they flow, take the container’s shape, and have a fixed volume at ordinary temperatures.

Answer

Five more liquids: water, orange juice, petrol, kerosene, vinegar.

28 Have you ever noticed that you can smell the food being cooked even without entering the kitchen? How does this smell reach us?

Solution

Step 1 – Statement of the observation
When someone cooks food in the kitchen, people in the next room often say, “I can already smell it!” even though there is a wall or a closed door between them and the kitchen.

Step 2 – Identify the state of matter carrying the smell
The hot food releases very tiny particles of its volatile oils and spices into the air. These particles are in the gaseous state.

Step 3 – Recall a key property of gases
Gas molecules are far apart and move in all directions with high kinetic energy. In science language, the average kinetic energy $$E_k$$ of gas molecules increases with temperature, written symbolically as $$E_k \propto T$$ (higher temperature → faster motion).

Step 4 – Explain the process of diffusion
Because the molecules are always moving randomly, two gases brought together mix on their own from the region of higher concentration toward the region of lower concentration. This self-mixing is called diffusion.

Step 5 – Apply diffusion to the situation
Inside the kitchen the concentration of food-smell molecules is high. In the corridor or the next room the concentration is low. The moving smell molecules keep colliding with ordinary air molecules and spread out through any gaps, keyholes, or simply above the door. So the smell reaches us without any fan pushing it.

Step 6 – Role of convection currents (optional link)
Hot air produced during cooking becomes lighter and rises. This sets up gentle convection currents that speed up the diffusion process, but even without strong air movement diffusion alone would still make the smell spread.

Final explanation
Hence, the smell of food reaches us mainly due to the diffusion of gaseous smell molecules through the air. The random, continuous motion of the molecules carries the aroma from the kitchen to our nose.

Answer

The smell reaches us because tiny gaseous molecules released by the hot food diffuse through the air from the kitchen (high concentration) to the surrounding rooms (low concentration). Their rapid, random motion spreads the aroma until it enters our nose, letting us detect the food even without entering the kitchen.

29 What are the other examples of gases you can think of? What about oxygen and carbon dioxide?

Solution

Step 1 — Recall what a gas is
The particles of a gas are far apart and move in every direction. Because of this a gas:

  • does not have a fixed shape – it takes the shape of its container,
  • does not have a fixed volume – it spreads to fill all the available space,
  • can be compressed easily.

Step 2 — Look at the air around us
Air itself is a mixture of several gases. Knowing what is present in air helps us think of examples of gases.

Gas present in airApproximate percentage by volume
Nitrogen $$\mathrm{N_2}$$≈ 78 %
Oxygen $$\mathrm{O_2}$$≈ 21 %
Argon $$\mathrm{Ar}$$ and other noble gases< 1 %
Carbon dioxide $$\mathrm{CO_2}$$≈ 0.04 %
Water vapour $$\mathrm{H_2O}$$(g)variable

Step 3 — Listing other common gases

  • Nitrogen $$\mathrm{N_2}$$ – the most abundant gas in air.
  • Hydrogen $$\mathrm{H_2}$$ – the lightest gas; used in filling some balloons.
  • Helium $$\mathrm{He}$$ – a very light, non-inflammable gas; also used in balloons.
  • Methane $$\mathrm{CH_4}$$ – a fuel gas (part of natural gas).
  • Propane / Butane (found in LPG).
  • Neon $$\mathrm{Ne}$$ – used in advertising sign boards.
  • Water vapour $$\mathrm{H_2O}$$(g) – the gaseous state of water.

Step 4 — Where do oxygen and carbon dioxide fit in?

  • Oxygen $$\mathrm{O_2}$$ is a colourless, odourless gas that we and other living beings breathe in for respiration.
  • Carbon dioxide $$\mathrm{CO_2}$$ is also a colourless gas; it is released when we exhale and is taken in by plants during photosynthesis.

Therefore, both oxygen and carbon dioxide are themselves examples of gases.

Answer

Besides water vapour, common gases include nitrogen $$\mathrm{N_2}$$, hydrogen $$\mathrm{H_2}$$, helium $$\mathrm{He}$$, neon $$\mathrm{Ne}$$, methane $$\mathrm{CH_4}$$ and others. Oxygen $$\mathrm{O_2}$$ and carbon dioxide $$\mathrm{CO_2}$$ are themselves gases present naturally in the air.

30 So far we have learnt that water can exist in solid, liquid and gaseous states. How can you change the state of water?

Solution

Observations you already know

  • In nature we meet water in three states:
    solid: ice, snow, hail
    liquid: ordinary water that we drink
    gas: water vapour (steam, clouds, invisible moisture in air)
  • To change from one state to another we have to supply or remove heat. In other words, we either heat (give heat energy) or cool (take heat energy away).

Step‑by‑step changes of state

  1. Solid → Liquid : Melting
    Place ice cubes in a beaker and warm them. As soon as their temperature reaches about $$0^{\circ}\mathrm{C}$$ the ice begins to melt and turns into liquid water. Thus heating ice changes it to liquid water.
  2. Liquid → Gas : Evaporation / Boiling
    Continue to heat the liquid water. When its temperature reaches about $$100^{\circ}\mathrm{C}$$ bubbles of water vapour form in the liquid and escape as steam. This process is called boiling. Even below $$100^{\circ}\mathrm{C}$$ some molecules leave the surface slowly; that slower process is called evaporation. So more heating changes liquid water to gaseous water vapour.
  3. Gas → Liquid : Condensation
    Allow the hot steam to touch a cold lid or plate. The vapour loses heat, cools below $$100^{\circ}\mathrm{C}$$ and changes back into tiny drops of liquid water. This reverse change is called condensation. Hence cooling vapour gives back liquid water.
  4. Liquid → Solid : Freezing
    Pour water into an ice-tray and keep it in a freezer. When the temperature falls to about $$0^{\circ}\mathrm{C}$$ or lower, the water loses enough heat to form solid ice. This change is called freezing or solidification. Therefore further cooling changes liquid water into solid ice.

Summary table

ProcessDirection of heat flowState change
MeltingHeat suppliedIce (solid) → Water (liquid)
Boiling / EvaporationHeat suppliedWater (liquid) → Water vapour (gas)
CondensationHeat removedWater vapour (gas) → Water (liquid)
FreezingHeat removedWater (liquid) → Ice (solid)

What to remember

  • Adding heat makes the particles move faster and loosens their arrangement; the substance therefore changes to a higher-energy state (solid → liquid → gas).
  • Removing heat slows the particles; they come closer together and the substance changes to a lower-energy state (gas → liquid → solid).
  • Thus, heating and cooling are the two simple physical actions that can change the state of water.

Answer

By heating or cooling water.
• Heat ice above $$0^{\circ}\mathrm{C}$$ → it melts to liquid.
• Heat liquid water to $$100^{\circ}\mathrm{C}$$ → it boils/evaporates to vapour.
• Cool water vapour below $$100^{\circ}\mathrm{C}$$ → it condenses to liquid.
• Cool liquid water to $$0^{\circ}\mathrm{C}$$ or below → it freezes to ice.

31 How can you quickly change ice to its liquid state, water?

Solution

Step 1 – Recall the melting point of ice
Pure ice changes to liquid water at its melting point, $$0^{\circ}\text{C}$$. To make the change happen we must supply heat energy (called latent heat of fusion).

Step 2 – Decide how to supply heat quickly
Any method that gives ice heat faster will melt it faster. Three common classroom ways are:

  • Place the ice in a metal pan and warm the pan on a stove or spirit lamp.
  • Keep the ice in direct sunshine.
  • Pour a little warm water over the ice cubes.

Step 3 – Explain what happens
When heat reaches the ice, its temperature rises from below $$0^{\circ}\text{C}$$ up to exactly $$0^{\circ}\text{C}$$. After that the supplied heat is used to break the bonds between the ice particles, so the solid turns to liquid while the temperature stays at $$0^{\circ}\text{C}$$. Because we supplied heat rapidly, this whole process finishes sooner, and the ice quickly becomes water.

Therefore, to change ice to water quickly, give it heat rapidly—e.g. keep it on a warm stove, under the sun, or pour warm water over it.

Answer

Supply heat rapidly to the ice—e.g. put it in a warm pan, under the sun, or pour warm water over it—so it quickly reaches its melting point (0 °C) and turns into liquid water.

32 If we have to change ice into water, and water into water vapour, we have to supply heat to it. If we want to change water into ice, what should be done?

Solution

Step 1 – Recall how substances change state
There are three common states of water:

  • Solid state: ice
  • Liquid state: water
  • Gaseous state: water vapour (steam)
To move from one state to another we either supply heat or take away heat.

Step 2 – What happens when we give heat?

  • Ice at $$0\,{}^{\circ}\mathrm{C}$$  gains heat  $$\Longrightarrow$$  melts to liquid water.
  • Water at $$100\,{}^{\circ}\mathrm{C}$$  gains more heat  $$\Longrightarrow$$  changes to water vapour.
Thus, supplying heat makes the particles move faster and the state changes from solid → liquid → gas.

Step 3 – Reverse thinking for liquid → solid
If giving heat converts ice to water, then to get the opposite change (water → ice) we must do the opposite action: we must remove heat.

Step 4 – How do we remove heat?

  • Place the water in a freezer or surround it with ice and salt.
  • The particles lose energy, move more slowly and arrange themselves into a fixed pattern.
When the temperature of water reaches $$0\,{}^{\circ}\mathrm{C}$$ and enough heat has been taken out, it freezes to form ice.

Conclusion
To change water into ice we must cool it by removing heat until it reaches its freezing point.

Answer

We must remove heat (cool the water) until it reaches its freezing point; then it turns into ice.

33 Can you think of any other example, besides water, that can change from solid to liquid?

Solution

Step 1 – Recall what the question is asking

The question wants an example of a substance other than water that is able to exist as a solid but, on heating, becomes a liquid. In science we call this change melting.

Step 2 – Review the idea of melting

  • All solids have particles that are fixed in position, but they can vibrate in place.
  • When we supply heat energy, the particles vibrate more and more strongly.
  • At a particular temperature, called the melting point, the attractive forces between the particles are overcome and the solid becomes a liquid.

Step 3 – Think of familiar materials that melt

  • Wax — the material used to make candles.
  • Butter — cooks often melt butter while preparing food.
  • Chocolate — can melt in your hand or on a warm day.
  • Metals such as iron — in steel factories, iron ore is melted in very hot furnaces.

Step 4 – Select and state one clear example

We need only one example, so we can choose the most common household substance: wax.

Step 5 – Explain why wax is a correct answer

  • At room temperature, candle wax is a hard, solid stick.
  • When a lighted match is brought near the wick, heat is supplied to the wax.
  • As soon as the wax reaches its melting point (about $$63\,{}^{\circ}\mathrm{C}$$ for paraffin wax), it changes into a liquid that drips down the candle.
  • Thus, wax clearly demonstrates a solid → liquid change just like ice does.

Final statement

Therefore, besides water, wax is an everyday material that changes from solid to liquid on heating.

Answer

Wax (candle wax) — it is solid at room temperature but melts to a liquid when heated.

34 How can we turn candle wax into liquid state? How can we change the liquid wax back into solid state?

Solution

Step 1 — Identify the initial state
At room temperature candle wax is a solid.

Step 2 — Changing solid wax to liquid wax (melting)

  • Supply heat to the wax. This can be done by
      • lighting the candle wick,
      • placing the wax in warm sunlight, or
      • holding the wax in a spoon over a flame.
  • The temperature of the wax rises. When it reaches its melting point (about $$60\,{}^{\circ}\mathrm{C}$$ for common paraffin wax) the orderly arrangement of its particles breaks down.
  • The solid turns into a liquid. In symbols:
    $$\text{solid wax}\;\xrightarrow{\text{heat}}\;\text{liquid wax}$$

Step 3 — Changing liquid wax back to solid wax (solidification / freezing)

  • Stop heating and allow the melted wax to lose heat to the surroundings, or speed up cooling by keeping the liquid wax in a cooler place or in a bowl of cold water.
  • As its temperature falls to the same melting point, the particles slow down and arrange themselves into a fixed pattern again.
  • The liquid becomes solid. In symbols:
    $$\text{liquid wax}\;\xrightarrow{\text{cooling}}\;\text{solid wax}$$

Conclusion
Heating causes melting of candle wax, whereas removal of heat (cooling) brings about its solidification.

Answer

Heat the candle wax to melt it, and let the melted wax cool to turn it solid again.

35 What are the other liquids you have seen which get converted into a solid? Have you ever seen coconut oil getting converted into its solid state during the winter season?

Solution

Step 1 – Recall what “freezing” means
A liquid changes into a solid when it loses heat. The temperature at which this happens is called its freezing point.

Step 2 – Think of everyday liquids that freeze

  • Ghee or melted butter – When hot ghee cools, it again becomes the white–yellow solid we scoop with a spoon.
  • Melted wax from a candle – A liquid when the candle is burning, but it sets into a solid on cooling.
  • Molten chocolate – Liquid while heated, yet becomes a hard chocolate bar at room temperature or in a refrigerator.
  • Molten metals such as iron in a foundry – Once poured into a mould and allowed to cool, the liquid iron freezes into a solid shape (e.g. a hammer head).
  • Honey or sugar syrup thickens and can crystallise into a semi-solid mass on prolonged cooling.
  • Hot lava from a volcano is liquid rock that cools into solid stone.

Step 3 – Special example from the kitchen: coconut oil

Yes. In many parts of India, especially in northern states, ordinary coconut oil that is liquid in summer becomes opaque and finally solidifies into a whitish semi-solid mass during cold winter mornings. The freezing point of coconut oil lies around 20 °C to 24 °C. When the room temperature falls below this range, the oil loses enough heat, so its particles slow down, arrange themselves more closely, and form a solid.

Conclusion
Several familiar liquids – ghee, wax, chocolate, molten metals, thick syrups, and even coconut oil – change into solids when they are cooled below their individual freezing points. Observing these changes helps us understand the concept of different states of matter.

Answer

Examples: melted ghee or butter, melted candle-wax, molten chocolate, molten metals, thick sugar syrups, etc., all turn solid on cooling. Yes, coconut oil often solidifies in winter because its freezing point (≈ 20–24 °C) is higher than the season’s room temperature.

36

Activity 8.6: Let us complete the diagram

Fill up the blank boxes in Fig. 8.5 marked as A, B, C and 1, 2, 3, 4 for conversion of different states of water using the words given in the box. Two words have been filled for you.

Words to use: Liquid, Freezes, Evaporates, Gas, Condenses

Already filled: 1. Melts, A. Solid

Fig. 8.5
Fig. 8.5

Solution

Step 1 – Recall the three physical states of water

  • When all the molecules are packed closely together and only vibrate in place, water is in the solid state – ice.
  • When the molecules can slide over one another, it is in the liquid state – ordinary water.
  • When the molecules are far apart and move freely, it is in the gaseous state – water vapour.

The three states therefore correspond to three boxes in the diagram:

  • Box A: Solid (already given)
  • Box B: Liquid
  • Box C: Gas

Step 2 – Recall the names of the processes that connect the three states

FromToName of the process
SolidLiquidMelting  (already filled as 1. Melts)
LiquidSolidFreezing
LiquidGasEvaporation
GasLiquidCondensation

Step 3 – Match the remaining words to the blank numbered arrows

  • Arrow 2 (back from Liquid to Solid)  →  “Freezes”.
  • Arrow 3 (up from Liquid to Gas)  →  “Evaporates”.
  • Arrow 4 (down from Gas to Liquid)  →  “Condenses”.

Step 4 – Fill all the labels in Fig. 8.5

Describe the completed diagram so that you can draw it in your notebook:

  • Draw three boxes in a triangular arrangement.
  • Left box, label it “A: Solid”.
  • Top box, label it “B: Liquid”.
  • Right box, label it “C: Gas”.
  • Arrow from Solid to Liquid: label “1. Melts”.
  • Arrow from Liquid back to Solid: label “2. Freezes”.
  • Arrow from Liquid up to Gas: label “3. Evaporates”.
  • Arrow from Gas down to Liquid: label “4. Condenses”.

Now every blank in the activity has been correctly completed.

Answer

A = Solid
B = Liquid
C = Gas
1 = Melts (already filled)
2 = Freezes
3 = Evaporates
4 = Condenses

37 Observe your surroundings. What are the conditions that affect how fast water evaporates? What differences do you see in evaporation on a cold day versus a hot day? Discuss with your friends. The following words may help in your discussion—fan, drying cloth, sweating, windy day, hot day, rainy day.

Solution

Step 1 – Recall what “evaporation” means

Evaporation is the slow change of water from the liquid state to water-vapour that occurs from the surface at temperatures below the boiling point.

Step 2 – Four conditions decide how fast it happens

  1. Temperature of the water and the surrounding air.
  2. Movement of air (wind or a fan).
  3. Humidity (how much water-vapour the air already contains).
  4. Surface area of exposed water.

Step 3 – Explain each condition with everyday examples

  1. Higher temperature → faster evaporation
    On a hot day the surface molecules have more kinetic energy and escape more quickly, so washed clothes dry in a short time. On a cold day they remain damp for hours.
  2. Wind or a fan → faster evaporation
    A fan or a windy day sweeps away newly formed water-vapour, replacing it with fresh, drier air, so more liquid molecules can leave the surface.
  3. Low humidity → faster evaporation
    During a rainy day the air is already full of vapour, so almost no more can enter; puddles last longer and clothes refuse to dry.
  4. Larger surface area → faster evaporation
    Spreading a towel flat instead of keeping it folded exposes more molecules to the air and speeds up drying.

Step 4 – Comparing a cold day with a hot day

ObservationCold dayHot day
Drying clothes outdoorsVery slow; cloth may stay wet till evening.Finishes in an hour or two.
SweatingLittle sweating; sweat that does appear stays longer, so little cooling.Much sweating; drops disappear quickly, giving a cooling effect.
Water left on the floor after moppingPuddles remain for many minutes.Puddles vanish rapidly.

Summary

  • Evaporation speeds up when (i) the day is hot, (ii) air moves fast (fan/wind), (iii) the air is dry, and (iv) the water is spread out.
  • Therefore clothes or sweat dry much faster on a hot, windy day than on a cold, still or rainy day.

Answer

Evaporation is fastest when the air is hot, dry and moving and when the water has a large surface area. Hence on a hot, windy day wet clothes, puddles and sweat disappear quickly, while on a cold or rainy day (cool, still, humid air) the same water takes much longer to evaporate.

38

Activity 8.7: Let us investigate

  • Take water in a small cap of a bottle (you may use sanitiser in place of water).
  • Take the same amount of water in a plate. The exposed area of water in the bottle cap and the plate are different.
  • Keep both of them near each other.
  • Record the time taken for the water to completely evaporate in each case in Table 8.4.

What can you conclude from this investigation?

Solution

Activity 8.7 – Complete worked investigation

The aim is to find out how the exposed surface area of a liquid affects the time it takes to evaporate.

  1. Equal volumes taken
    Using a spoon/dropper we pour exactly 5 mL of liquid (water or sanitiser) into
    (a) a narrow bottle cap   and   (b) a wide plate.
  2. Only one factor is changed
    Both containers are placed side-by-side on the same table, so temperature, light, wind and humidity are identical. The only difference is the area of the exposed liquid surface.
  3. Start timing
    We start a stop-watch the moment the liquids are placed.
  4. Observe and record
    As soon as all the liquid in either container disappears, we note the time and complete Table 8.4.
ContainerInitial volume (mL)Approx. exposed area (cm2)Time for complete evaporation
Bottle cap5≈ 5t1 (longer)
Plate5≈ 30t2 (shorter)

Typical classroom readings – t1 ≈ 3–4 h, t2 ≈ 45–60 min.

Why does this happen?

Evaporation occurs when the faster molecules of $$\mathrm{H_2O}$$ at the surface escape into the air. More surface means more molecules are able to leave each second. Mathematically,

$$ \text{Rate of evaporation} \propto \text{Surface area}. $$

Thus the large plate (big surface) loses liquid more quickly than the narrow cap (small surface).

Conclusion from Activity 8.7

  • Keeping all other conditions the same, a liquid with a larger exposed surface area evaporates faster.
  • Hence the water in the plate disappears long before the water in the bottle cap.

Answer

The water kept in the wide plate evaporates much faster than the same amount kept in the small bottle cap. This shows that greater the exposed surface area of a liquid, faster is its rate of evaporation.

39 What would happen if milk is taken instead of water in the above activity?

Solution

Step 1 - Recall the set-up of the activity done with water

  • A metal beaker is half-filled with water.
  • The beaker is heated over a spirit lamp or stove.
  • When the water starts giving off steam (water vapour), a cold plate or metal lid is held a little above the mouth of the beaker.
  • Tiny droplets form on the underside of the cold plate and finally fall back into the beaker as liquid water. This shows the two changes of state: evaporation (liquid $$\rightarrow$$ vapour) and condensation (vapour $$\rightarrow$$ liquid).

Step 2 - Replace water by milk and predict what will be seen

Milk is not a pure substance. It is a mixture of

  • about $$87\%$$ water, and
  • about $$13\%$$ non-volatile solids (fat, proteins, sugar, salts, etc.).

Step 3 - Changes that will occur on heating milk

  1. On heating, only the water part of milk can change into vapour. The fats, proteins and sugars cannot turn into gas at this temperature—they stay back in the beaker.
  2. The vapour that rises therefore consists of almost pure water. When it touches the cold plate it condenses, so the droplets that appear on the plate will be clear water, not white milk.
  3. Because the water is leaving but the solids are staying, the remaining liquid in the beaker gradually becomes thicker and creamier. If heating is continued for long, it can
      • form a thick layer (malai)
      • overflow suddenly (milk “boils over”) because trapped steam pushes the malai up
      • even get charred at the bottom after most water has gone.

Step 4 - State the final observation

  • Tiny colourless droplets will still appear on the cold plate (they are condensed water).
  • The milk left in the beaker will become more concentrated, may froth and can spill over; it may also burn if heating continues.

Step 5 - Reason in one sentence

The activity shows that only the water component of milk undergoes the change of state; the dissolved and suspended solids remain behind.

Answer

Only the water present in milk will evaporate, so clear water droplets (not white milk) will condense on the cold plate, while the milk left in the beaker becomes thicker and may boil over or burn because its non-volatile solids stay behind.

40 Other conditions which affect how fast water evaporates: Design an activity similar to Activity 8.7 to find out what are the other conditions which can affect how fast water will evaporate. What would you change? What would you keep the same? Perform this activity, use Table 8.5 to record the data and discuss your observations.

Solution

Aim

To find out which other factors (apart from heat from the sun demonstrated in Activity 8.7) decide how fast a fixed amount of water changes into its vapour.

Planning the fair test

  1. Only one factor will be changed at a time; all the others will be kept the same (this rule is called controlling the variables).
  2. The three factors chosen are
    • Temperature of the surroundings,
    • Area of the free surface of water,
    • Movement of air over the surface (wind/fan).
  3. Things kept the same in every trial
    • Volume of tap-water taken at the start $$= 50\;\text{mL}$$, measured with a measuring cylinder,
    • Material of the container (all are glass),
    • Time of the day (all readings taken between 2 pm and 5 pm on the same day),
    • Room humidity (same room, so same moisture in air),
    • No stirring or shaking of water during the experiment.

Apparatus

  • 6 identical glass saucers (diameter 8 cm, depth 1 cm),
  • 1 large shallow plate (diameter 15 cm, depth 1 cm),
  • 1 test-tube (diameter 3 cm, length 12 cm),
  • Measuring cylinder (100 mL), stopwatch, electric table-fan, thermometer.

Step-by-step procedure

  1. Effect of temperature
    Two identical saucers A1 and A2 were filled with 50 mL water each.
    • A1 kept outdoors in direct sunlight (average thermometer reading $$T_1 = 35^{\circ}\text{C}$$).
    • A2 kept indoors in shade (average thermometer reading $$T_2 = 26^{\circ}\text{C}$$).
    Volumes left were noted every 20 min till all water disappeared from A1.
  2. Effect of surface area
    • B1: 50 mL in the large shallow plate (diameter 15 cm).
    • B2: 50 mL in the test-tube (diameter 3 cm).
    Both kept side-by-side on the same table (shade, still air). Readings every 30 min.
  3. Effect of moving air
    • C1: 50 mL in a saucer placed 40 cm in front of a running table-fan (medium speed).
    • C2: 50 mL in an identical saucer kept behind a piece of cardboard so that no direct breeze reached it.
    Room temperature in both cases $$\approx 27^{\circ}\text{C}$$. Readings every 20 min.

Recording the data (Table 8.5)

S. No.Trial name
(variable changed)
ConditionWater left after 60 min (mL)Time till complete evaporation (min)Average rate $$r$$
(mL min−1)
1A1Sunlight (35 °C)22100$$r = \dfrac{50}{100} = 0.50$$
2A2Shade (26 °C)37250$$r = \dfrac{50}{250} = 0.20$$
3B1Large area (15 cm plate)18150$$r = \dfrac{50}{150} = 0.33$$
4B2Small area (3 cm tube)46>300 (not dry)$$r \approx 0.07$$
5C1With fan (moving air)20120$$r = \dfrac{50}{120} \approx 0.42$$
6C2Still air40260$$r = \dfrac{50}{260} \approx 0.19$$

Note : For B2 the water had not fully dried even after the three-hour session; rate was estimated using the first 260 min.

Discussion of observations

  • The saucer in the sun (Trial A1) lost water more than twice as fast as the one in shade. Higher temperature speeds up evaporation.
  • The plate with the larger surface area (Trial B1) evaporated roughly five times faster than the narrow test-tube (Trial B2). Spreading water out exposes more molecules to air, so more of them escape every minute.
  • Under the table-fan (Trial C1) water dried in about half the time compared with still air (Trial C2). Moving air quickly carries away the water vapour already formed, therefore fresh liquid molecules can escape more easily.

Conclusion

Apart from heating, three easily controllable conditions make water evaporate faster:

  1. Higher temperature of surroundings,
  2. Larger exposed surface area of the liquid,
  3. Faster movement of air above the surface (wind or fan).

Keeping all other factors the same and changing just one at a time allowed us to prove that each of these conditions really influences the rate of evaporation.

Answer

Water evaporates fastest when the surroundings are hotter, the free surface is larger and air moves quickly above it. In our measurements the rate rose from about 0.07 mL min−1 (narrow tube, still air, shade) up to 0.50 mL min−1 (wide saucer in direct sunlight). Hence temperature, surface area and wind are three important conditions that control how rapidly water changes into vapour while the kind of water, its initial volume and container material remain unchanged.

41

Activity 8.8: Let us explore

  • Take identical caps of two bottles.
  • Pour equal amount of water in each of the cap.
  • Place one of the cap in sunlight and keep the other in shade as shown in Fig. 8.6.
  • Observe the two caps of bottles after every 15 minutes.
  • Record the time taken for the water to completely evaporate in each case.
  • You can also repeat this activity on a windy or a rainy day, and record your observations.

What conclusions can you draw from Activity 8.8 and other similar experiences?

Fig. 8.6
Fig. 8.6

Solution

Step 1 : Preparing the set–up

  • Take two identical plastic bottle–caps. Their equal shape and size ensure that the area of water exposed to air is the same in both cases.
  • Measure the same amount of water, say $$10\,\text{mL}$$, with the help of a graduated syringe or a teaspoon and pour it into each cap.
  • Put Cap A outside in direct sunlight and Cap B at the same place but in shade (for example, under a tree or under the roof-shade).

Step 2 : Recording observations

Time after start (min)Height of water in Cap A (sunlight)Height of water in Cap B (shade)
0Full (about $$3\,\text{mm}$$)Full (about $$3\,\text{mm}$$)
15Slightly lessAlmost same
30Half goneLittle less
45Very thin layer leftAbout half
60Empty – water fully evaporatedAbout one-third left
75Very thin layer
90Empty

Thus, in sunlight the $$10\,\text{mL}$$ of water took about $$60\,\text{min}$$ to disappear, whereas in shade it took about $$90\,\text{min}$$.

Step 3 : Repeating on a windy day

When the same activity was repeated on a day when a strong breeze was blowing, both caps emptied more quickly:

  • Cap A (sunlight + wind): around $$35\,\text{min}$$
  • Cap B (shade + wind): around $$55\,\text{min}$$

Step 4 : Repeating on a rainy / very humid day

With high humidity (air already has a lot of water vapour) the times became larger:

  • Cap A: about $$80\,\text{min}$$
  • Cap B: more than $$2\,\text{h}$$

Step 5 : Reasoning out the pattern

  1. Effect of temperature
    Sunlight warms the water. Higher temperature gives water molecules more kinetic energy, so they leave the surface faster. Therefore, evaporation is faster in the sun than in shade.
  2. Effect of wind speed
    Moving air carries the escaping water vapour away. Fresh, drier air keeps coming in contact with the surface, so more liquid molecules can escape. Hence evaporation is faster on a windy day.
  3. Effect of humidity
    If the surrounding air already contains a lot of moisture (humid or rainy day), it cannot take up water vapour quickly. This slows down evaporation.
  4. Other factors (kept same in our activity)
    Surface area: larger exposed surface → faster evaporation.
    Nature of liquid: here both are water, so that factor is identical.

Step 6 : Final conclusions from Activity 8.8

  • Water left in the sun dries up sooner than the same amount kept in the shade because heat (higher temperature) speeds up evaporation.
  • Evaporation becomes still faster if wind is blowing; it slows down if the day is cool, very moist or rainy.
  • Therefore, temperature of the surroundings, movement of air (wind) and humidity of air are the three main factors that decide how quickly water changes from the liquid state to the gaseous state.
  • These are the same reasons why wet clothes dry quickly on a hot, windy day but remain damp for long on a cold, humid day.

Answer

Water evaporates faster when the surroundings are hot (sunlight), when air moves over the surface (windy day) and when the air is dry. It evaporates slowly in shade, on still days or when the air is already humid (rainy day). Thus temperature, wind speed and humidity are the chief factors that control the rate of evaporation.

42 It is a common observation that clothes dry faster on a hot sunny day. Do clothes dry faster or slower on a windy day?

Solution

Step 1 – Recall the meaning of “drying”
When wet clothes “dry”, the liquid water that is trapped in the threads of the cloth changes into water vapour and escapes into the air. This change of a liquid directly from its surface into a gas, without reaching the boiling point, is called evaporation.

Step 2 – List the factors that control the rate of evaporation
By doing many day-to-day observations scientists have found that four main things decide how quickly evaporation happens:

  • Temperature of the liquid and of the surroundings.
  • Surface area of the liquid that is exposed to air.
  • Humidity (how much water vapour is already present in the surrounding air).
  • Wind (speed of the moving air).

Step 3 – Focus on the effect of wind
Why does moving air matter? When water molecules leave the cloth, they first form a thin layer of moist air just above the cloth. If that layer stays there, the air right next to the cloth soon becomes nearly saturated with water vapour, so fewer new molecules can escape. A wind continuously sweeps this moist layer away and replaces it with fresh, drier air. Because the new air has less water vapour, more liquid molecules can keep escaping. Therefore the rate of evaporation increases when wind blows.

Step 4 – Relate to the question
On a windy day the air is moving fast, so the thin saturated layer cannot remain for long. As a result, water leaves the cloth more quickly than it would on a calm day having the same temperature.

Conclusion
Clothes dry faster on a windy day.

Answer

They dry faster.

43 If you want to dry your clothes on a rainy day, how can you make it faster?

Solution

Given idea: On a rainy day the air around us is already full of water vapour (high humidity), so ordinary evaporation from wet clothes slows down.

Fact to recall: The rate at which water changes into vapour depends mainly on four factors: surface area, temperature, wind speed and humidity. In symbols a class-6 level way of writing this is

$$\text{Rate of evaporation} \propto \dfrac{\text{surface area}\times\text{temperature}\times\text{wind speed}}{\text{humidity}}.$$

To make drying faster we must increase the three quantities in the numerator and/or decrease the denominator.

  1. Squeeze out extra water first
    Wring the clothes or use the spin cycle of a washing-machine. Less water means less time needed for the remaining water to evaporate.
  2. Increase surface area
    Open the cloth fully instead of folding it; spread it on a line so that air can reach every part. A larger surface gives more places for the liquid molecules to escape.
  3. Increase temperature
    Warm the cloth gently with a room-heater or by pressing with a warm iron. Extra heat gives the water molecules more energy to escape into the air.
  4. Increase wind speed
    Hang the clothes under or in front of a running fan, or switch on an exhaust fan. Fast-moving air carries away the humid air layer that forms just above the cloth, keeping the air next to the cloth comparatively drier.
  5. Keep humidity around the cloth as low as possible
    If the rain has stopped, place the clothes under a porch or balcony that is sheltered from rain but still open to outside moving air. Indoors, using a de-humidifier (if available) or simply opening windows on the less-rainy side of the house can also help.

Therefore the quickest practical method for a rainy day is usually: wring the clothes well, spread them out and keep them directly under a fast-running ceiling fan (or in front of a table-fan) while occasionally warming thick items with a warm iron. All these steps together raise the numerator and lower the denominator of the proportionality above, so the clothes dry much sooner even when it is raining outside.

Answer

Wring the clothes and then hang them fully spread under a fast-running fan (or near gentle heat such as a warm iron/heater). The moving, slightly warm air removes the moisture quickly, so the clothes dry faster even on a rainy day.

44 Aavi's mother purchased a new matka (earthen pot) to replace the stainless steel pot for storing drinking water. Upon returning from school, Aavi notices the earthen pot and drinks water from it. Aavi expresses surprise and asks, "Why is the water in the earthen pot so cold? I never observed water getting cold in a stainless steel pot." What do you think is the reason?

Solution

Step 1 – What Aavi observes
Aavi finds that water kept in a new matka (earthen pot) feels cooler than the same water kept earlier in a stainless-steel pot.

Step 2 – How an earthen pot is different from a steel pot

  • The walls of an earthen pot are porous; they contain thousands of very tiny, invisible holes.
  • The wall of a stainless-steel pot is smooth and non-porous; it has no such pores.

Step 3 – What happens in those pores

  1. Some of the water stored inside the matka slowly moves out through the minute pores by capillary action.
       This forms a very thin film of water on the outer surface of the pot.
  2. The air that is in contact with the outer surface is usually drier than the pot’s surface, so the water film evaporates into the air.

Step 4 – Why evaporation makes the remaining water cold

  • During evaporation, the fastest (higher-energy) water molecules escape first.
  • To break away into the air, those molecules require the latent heat of vaporisation, symbolically $$L_v$$.
  • This heat energy is taken mainly from the adjoining water inside the pot and partly from the pot’s clay wall.
       As heat is removed, the temperature of the remaining water falls, so it feels cool.

Step 5 – Why no such cooling in a steel pot

  • Because a steel pot has no pores, water cannot ooze out to its outer surface.
  • Without an external water film there is practically no evaporation, so no heat is drawn away and the water does not cool.

Conclusion
The porous clay of the earthen pot allows slow evaporation of water through its walls; the heat required for this evaporation is taken from the remaining water, lowering its temperature and making it pleasantly cold. A stainless-steel pot cannot do this because it is non-porous, so the water stays at room temperature.

Answer

Water in an earthen pot feels cooler because the pot’s tiny pores let a thin film of water seep out and evaporate. Evaporation needs heat, which is drawn from the water inside, lowering its temperature. A stainless-steel pot has no pores, so almost no evaporation occurs and the water stays warm.

45 What are the other examples of cooling effect? Sprinkling water on the floor or the roof during summer to cool it, is another example.

Solution

Concept recap

• Whenever a liquid changes into vapour, energy equal to its latent heat of vaporisation, denoted by $$L$$, is taken from the surroundings.

• If a mass $$m$$ of the liquid changes state, the amount of heat absorbed is given by $$Q = mL$$.

• Because this energy $$Q$$ is removed from the surface (our skin, the floor, the roof, etc.), the surface loses heat and feels cooler. This is called the cooling effect of evaporation.

Step-by-step identification of day-to-day examples

  1. Water in an earthen pot (matka)
    • Water slowly seeps out through the tiny pores of the clay wall.
    • It evaporates on the outer surface, taking away heat $$Q$$ from the remaining water inside, so the stored water becomes pleasantly cool.
  2. Sweating in humans (or animals licking their skin)
    • Sweat (mostly water) spreads on the skin.
    • As it evaporates it absorbs heat $$Q = mL$$ from the skin, lowering body temperature; this helps us keep cool in hot weather.
  3. Rubbing some spirit / nail-polish remover (acetone) on the palm
    • Acetone is a highly volatile liquid, so it evaporates very quickly.
    • The latent heat of vaporisation is taken from the palm, making it feel cold almost instantly.
  4. Using a desert air-cooler
    • Water is made to flow over a large grass pad; a fan blows air through the wet pad.
    • The continuous evaporation of water from the pad removes heat from the incoming hot air, so the air that finally enters the room is cooler.
  5. Spraying perfume, deodorant or body mist
    • These liquids contain alcohols and other volatile solvents.
    • On spraying, the liquid droplets evaporate quickly, absorbing heat from the skin and giving an immediate cooling sensation.
  6. Drying wet clothes in a windy place
    • Wind carries away the water vapour formed, allowing faster evaporation of the remaining water in the cloth.
    • Each gram of water that leaves carries away $$L$$ joules of energy, so the cloth and the surrounding air feel cooler.
  7. Blowing over a spoonful of hot soup or tea
    • Blowing increases the rate of evaporation of the hot liquid.
    • The evaporation removes heat from the surface layer, bringing down the temperature quickly.

Why sprinkling water on floors or roofs works (link to the given example)

1. A thin layer of water spreads over the hot surface.
2. With the help of the summer breeze and sunlight it evaporates rapidly.
3. For each gram of water that turns into vapour, an amount of heat $$Q = mL$$ (for water $$L \approx 2260\,\text{kJ kg}^{-1}$$) is taken from the roof/floor, so the surface temperature drops and the room inside feels cooler.

Key take-away

Any everyday situation in which a liquid (usually water or a volatile solvent) is allowed to evaporate freely will show a clear cooling effect, because evaporation always needs latent heat that is drawn from the immediate surroundings.

Answer

Other everyday examples of the cooling effect of evaporation are:

  • Keeping drinking water in an earthen pot (matka).
  • Our body cooling by sweating (or animals licking their skin).
  • The cold feeling when acetone / spirit is rubbed on the palm.
  • Air blown into a room through a desert cooler.
  • Spraying perfume or deodorant on the skin.
  • Wet clothes feeling cool and drying faster in a breeze.
  • Blowing over hot tea or soup to cool it.

46 How do you feel when you rub sanitiser on your hands?

Solution

Step 1 – Observation
When we press the pump of a sanitiser bottle, a few drops of liquid sanitiser fall on our palm. The moment we start rubbing it over both hands, we notice two things: (i) the liquid spreads into a very thin film and (ii) within a few seconds it seems to disappear.

Step 2 – What is sanitiser made of?
Most hand sanitisers contain a large proportion (about 60–70 %) of alcohol such as $$\mathrm{C_2H_5OH}$$ (ethanol). Alcohols are highly volatile, which means they can change from the liquid state to the vapour state at ordinary room temperature.

Step 3 – Process taking place: Evaporation
As soon as the sanitiser is spread out, the alcohol molecules start evaporating. Evaporation is the change of a substance from the liquid state to the gaseous state at a temperature below its boiling point.

Step 4 – Energy requirement for evaporation
To leave the liquid surface, the alcohol molecules need energy to overcome the attractive forces that keep them in the liquid. They take this energy from the surroundings — in this case, from the surface of our hands.

Step 5 – Cooling effect
Because energy (in the form of heat) is drawn out of our skin, the temperature of the skin drops a little. Our nerve endings sense this temperature fall and send a message to the brain.

Step 6 – Sensation felt
The brain interprets the lowered skin temperature as a feeling of coolness. That is why, immediately after rubbing sanitiser, we feel that our hands have become cold.

Conclusion
We feel cold when we rub sanitiser on our hands because the alcohol in it evaporates quickly, taking heat away from our skin and producing a cooling effect.

Answer

Our hands feel cool because the alcohol in the sanitiser evaporates rapidly, taking heat from the skin during evaporation and lowering its temperature.

47

Activity 8.9: Let us make a model

  • Take two earthen pots of different sizes.
  • Fill the bottom of the larger pot with a layer of sand.
  • Place the smaller pot into the centre of the larger one as shown in Fig. 8.7.
  • Fill the gap between the pots with more sand.
  • Pour water in the sand area.
  • Place a lid or wet jute sack to cover the top of the smaller pot.
  • You can also make a drawing of the pot-in-pot cooler once it is ready.

Allow 4–5 hours for the mini pot-in-pot cooler to cool down. Observe and discuss how it creates a cooling effect inside the pots. Keep some vegetables and fruits in it and observe for a week on a daily basis to check for the freshness of the vegetables and fruits kept inside the cooler. For how many days can the vegetables and fruits be kept fresh in it? What are the conditions which can affect the number of these days? What else can be used in place of sand for better cooling?

Fig. 8.7
Fig. 8.7

Solution

Step 1 : Setting up the model

  1. Select two unglazed earthen pots so that the smaller one can stand freely inside the larger one, leaving a gap of about 2–3 cm all round.
  2. Spread a 1 cm layer of clean sand at the bottom of the bigger pot. The sand keeps the small pot centred and allows water to spread uniformly.
  3. Lower the smaller pot carefully so that it sits exactly in the middle.
  4. Fill the annular gap (the space between the walls of the two pots) right up to the rim with moist sand, tamping it gently so that no air pockets remain.
  5. Slowly pour water on the sand until it is completely wet. Stop when a little water begins to appear at the top surface of the sand — this means all of it is saturated.
  6. Cover the mouth of the inner pot with a tight-fitting lid or a piece of wet jute sack. A tight cover prevents warm outside air from entering directly.
  7. Keep the whole arrangement in a well-ventilated shady place. Direct sunlight will heat the outer surface and spoil the cooling effect.

Step 2 : Waiting period
Leave the arrangement undisturbed for about 4–5 h so that evaporation can start and an observable drop in temperature can develop inside the inner pot.

Step 3 : Scientific explanation of the cooling

  • The walls of ordinary earthen pots are porous — they contain tiny invisible holes.
  • The water poured into the sand slowly seeps through these pores and spreads over the outer surface of the bigger pot.
  • When the surrounding air flows across this damp surface, some of the water molecules gain enough energy to evaporate.
  • For every gram of water that changes from liquid to vapour, about $$2.26 \times 10^{3}\;\text{J}$$ of heat energy (called latent heat of vaporisation) is required.
  • This energy is obtained from the sand, the clay walls and, most importantly, from the air and the inner pot. As energy is removed, the temperature of these parts drops, so the space inside the small pot becomes cooler than the surroundings.

Step 4 : Testing with fruits and vegetables

  1. Place 4–5 washed and dried tomatoes, a couple of lemons and a handful of green chillies in the inner pot.
  2. Note the appearance, smell and firmness of each item every 24 h for a week.
  3. Simultaneously keep another set of the same items on an open plate nearby and observe them in the same way. This acts as the “control”.

Typical observations (for a warm, dry day, temperature 35 °C, relative humidity 30 %):

DayInside coolerOutside in open air
1All fresh; pot feels cool (≈ 26 °C)All fresh
3Slight softening of tomatoes onlyTomatoes wrinkled; chillies limp
5Tomatoes still usable; chillies just begin to wiltTomatoes partly spoiled; fungus on 1 lemon
7Tomatoes show minor spots; others fineMost items inedible

Thus, under the above conditions, the pot-in-pot cooler kept the produce reasonably fresh for about 6–7 days, roughly twice the life of the control sample.

Step 5 : Factors affecting the number of fresh-days

  • Humidity of air: Low humidity speeds up evaporation, so cooling is stronger and produce lasts longer. High humidity (rainy season) reduces the effect.
  • Air flow: A gentle breeze carries away the newly formed water vapour, allowing fresh water to evaporate, so a well-ventilated spot works best.
  • Ambient temperature: Hotter surroundings supply more heat for evaporation, increasing the cooling (surprisingly, this device works very well in hot deserts).
  • Regular wetting: The sand must be kept moist; if it dries out, evaporation stops and the temperature inside rises.
  • Porosity and thickness of the clay: Highly porous, thin-walled pots allow water to seep and evaporate faster, giving better cooling.
  • Exposure to sun: Direct sunlight adds heat faster than it can be removed, so the cooler should always be kept in shade.

Step 6 : Alternatives to sand

  • Fine sawdust
  • Powdered charcoal
  • Broken-brick powder (surkhi)
  • Even a thick layer of old cotton cloth or jute fibres

All these materials hold water well and have many air spaces, so they increase the surface area available for evaporation and can give slightly better cooling than sand.

Conclusion

The pot-in-pot cooler works on the principle of evaporative cooling. Under hot, dry and breezy conditions, it can keep fruits and vegetables fresh for nearly a week — much longer than in the open air — without using any electricity. The effectiveness depends mainly on ambient humidity, airflow, regular moistening of the filler material and the permeability of the earthen pots.

Answer

The earthen-pot model remains cool because water in the wet sand escapes through the porous outer wall and evaporates; the latent heat needed for evaporation is drawn from the pots and the air inside, so the temperature of the inner pot falls.

In a warm, dry, well-ventilated place the cooler can keep fruits and vegetables fresh for about 6 – 7 days.

Low humidity, good airflow, high ambient temperature, regular wetting of the sand and shade from direct sun increase the number of days; high humidity, stagnant air or dry sand reduce it.

Instead of sand one may use sawdust, powdered charcoal, broken-brick powder or even thick layers of wet cloth for equal or better cooling.

48 Why does air containing water vapour go up in the atmosphere (thin layer of air that surrounds the Earth)?

Solution

Step 1  — Recall some ideas learnt earlier

  • Air is a mixture that contains mainly nitrogen (about 78 %), oxygen (about 21 %) and small amounts of other gases.
  • Whenever water evaporates it changes into water vapour and mixes with the surrounding air.
  • Whether a balloon, a bubble or a parcel of air will rise or sink depends on its density, that is how heavy it is for a certain volume.

The density (Greek letter $$\rho$$) of any material is

$$\rho = \dfrac{\text{mass}}{\text{volume}}$$

Step 2  — Compare masses of the molecules

  • Molecular mass of nitrogen: $$M_{\mathrm{N_2}} = 28\;\text{u}$$
  • Molecular mass of oxygen  : $$M_{\mathrm{O_2}} = 32\;\text{u}$$
  • Molecular mass of water   : $$M_{\mathrm{H_2O}} = 18\;\text{u}$$

Because water-vapour molecules are lighter (18 u) than the molecules that make up ordinary dry air (about 29 u on average), replacing some of the heavier molecules by lighter ones makes the mixture lighter.

Step 3  — Resulting change in density

If a fixed volume contains more water-vapour molecules and fewer nitrogen/oxygen molecules, its total mass becomes smaller, so

$$\text{mass goes down} \;\Longrightarrow\; \rho = \dfrac{\text{smaller mass}}{\text{same volume}} \;\text{gets smaller}. $$

Hence moist air has a lower density than the surrounding drier air.

Step 4  — Buoyant (upward) force acts

In fluids (liquids or gases) the heavier surroundings push up any lighter portion. This upward push is called buoyant force. Because the parcel of moist air is lighter, the buoyant force on it is greater than its own weight, so it rises exactly the way a light wooden block floats upward in water.

Step 5  — Final statement

Therefore, air that contains water vapour (and is often also warmed during evaporation) becomes lighter than the air around it, so the buoyant force makes it rise into the higher parts of the atmosphere.

Answer

Because the molecules of water vapour (mass ≈ 18 u) are lighter than the nitrogen and oxygen molecules that form ordinary air (average mass ≈ 29 u), replacing some of the heavier molecules by lighter ones lowers the density of the mixture. This less-dense, moist air experiences a buoyant upward push from the surrounding heavier air and therefore rises into the atmosphere.

49

Aavi enjoys the rain and creates a poem. You can complete the poem and present it in your class.

I wonder, oh! I wonder so,
Which path does water choose to go?
I wonder, oh! I wonder so,
When does it snow?
I wonder, oh! I got a wonder call,
How does rain fall?
........................................
........................................
I wonder, ponder and dream each day,
As water's journey takes its way.

Solution

Step 1: Recall the three main stages of the water cycle
For Class 6 we describe them in simple words.

  • Evaporation → liquid water turns into water vapour and goes up.
  • Condensation → the vapour cools high in the sky and forms clouds.
  • Precipitation → when the clouds get heavy the water falls back as rain, snow or hail.

Step 2: Decide what the two missing lines should talk about
The poem already asks “How does rain fall?” so the blanks should explain the steps just before rain—evaporation and condensation.

Step 3: Keep the rhyme and rhythm
The last word of each of the two blank lines should rhyme with each other to sound poetic. A common rhyme pair is “light / sight”. Both words also match the idea of water vapour (light) and clouds (sight).

Step 4: Write the two lines
The lines that fit both science and rhyme are:

It rises up as vapour light,
Cools to clouds, a fluffy sight,

Step 5: Read the complete poem aloud
When you read it from start to finish it flows smoothly, explains evaporation and condensation, and still ends with the original final couplet.

Answer

It rises up as vapour light,
Cools to clouds, a fluffy sight,

50

Activity 8.10: Let us engage in a group activity

  • Take an empty discarded one litre plastic bottle. Pour about one cup of water into it.
  • Close the lid tightly. Now quickly squeeze and release the bottle continuously for about 2–3 minutes. Observe the space above the water in the bottle.
  • Repeat the same activity after adding a small burnt piece of newspaper into the water.

What will you observe?

Solution

Background idea

A small amount of water is kept in a closed bottle that still contains air. Very slowly, some of this water changes to invisible water vapour – we say it evaporates. The air in the bottle therefore contains water vapour that is almost ‘saturated’. Whether this vapour becomes visible (condenses) depends on two things:

  • the temperature / pressure of the air, and
  • the presence of tiny solid particles called condensation nuclei on which droplets can form.

Activity – Part A (only water inside)

  1. When you squeeze the bottle, the air is compressed. Pressure rises and its temperature also rises a little (you can feel the bottle warm).
  2. This warming allows the air to hold even more water vapour, so no droplets form.
  3. When you suddenly release the squeeze, the air expands. Its pressure and temperature both fall. Now the air cannot hold as much vapour, so it becomes supersaturated.
  4. However, the air is almost “clean”; it has hardly any particles for droplets to start on. Therefore very few droplets form and you see little or no mist in the empty space above the water.

Activity – Part B (water + a burnt bit of newspaper)

  1. The piece of burnt newspaper gives off tiny carbon and ash particles. These mix with the air in the bottle and act as condensation nuclei.
  2. Repeat the squeeze–release cycle:
    • Squeezing: pressure ↑, temperature ↑ → no condensation.
    • Releasing: pressure ↓, temperature ↓ → air becomes supersaturated again.
  3. This time the excess water vapour quickly settles on the smoke/ash particles. Millions of microscopic droplets of $$\mathrm{H_2O}$$ are produced all at once, scattering light.
  4. You now see a thick whitish cloud / fog in the space above the water. After a little while the droplets fall back or evaporate and the cloud disappears.

Reason summed up

Condensation is easier when suitable nuclei are present. Smoke from the burnt paper provides those nuclei, so a visible cloud appears in Part B but not in Part A.

What you will observe

  • Without burnt paper – Almost no cloud; the space above the water looks clear.
  • With burnt paper – A dense whitish fog / cloud forms immediately each time you release the squeeze.

This simple activity models how real clouds form in the sky: cooling air and tiny dust or smoke particles make water vapour change back into small liquid droplets.

Answer

First try (plain water): almost no change—the air above the water looks clear.

Second try (after dropping a burnt bit of newspaper): each time you stop squeezing a whitish fog or cloud suddenly appears in the space above the water and then slowly fades. The smoke particles give the water vapour surfaces on which to condense.

51

Activity 8.11: Let us understand the process

Label Fig. 8.9 using arrows shown and the words given in the box to show where water is stored, how water changes its state and where it moves.

Words to use: Cloud, Lake, Ocean, River, Groundwater, Evaporation, Condensation, Rain, Snow

Fig. 8.9
Fig. 8.9

Solution

Step 1 – Locate the four places where water is STORED

  • Very large continuous water body at the edge of land → label it Ocean.
  • Small enclosed water body away from the sea-coast → label it Lake.
  • Narrow winding blue strip joining hills to the sea → label it River.
  • Blue shaded region drawn inside the ground below the soil → label it Groundwater.

Step 2 – Show HOW liquid water turns into water vapour

  • The arrows that rise upward from the Ocean, Lake and River surfaces represent heating by the Sun. Mark these arrows as Evaporation.

Step 3 – Show HOW water vapour turns back to tiny liquid/solid droplets

  • The rising vapour cools as it reaches higher, colder air. The curved arrows that turn into a grey-white mass should be labelled Condensation, and the white mass itself is the Cloud.

Step 4 – Show HOW water returns to the Earth’s surface

  • The straight downward arrow made of droplets falling from the cloud is labelled Rain.
  • The downward arrow made of star-like flakes coming from the cloud (usually towards a hill-top) is labelled Snow.

Step 5 – Check that every word in the box has been used exactly once

Word from the boxWhere it has been written on Fig. 8.9
CloudGrey-white mass at the top of the diagram
LakeSmall inland water body
OceanLargest water body touching the land
RiverNarrow winding strip connecting hills to sea
GroundwaterBlue zone under the soil and rocks
EvaporationUpward arrows from all surface water bodies
CondensationArrow (or label) inside cloud where vapour cools
RainVertical arrow of water drops coming out of cloud
SnowArrow of flakes coming out of cloud on the colder side

When all nine labels are placed as listed, Fig. 8.9 correctly represents the complete water cycle showing storage, change of state and movement of water.

Answer

Place the nine labels on Fig. 8.9 as follows:

  • Cloud – on the white/grey mass in the sky
  • Lake – beside the small inland water body
  • Ocean – beside the large sea
  • River – beside the long winding stream
  • Groundwater – in the blue zone below the soil
  • Evaporation – on the upward arrows from Ocean/Lake/River
  • Condensation – on the arrow (or within) the Cloud where vapour cools
  • Rain – on the downward arrow of water drops
  • Snow – on the downward arrow of flakes

52 What did I do well? Was I able to label all the parts of the water cycle? Which parts of the water cycle were unclear to me?

Solution

Step 1 – Recall the full water-cycle diagram

  • The complete cycle normally shows at least six labelled stages: Evaporation, Transpiration, Condensation (cloud-formation), Precipitation, Run-off / Collection and Ground-water infiltration.
  • Some textbooks merge Run-off, Collection and Infiltration into one broad stage called “Collection”.

Step 2 – Compare your diagram with the complete list

StageDid you label it?If yes, write ✔If no, leave blank or write ✗
Evaporation(your answer)
Transpiration(your answer)
Condensation(your answer)
Precipitation(your answer)
Run-off / Collection(your answer)
Ground-water infiltration(your answer)

Step 3 – Self-assessment

  1. What did I do well?
    Tick every row in which you wrote the correct label. These are your strong points.
  2. Was I able to label all the parts?
    If every row is ticked, answer “Yes”. Otherwise answer “No – two (or however many) parts were missing”.
  3. Which parts were unclear to me?
    The rows you left blank or marked ✗ show the unclear parts. Copy their names into a short list. Example: “Transpiration and Ground-water infiltration were unclear.”

Step 4 – Clarify any unclear parts

  • Transpiration – loss of water vapour from plant leaves.
  • Ground-water infiltration – part of rainwater that seeps into the soil and collects underground.

Re-label these parts on your drawing; then re-check the table until every row shows a ✔.

Answer

You labelled Evaporation, Condensation, Precipitation and Collection correctly.
You missed or were unsure about Transpiration and Ground-water infiltration.
So, most parts are correct, but two stages need revision.

Let us enhance our learning

1 Which of the following best describes condensation?
(i) The conversion of water into its vapour state.
(ii) The process of water changing from a liquid into gaseous state.
(iii) The formation of clouds from tiny water droplets.
(iv) The conversion of water vapour into its liquid state.

Solution

Step 1 – Recall the definition of condensation
Condensation is the physical change in which water vapour (gas) cools down and changes back into liquid water. In symbols we may write
$$\text{water vapour (gas)} \;\longrightarrow\; \text{liquid water}$$

Step 2 – Read each option carefully

  • (i) “The conversion of water into its vapour state.” – This describes evaporation/boiling, not condensation.
  • (ii) “The process of water changing from a liquid into gaseous state.” – This is again evaporation (liquid $$\to$$ gas), the opposite of condensation.
  • (iii) “The formation of clouds from tiny water droplets.” – Clouds are indeed made up of tiny liquid droplets produced after water vapour condenses high up in the sky, but the option talks about the already-formed droplets, not about the change of state itself. So the wording does not directly define condensation.
  • (iv) “The conversion of water vapour into its liquid state.” – This matches exactly with the definition in Step 1 (gas $$\to$$ liquid).

Step 3 – Choose the correct option
Only option (iv) directly states “water vapour $$\to$$ liquid water”, hence option (iv) is the best description of condensation.

Answer

(iv)

2 Identify in which of the given processes, evaporation is very important—

(i) Colouring with
(a) crayons    (b) water colours    (c) acrylic colours    (d) pencil colours

Solution

Step 1 – Recall the idea of evaporation
Evaporation is the change of a liquid into vapour on its own, leaving the non-volatile (non-evaporating) part behind.

Step 2 – Check whether a liquid solvent is present in each kind of colour

  • Crayons – the colour is mixed with wax. No liquid has to dry up, so evaporation is not needed.
  • Water colours – the pigment is carried by water. After painting, the water must evaporate so that only the colour remains.
  • Acrylic colours – these are water-based dispersions of acrylic polymer. Here too, water must evaporate for the paint film to set.
  • Pencil colours – the colour is mixed with a waxy/greasy binder in the pencil lead. No liquid solvent has to leave the paper.

Step 3 – Pick the options where the result depends on the solvent evaporating
Evaporation is very important in water colours and acrylic colours.

Answer

(b) water colours   and   (c) acrylic colours

(ii) Writing on paper with
(a) pencil    (b) ink pen    (c) ball point pen

Solution

Step 1 – Link writing instruments to the need for a solvent to dry

  • Pencil – a mixture of graphite and clay is rubbed off directly; nothing is liquid, so evaporation is not needed.
  • Ink pen (fountain pen) – the ink is a water solution. After it reaches the paper, the water must evaporate so that the dye remains fixed.
  • Ball-point pen – the ink is a viscous paste with a volatile solvent (often an alcohol). The solvent has to evaporate quickly so that the writing sets and does not smear.

Step 2 – Identify where evaporation is crucial
Evaporation is very important in the case of an ink pen and a ball-point pen, but not for a pencil.

Answer

(b) ink pen   and   (c) ball point pen

3 We see green coloured plastic grass at many places these days. Space around natural grass feels cooler than space around the plastic grass. Can you find out why?

Solution

Step 1 : What happens on natural grass

  • The roots of natural grass are always taking up water from the soil.
  • This water reaches the surface of the leaves and slowly changes into water vapour. The process is called trans-piration.
  • To change state from liquid to vapour, every gram of water needs energy called its latent heat of vaporisation, written symbolically as $$L_v$$.
  • The required energy is taken from the surroundings (air, soil, leaf). Because heat is removed, the temperature of the nearby air falls and we feel the place to be cool.

Step 2 : What happens on plastic grass

  • Plastic grass contains no real water.
  • Since no liquid water is present, no evaporation or transpiration can take place, so no latent heat is absorbed from the surroundings.
  • Instead the plastic simply absorbs sunlight and becomes warm; that warmth is passed on to the air, so the place feels hotter.

Step 3 : Conclusion

Natural grass keeps its surroundings cool because the continuous evaporation of water takes away heat, whereas plastic grass cannot evaporate water, so the cooling effect is absent.

Answer

Natural grass is cooler because water in it keeps evaporating (transpiration); the evaporation uses up heat from the surroundings, so the air cools. Plastic grass has no water to evaporate, so no heat is removed and the space around it remains warmer.

4 Give examples of liquids other than water that evaporate.

Solution

Step 1 — Recall the idea of evaporation

Evaporation is the slow conversion of a liquid into its vapour at any temperature below its boiling point. Although we most often observe this process with water (wet clothes drying, puddles disappearing), every liquid can, in principle, evaporate. The rate just depends on factors such as temperature, surface area, wind and the nature of the liquid itself.

Step 2 — Think of daily-life liquids other than water

Many familiar liquids have a smell. That smell reaches our nose because tiny vapour particles enter the air — proof that evaporation is taking place. Let us list some of them.

  • Petrol (or petrol mixed with diesel) — It evaporates so quickly that we can smell it the moment it is spilt.
  • Nail-polish remover (acetone) — When applied on nails it feels cool because acetone evaporates rapidly, taking heat away.
  • Perfume or deodorant (which contains alcohol) — The pleasant fragrance spreads due to the vapour of the liquid perfume.
  • Kerosene — If left in an open container for a few days its level slowly falls, showing that it has evaporated.
  • Spirit or rubbing alcohol — Used for first-aid; the cooling sensation on the skin is again because of evaporation.

Step 3 — State the examples clearly

Thus, liquids such as petrol, acetone (nail-polish remover), perfumes (alcohol), kerosene and spirit all evaporate even at room temperature, just like water does.

Answer

  • Petrol
  • Acetone (nail-polish remover)
  • Perfume / alcohol (spirit)
  • Kerosene

5 Fans move air around, creating a cooling sensation. It might seem strange to use a fan to dry wet clothes since fans usually make things cooler, not warmer. Normally, when water evaporates, it requires heat, not cold air. What do you think about this?

Solution

Given discussion: A fan gives us a cool feeling. Drying clothes, however, needs the water in them to evaporate, and evaporation needs heat. At first sight it therefore looks odd that the same fan that cools us can also dry clothes.

Key idea: Evaporation does not depend only on temperature. It also depends on the humidity (the amount of water vapour already present in the air) and on the speed of air moving over the wet surface.

Step 1 – Recall what evaporation is

  • Some fast-moving molecules at the surface of a liquid escape into the air. This is called evaporation.
  • Energy (heat) is absorbed in the process, so the remaining liquid becomes a little cooler.
  • The overall change can be written as \[ \mathrm{H_2O(l) \; + \; 2260\,kJ\,kg^{-1} \; \longrightarrow \; H_2O(g)} \]

Step 2 – Factors that speed up evaporation

  1. Higher temperature → molecules already have more energy.
  2. Larger surface area.
  3. Lower humidity of surrounding air.
  4. Greater wind (air) speed.

Step 3 – What exactly does a fan do?

  • The fan increases air speed near the clothes.
  • The moving air quickly carries away the moist, almost saturated layer of air that forms just above the wet cloth.
  • This is immediately replaced by drier (unsaturated) air. Because the surrounding air is now less humid, more water molecules can leave the cloth.
  • Thus the rate of evaporation becomes much higher even though the air itself is not warmer.

Step 4 – Where does the required heat come from?

  • The necessary heat is drawn from the cloth, the air in the room and any nearby objects. That is why the cloth — and the air we feel — becomes cooler.
  • The fan does not supply heat; it only helps remove the water vapour, maintaining a low-humidity condition at the surface of the cloth.

Step 5 – Explaining the apparent contradiction

  • We feel cool in front of a fan because the accelerated evaporation of our skin sweat takes heat away from our body.
  • The same mechanism works for clothes: faster air flow → faster evaporation → heat taken from cloth → cloth dries.
  • So using a fan to dry clothes is not strange at all; it relies on the very same principle by which a fan keeps us cool.

Final conclusion: A fan does not have to heat the clothes; it only has to push away the moist air touching them. By lowering the humidity and increasing air speed, the fan lets water molecules leave the cloth more quickly, and the cloth dries even though the air may actually feel cooler.

Answer

The fan speeds up evaporation by sweeping away the moist air just above the wet cloth and replacing it with drier air. Lower humidity + higher air speed = faster evaporation, even without raising the temperature. The heat needed is taken from the cloth and surrounding air, so the cloth both cools and dries at the same time.

6 Usually, when sludge is removed from drains, it is left in heaps next to the drain for 3–4 days. Afterward, it is transported to a garden or a field where it can be used as manure. This approach reduces transportation cost of the sludge and enhances the safety of individuals handling it. Reflect upon it and explain how.

Solution

Step 1 · What is freshly collected sludge?
Sludge that is pumped out of drains is a semi-liquid mixture. A very large part of it is water. The solid particles (decaying leaves, food wastes, soil, microbes, etc.) are dispersed in this water, so the mass is heavy, gives out a foul smell and contains many disease-causing germs.

Step 2 · What happens when the heap is left for 3–4 days?

  • Water drains back into the nearby channel and also evaporates into the air. In other words the sludge loses moisture. The solid part that remains is called dewatered sludge.
  • Sunlight and the rise in temperature kill a large number of pathogenic (disease-causing) bacteria and worms.
  • The foul gases escape and the bad smell is reduced.

Step 3 · How does this lower the transportation cost?
Because most of the water has gone, the mass to be carried is much lighter. A smaller volume now occupies the cart or lorry. Fewer trips, less fuel and less labour are therefore required, so the cost of moving the sludge to fields or gardens becomes lower.

Step 4 · How does this increase the safety of the workers?

  • With less water, the sludge no longer splashes, so it is easier and cleaner to lift with spades.
  • Many harmful microbes have already been destroyed by heat and drying; hence the risk of infections is reduced.
  • The weaker smell causes less nausea and dizziness for the people handling it.

Conclusion
Leaving freshly removed sludge to stand for a few days converts a heavy, germ-laden, foul-smelling liquid mass into a lighter, partly dried, safer material. As a result, both the money spent on transport and the health hazards for workers become much smaller.

Answer

The waiting period lets excess water drain and evaporate, so the sludge loses weight and volume. It also allows sunlight and heat to kill many germs and reduce foul odour. Because it is now lighter, fewer trips and less fuel are needed to carry it to the field (lower cost), and because it contains fewer pathogens and splashes less, the people who load and unload it are better protected (greater safety).

7 Observe the activities in your house for a day. Identify the activities that involve evaporation. How does understanding the process of evaporation help us in our daily activities?

Solution

Step 1 : Making a list of activities at home during one day

  • Morning — mother washes and dries clothes on a clothes-line.
  • Breakfast — water is boiled for tea; rice cooks in an open pan.
  • Cleaning — some water is mopped on the floor and later disappears.
  • After play — we sweat and feel cooler when air blows.
  • Mid-day — drinking water is kept in an earthen pot; it feels cool.
  • Evening — father irons clothes; the sprinkled water vanishes from the fabric.
  • Night — mother sprays room freshener; its liquid quickly disappears.

Step 2 : Why do these activities show evaporation?

  • In every case liquid water changes into water vapour and mixes with the air.
  • This change at temperatures below the boiling point is called evaporation.
  • Factors that make it faster are:
    • Heat (higher temperature).
    • Wind or moving air.
    • Larger surface area.

Step 3 : How understanding evaporation helps in daily life

  1. Drying clothes quickly  ⟶  we spread them out (large surface) and hang them in sunshine or under a fan (heat + wind).
  2. Saving fuel while cooking  ⟶  covering a pan reduces unnecessary evaporation, so food cooks faster.
  3. Keeping cool by sweating  ⟶  we wear loose cotton; it allows sweat to evaporate, removing heat from the body.
  4. Cooling water in an earthen pot  ⟶  water seeps to the outer surface of the pot and evaporates, taking away heat, so the remaining water becomes cooler.
  5. Floor mopping  ⟶  we leave windows open for air flow; the floor dries sooner because evaporation speed increases.
  6. Using perfumes or sanitiser  ⟶  they contain alcohol that evaporates quickly, spreading fragrance or drying the hands fast.

Conclusion

Recognising where evaporation occurs allows us to make tasks faster, save energy and stay comfortable by controlling temperature, airflow and surface area.

Answer

Many household tasks show evaporation: clothes drying, water boiling away during cooking, a wet floor turning dry, sweat cooling our body, water cooling in an earthen pot, sprinkled water vanishing while ironing and room freshener disappearing in air. Knowing that evaporation is faster with heat, breeze and larger surface helps us spread clothes in sunlight, switch on a fan, cover boiling pans to save fuel, wear loose cotton to stay cool, keep water in clay pots in summer and ventilate rooms after mopping. Thus, understanding evaporation makes everyday work quicker, cheaper and more comfortable.

8 How is water present in the solid state in nature?

Solution

Water can exist in three states — solid, liquid and gas. When the temperature drops to the freezing point, i.e. $$0\,{}^{\circ}\mathrm{C}$$, the molecules of water lose energy and arrange themselves in a fixed, rigid pattern to form ice, the solid state of water.

In nature, this solid form appears in several familiar ways:

  • Snow and snowflakes: Water vapour in cold air directly changes to tiny ice crystals that join together and fall as soft, white flakes.
  • Ice sheets at the Poles: Huge, flat layers of solid ice cover the land and sea in Antarctica and the Arctic.
  • Glaciers on high mountains: Thick moving rivers of compacted snow and ice flow slowly down mountain valleys.
  • Hailstones: Rounded pellets of ice that form in thunderclouds and fall during storms.

Thus, whenever you see snow-covered peaks, polar ice-caps, glaciers or hail, you are looking at water present in its solid state.

Answer

Water occurs in the solid state in nature as snow on mountains, polar ice-caps, glaciers and hail (ice).

9 Reflect on the statement "Water is our responsibility before it is our right." Share your thoughts.

Solution

Understanding the statement

The sentence “Water is our responsibility before it is our right” tells us two things in a particular order:

  1. Responsibility  – what we must do for water.
  2. Right  – what we deserve to get from water.

If we reverse the order (ask for our right first and ignore our duty), clean water will become scarce and even our basic right will disappear. Therefore, the statement reminds us that we have to act before we can claim.

Why is water everyone’s responsibility?

  • Limited fresh-water supply – Only about 3 % of Earth’s water is fresh, and much of that is locked in ice or is hard to reach.
  • Interconnected users – Rivers, lakes and underground water do not belong to one person; any misuse quickly harms others.
  • Essential for life – Plants, animals and people cannot survive without it, so protecting water protects life itself.

What can a Class 6 student do?

Daily actionReason / Impact
Close the tap while brushing teeth.Saves about 5–6 L each time.
Use a bucket for bathing instead of a shower.Cuts use from ≈30 L to ≈15 L.
Check for leaking taps at home or school and report them.One drip per second wastes ≈12 L a day.
Reuse water (e.g. left-over drinking water for plants).Creates a habit of valuing every drop.
Avoid throwing garbage or chemicals into drains.Prevents pollution of rivers and lakes.

Thinking ahead

  • Support rain-water harvesting in buildings.
  • Plant trees; they help recharge ground water.
  • Talk to friends and family about water conservation.

Conclusion

When we treat water wisely—by saving, sharing and keeping it clean—we protect our right to use it now and we secure the same right for future generations. Hence, water truly is our responsibility before it is our right.

Answer

We must first save and protect water—by using it carefully, stopping leaks, preventing pollution and sharing it fairly—only then can we safely claim the right to clean, adequate water for everyone.

10 The seat of a two-wheeler parked on a sunny day has become very hot. How can you cool it down?

Solution

Step 1 – Identify the problem
The dark seat of a two-wheeler absorbs a lot of the Sun’s heat. Its temperature therefore rises well above the surrounding air temperature, and it becomes uncomfortable to touch.

Step 2 – Think of what can remove the extra heat
We need something that can take away heat from the seat quickly. Water is ideal because when it changes its state from liquid to vapour it needs a large amount of heat energy called the latent heat of vaporisation.

Step 3 – Plan the cooling action
(a) Sprinkle some water on the hot seat, or
(b) Spread a small towel or handkerchief soaked in water over the seat.

Step 4 – Explain scientifically why this works
• The water molecules on the seat surface start to evaporate.
• To evaporate, they must take in the latent heat $$L$$ from their surroundings. The required heat is drawn out of the hot seat itself.
• The amount of heat taken away is $$\Delta Q = mL$$, where

  • $$m$$ = mass of the water that evaporates,
  • $$L$$ = latent heat of vaporisation of water.
• Because heat leaves the seat, its temperature falls and it becomes comfortable to sit on.

Step 5 – Final method stated clearly
Therefore, to cool a two-wheeler seat that has become hot in the Sun, simply sprinkle a little water on it or cover it with a wet cloth for a short time. The seat will cool down rapidly as the water evaporates.

Answer

Sprinkle some water (or place a wet cloth) on the hot seat; as the water evaporates it absorbs heat from the seat, cooling it quickly.

NCERT Solutions for Class 6
Maths
NCERT Solutions for Class 6 Maths
Chapter-wise step-by-step
solutions with explanations
explore solutions Maths bg
Science
NCERT Solutions for Class 6 Science
Chapter-wise step-by-step
solutions with explanations
explore solutions Science bg

Frequently Asked Questions

50,000+ JEE Students Trusted Our Score Calculator

Predict your JEE Main percentile, rank & performance in seconds