Join WhatsApp Icon JEE WhatsApp Group
NCERT Solutions for Class 6 Science

Chapter 5: Measurement of Length and Motion

Download Solutions PDF
Daily JEE Updates, Tips & Important Alerts
Join 30,000+ students and stay updated with JEE notifications and preparation insights.
Join Now!
Free PDF
Complete NCERT Solution PDF for Chapter 5: Measurement of Length and Motion

NCERT Solutions For Class 6 Science Chapter 5 Measurement of Length and Motion helps students understand the importance of accurate measurement, standard units, measuring tools, and different types of motion. The page provides detailed NCERT Solutions that explain textbook questions in a simple and structured manner according to the Class 6 Science syllabus. NCERT Solutions For Class 6 Science support students in learning concepts such as measuring length using appropriate instruments, comparing measurements, and identifying different forms of movement. The chapter also helps students connect scientific concepts with real-life examples of motion around them. These solutions are useful for homework, revision, assignments, and school exam preparation. Students can access the chapter PDF for quick reference and effective learning. The easy-to-follow explanations improve conceptual understanding and help students build a strong foundation in Science.
Download Solutions PDF

Intext Questions

1 Are the tape and rod similar to the scale that the elder sister has in her geometry box? What did mother mean by char angula?

Solution

Step 1 · What is found in the sister’s geometry box?
The elder sister keeps a 15 cm plastic scale. It is a straight, rigid strip having equally spaced 1 cm and 1 mm marks. Because the marks are at fixed, known distances, the scale serves as a standard measuring device.

Step 2 · Comparing the scale with the tailor’s tape
A tailor’s tape is a long, flexible ribbon. Along its entire length centimetres and millimetres are printed exactly the same way as on the rigid scale. Therefore, although the tape can bend round a body and the scale cannot, both instruments are based on the same set of uniform centimetre divisions. In that sense the tape is similar to the scale.

Step 3 · Comparing the scale with the measuring rod
A carpenter or mason often uses a 1 m wooden or metal measuring rod. This rod again has 0 cm, 1 cm, 2 cm, … markings exactly like the small plastic scale, only extended to 100 cm.  Hence the rod, too, is similar to the sister’s scale; the only difference is its larger length and greater rigidity.

Conclusion for the first part
Yes, both the tape and the rod are similar to the geometry–box scale because all three are standard, graduated instruments that measure length in centimetres (and millimetres).

Step 4 · Meaning of “char angula”
In many Indian homes elders still use older, non-standard body units. One such unit is an angula, the breadth of a finger. “Char” means four. Thus, when mother said “char angula”, she asked for a length equal to four finger-breadths placed side by side. In present-day standard units this is roughly 6–8 cm, but the exact value changes from person to person because finger widths differ.

Final answer in one sentence
The tape and the measuring rod are like an ordinary scale because all of them carry the same uniform centimetre markings, and mother’s phrase “char angula” simply meant a length equal to four fingers held together.

Answer

The tape and the measuring rod are indeed like the geometry-box scale—they are graduated centimetre rulers, only longer (tape) or stiffer (rod). “Char angula” means a traditional length of four finger-breadths, i.e. roughly 6–8 cm.

2 Suppose we all measure the length of the table again, but this time using a metre scale. Will our results still be different?

Solution

Step 1 — Recall what happened with hand-span measurement
Earlier each student used his / her own hand to measure the length of the same table. Because the size of the handspan is different for every person, the numerical answer (for example “15 handspans” or “17 handspans”) was also different.

Step 2 — Why the metre scale is expected to remove that difference
• A metre scale is a standard measuring device. Every centimetre ($$1\,\mathrm{cm}$$) and every millimetre ($$1\,\mathrm{mm}$$) marked on it has exactly the same length for everyone, because it has been manufactured according to the accepted SI unit, the metre ($$1\,\mathrm{m}$$).
• Therefore, if every student uses the same scale correctly, the count of divisions from the zero mark to the other end of the table will be identical; hence everybody should obtain the same numerical value in centimetres.

Step 3 — Practical reasons for small remaining differences
Even with a standard scale, two small kinds of error can creep in:

  • Zero-alignment error: one student may start reading from the exact ‘0’ mark, while another may place the edge of the scale flush with the table but leave a gap between the edge and the ‘0’ mark.
  • Parallax error: the eye must be kept vertically above the division being read. Looking from an angle makes the reading appear a little larger or smaller.

Because of these errors the results can differ by $$\pm0.1\text{ to }\pm0.2\,\mathrm{cm}$$, but the variation will be far smaller than the differences obtained with handspans.

Step 4 — Conclusion
If everybody follows the correct technique—place the ‘0’ mark exactly at one end of the table and read the scale keeping the eye vertically above the division—then ideally all students will get the same measurement. In real classroom conditions a tiny difference (fractions of a centimetre) may still show up, but the answers will be essentially the same.

Answer

They should all get the same (or almost the same) reading, because a metre scale is a common standard. Any slight difference would be due only to incorrect placement of the scale or wrong eye position, not to the scale itself.

3 Would it be convenient to use the unit metre to measure larger lengths, such as the length of a railway track between two cities, or to measure smaller lengths, such as the thickness of a page of a book?

Solution

Step 1 – What is a metre?

The standard (SI) unit of length is the metre, written as “m”. All other metric units are defined as decimal multiples or sub-multiples of the metre.

Step 2 – Checking the suitability of the metre for very large lengths

  • For distances such as the length of a railway track between two cities, the actual length is usually of the order of hundreds of kilometres.
  • Because $$1\;\mathrm{km}=1000\;\mathrm{m}$$, writing the same distance in metres introduces three extra zeros for every kilometre.

Example: If two cities are $$250\;\mathrm{km}$$ apart, then

$$250\;\mathrm{km}=250\times1000\;\mathrm{m}=2.5\times10^{5}\;\mathrm{m}.$$

This long figure (2,50,000 m) is clumsy to read, write and remember. Hence, using kilometres is far more convenient than using metres.

Step 3 – Checking the suitability of the metre for very small lengths

  • For objects as thin as a page of a book, the thickness is usually a fraction of a millimetre.
  • Since $$1\;\mathrm{m}=1000\;\mathrm{mm}$$, expressing such a small length in metres leads to several leading zeros.

Example: If a page is $$0.20\;\mathrm{mm}$$ thick, then

$$0.20\;\mathrm{mm}=\frac{0.20}{1000}\;\mathrm{m}=0.00020\;\mathrm{m}.$$

Writing “0.00020 m” is awkward compared with simply writing “0.20 mm”. Therefore millimetres (or even micrometres) are more convenient here.

Step 4 – Conclusion

The unit metre is best suited to objects whose sizes fall roughly between a few centimetres and a few tens of metres. For:

  • very large lengths (railway tracks, road distances, etc.) → use kilometres (km),
  • very small lengths (paper thickness, hair diameter, etc.) → use millimetres (mm) or even micrometres (µm).

Hence it is not convenient to use the metre for either of the two extreme cases mentioned in the question.

Answer

No. Kilometres are more convenient for the long railway track, and millimetres (or smaller units) are more convenient for the tiny thickness of a page; writing those lengths in metres would give unwieldy numbers.

4 Why are some length measuring devices made up of flexible materials?

Solution

Step 1  – Recall how we usually measure straight-line lengths

When we want to know the distance between two points that lie on a perfectly straight path, a rigid ruler (for example a 15 cm plastic scale) works very well because the straight ruler itself is straight and cannot bend. We simply match its zero mark with the first point and read the mark that coincides with the second point.

Step 2  – Notice situations where the object or the path is not straight

  • The waist line of a person, the circumference of a tree trunk or the rim of a bicycle wheel are curved.
  • The distance along a winding track on the ground is also curved and longer than the straight line between its ends.

A rigid ruler cannot lie along such a curved path, so it would either leave gaps or measure only a chord, giving the wrong length.

Step 3  – Why flexibility helps

  • A flexible tape (for example the tailor’s measuring tape or a surveyor’s steel tape) can bend and follow the exact shape of the curved line. Therefore every small part of the tape touches the object and the total reading equals the true length.
  • Because it can roll or fold up after use, a flexible device is convenient to store and carry, especially when the maximum length is several metres.
  • The material (cloth coated with plastic, thin steel or fiber-glass) regains its shape when unrolled, so the graduations remain accurate.

Conclusion

Some length-measuring devices are purposely made of flexible material so that they can:

  1. Conform exactly to curved or uneven objects and paths, allowing correct measurement of their full length, and
  2. Be rolled/folded for easy handling without breaking or occupying much space.

Answer

They are flexible so that the tape can bend around curved or uneven objects and paths, giving the true length, and so it can be rolled up for easy carrying and storage.

5 What do such kilometre stones indicate? How could Padma conclude that she was getting closer to her destination?

Solution

Padma was travelling by bus on a highway. At regular intervals beside the road she noticed upright stones on which numbers such as “335”, “334”, “333” … were written.

These stones are called kilometre stones (or milestones).

  • Each number on the stone tells the distance, in kilometres, still left to reach a fixed place (usually the next big town or the end of the highway).
  • For example, a stone marked $$335$$ means: “You are $$335\,\text{km}$$ away from that place.”

Padma first saw the stone marked $$335$$. A little later she saw stones marked $$334$$, then $$333$$, and so on:

Time during the journeyNumber on stoneDistance still left (km)
Start$$335$$$$335$$
After some time$$334$$$$334$$
Later$$333$$$$333$$

Because the number (distance left) was decreasing step by step, Padma reasoned:

  • $$335 \rightarrow 334 \rightarrow 333 \;\text{(distance becoming smaller)}$$
  • If the remaining distance is getting smaller, the bus must be getting closer to the destination.

Thus, kilometre stones indicate how many kilometres are left to reach a particular place, and the steadily falling numbers told Padma that she was moving nearer and nearer to that place.

Answer

• A kilometre stone (milestone) tells the number of kilometres still left to reach a fixed town or point on that road.
• As Padma saw the numbers on the stones changing from 335 to 334 to 333 … the remaining distance was clearly becoming smaller, so she knew she was getting closer to her destination.

6 Does this mean that the position of Padma, with respect to the reference point, is changing with time? When does the position of an object change with respect to a reference point? Does it change when an object is moving?

Solution

Step 1 — Recall the meaning of a “reference point”

• In order to describe where an object is, we first fix some convenient point and call it the reference point (also called the origin).
• We then state the position of every other body in terms of its distance and direction from this reference point.

Step 2 — What is meant by the “position” of an object?

• The position of an object at any instant is the shortest distance from the reference point together with the direction of that distance.
• If the object is on a straight track, we often replace “distance and direction” by a signed number. For example, “ $$+12\;\text{m}$$ ” means 12 m to the right of the origin while “ $$-7\;\text{m}$$ ” means 7 m to the left.

Step 3 — How do we decide whether the position is changing?

Let the position of Padma at time $$t_1$$ be $$x_1$$ and at a later time $$t_2$$ be $$x_2$$ (both measured from the same origin).
If $$x_2 \neq x_1$$, then the numerical value, the sign, or both have changed; therefore her position is different at the two instants. We then say that “her position is changing with time.”

Step 4 — Relate “changing position” to “motion”

  • If an object’s position with respect to the chosen reference point changes as time passes, the object is said to be in motion.
  • If its position does not change with time, the object is said to be at rest relative to that reference point.

Step 5 — Answer the exact questions

  1. “Does this mean that the position of Padma, with respect to the reference point, is changing with time?”
    Yes. Because Padma is moving farther from the reference point (or closer, depending on her direction), her distance and direction are not the same at different instants; therefore her position is changing with time.
  2. “When does the position of an object change with respect to a reference point?”
    Whenever an object is in motion, i. e. whenever it does not stay fixed at one spot relative to the reference point, its position changes with time.
  3. “Does it change when an object is moving?”
    Certainly. In fact, “changing position with time” is the very definition of motion. So as soon as the object starts moving relative to the reference point, its position begins to change; when it stops, the position becomes fixed again.

Answer

Yes. The position of Padma relative to the chosen reference point is changing because she is moving.
In general, the position of an object changes with respect to a reference point whenever the object is in motion; if the object is at rest, its position remains the same.

7 Suppose you are travelling on a ship which is moving at a constant speed along a straight line on a calm sea. Suppose there is no window on the ship. Is there any way that you can determine whether the ship is moving or is stationary?

Solution

Step 1 · Recall what we mean by motion
An object is said to be in motion only when its position changes with respect to a chosen reference point (also called a frame of reference).
Inside a closed room of the ship, the only things you can see are the walls, ceiling, floor, the table, your bag, etc. All of them are firmly fixed to the ship. Therefore, relative to these objects your own position does not change; you are at rest with respect to them.

Step 2 · Imagine every ordinary experiment you can perform inside the room

  • Drop a ball vertically: it will fall straight down to your feet.
  • Let a pendulum swing: it will take exactly the same time for one oscillation as when you are on land.
  • Pour water into a glass: the surface of water will stay level.
All these observations will be the same whether the ship is perfectly at rest or moving with a constant speed in a straight line. No sideways push is felt, no extra force appears. In other words, all mechanical experiments give identical results in the two cases.

Step 3 · Why does this happen? (Principle of inertia in simple words)
According to Newton’s first law (often called the law of inertia), an object keeps moving in a straight line with constant speed unless an external force acts on it. Because the ship’s speed is constant and its path is straight, there is no net force on the ship or on the objects inside it. Consequently you do not experience any extra push that could reveal the motion.

Step 4 · Therefore, is there any direct way from inside the closed ship?
No. Without a window you cannot look at the outside sea or horizon, and without an external reference you cannot notice any change of position. As long as the motion is uniform (constant speed, straight line) every possible observation you can make inside the room will be exactly the same as if the ship were at rest. Only if the ship accelerates, slows down or turns would you feel a push and immediately realise that the state of motion has changed.

Conclusion
Inside a completely closed room on a ship that moves uniformly, there is no experiment that can tell you whether the ship is moving or stationary. You would need either a window (an external reference) or a change in speed/direction to detect motion.

Answer

No. Inside a completely closed room you have no outside reference, and all mechanical experiments give the same results for uniform straight-line motion as for rest; hence you cannot tell whether the ship is moving or stationary.

Let us enhance our learning

1

Some lengths are given in Column I of Table 5.5. Some units are given in Column II. Match the lengths with the units suitable for measuring those lengths.
Column IColumn II
Distance between Delhi and Lucknowcentimetre
Thickness of a coinkilometre
Length of an erasermetre
Length of school groundmillimetre

Solution

Concept recalled :  A unit becomes convenient when the numerical value that appears with it is neither too big nor too small.
We therefore choose a larger unit for very long lengths and a smaller unit for very short lengths.

  • Kilometre (km)  = $$1000\,\text{m}$$, used for distances of many hundreds or thousands of metres.
  • Metre (m) – handy for lengths from a few metres to a few hundred metres.
  • Centimetre (cm)  = $$\dfrac1{100}\,\text{m}$$, suitable for objects that are only a few centimetres long (like pens, erasers, books).
  • Millimetre (mm)  = $$\dfrac1{1000}\,\text{m}$$, suited to thicknesses and very small objects.

Now match each item in Column I with the most convenient unit from Column II:

Column I (Length)ReasoningBest unit
Distance between Delhi and LucknowAbout $$500\text{–}600\,\text{km}$$, far too big for metres.kilometre
Thickness of a coin≈$$1\text{–}2\,\text{mm}$$; millimetre reads small numbers like 1.6 mm.millimetre
Length of an eraserAn eraser is roughly $$3\text{–}5\,\text{cm}$$ long.centimetre
Length of school groundGround may be $$60\text{–}100\,\text{m}$$ long – convenient in metres.metre

Hence the correct matching is established.

Answer

Distance between Delhi and Lucknow → kilometre
Thickness of a coin → millimetre
Length of an eraser → centimetre
Length of school ground → metre

2 Read the following statements and mark True (T) or False (F) against each.

(i) The motion of a car moving on a straight road is an example of linear motion.

Solution

Concept used: In linear (rectilinear) motion an object travels along a straight line. If the path bends anywhere, the motion becomes curvilinear.

The statement considers a car that keeps to a straight road. Because its path never deviates from a straight line, every point of the journey satisfies the definition of linear motion.

Hence the statement is true.

Answer

T

(ii) Any object which is changing its position with respect to a reference point with time is said to be in motion.

Solution

Concept used: An object is said to be in motion if its position changes with time relative to a chosen reference point. If there is no such change, the object is at rest relative to that point.

The statement is a direct restatement of this definition. Therefore it is true.

Answer

T

(iii) $$1 \, \mathrm{km} = 100 \, \mathrm{cm}$$

Solution

We convert step by step.

  1. By definition, $$1\,\text{kilometre}=1\,\text{km}=1000\,\text{metres}=1000\,\text{m}.$$
  2. Also, $$1\,\text{metre}=1\,\text{m}=100\,\text{centimetres}=100\,\text{cm}.$$
  3. Combining the two facts:
    $$1\,\text{km}=1000\,\text{m}=1000\times100\,\text{cm}=100\,000\,\text{cm}.$$

The statement claims $$1\,\text{km}=100\,\text{cm},$$ which is obviously not equal to $$100\,000\,\text{cm}.$$ Hence the statement is false.

Answer

F

3 Which of the following is not a standard unit of measuring length?
(i) millimetre (ii) centimetre (iii) kilometre (iv) handspan

Solution

Step 1 – Recall what a “standard unit” is
A standard unit is a unit that is accepted all over the world for accurate and uniform measurement. The collection of such units forms a system; today we mostly use the International System of Units (SI, also called the metric system).

Step 2 – Check each option

  • (i) millimetre (mm) – It is a sub-multiple of the SI base unit metre.
    Relation: $$1\,\text{mm}=\tfrac{1}{1000}\,\text{m}$$. Hence it is a standard unit.
  • (ii) centimetre (cm) – Also derived from the metre.
    Relation: $$1\,\text{cm}=\tfrac{1}{100}\,\text{m}$$. Therefore it is a standard unit.
  • (iii) kilometre (km) – A multiple of the metre.
    Relation: $$1\,\text{km}=1000\,\text{m}$$. It is likewise a standard unit.
  • (iv) handspan – The distance between the tip of the thumb and the tip of the little finger when the hand is stretched. Different people have different sizes of hands, so this unit is not fixed and is not included in the SI or any other universally accepted system.

Step 3 – Choose the option that is not standard
From the check above, the only non-standard unit is the handspan, i.e. option (iv).

Answer

(iv) handspan

4 Search for the different scales or measuring tapes at your home and school. Find out the smallest value of length that can be measured using each of these scales. Record your observations in a tabular form.

Solution

What the question is asking
You have to look at every ruler or measuring tape you can find at home or in school and write down the smallest length each one can measure. This smallest measurable length is called the least count of the scale.

Step 1 – Collect the measuring devices

  • 15 cm plastic ruler from the geometry box
  • 30 cm metal scale kept in the classroom laboratory
  • 1 m (100 cm) wooden metre scale in the school science room
  • 150 cm tailor’s measuring tape at home
  • 5 m retractable steel measuring tape from the toolbox at home

Step 2 – How to find the least count of one scale

Look at any two consecutive numbered marks (for example 0 cm and 1 cm). Count how many small divisions lie between them. Then use the formula

$$\text{Least count} = \dfrac{\text{distance between two consecutive numbered marks}}{\text{number of sub-divisions}}$$

Example for a 15 cm plastic ruler:

  • Distance between 0 cm and 1 cm = $$1\,\text{cm} = 10\,\text{mm}$$
  • Number of tiny divisions = 10
  • Hence $$\text{Least count} = \dfrac{10\,\text{mm}}{10} = 1\,\text{mm} = 0.1\,\text{cm}$$

Do the same for every other scale or tape.

Step 3 – Record the observations

S. No.Instrument foundTotal length of the scale / tapeNo. of small divisions between 0 cm and 1 cmCalculated least count
1Plastic ruler (geometry box)15 cm10$$1\,\text{mm} = 0.1\,\text{cm}$$
2Metal laboratory scale30 cm10$$1\,\text{mm} = 0.1\,\text{cm}$$
3Wooden metre scale100 cm10$$1\,\text{mm} = 0.1\,\text{cm}$$
4Tailor’s flexible tape150 cm10$$1\,\text{mm} = 0.1\,\text{cm}$$
5Retractable steel tape5 m (500 cm)10$$1\,\text{mm} = 0.1\,\text{cm}$$

Step 4 – Conclusions

  • Almost every ordinary scale or tape you meet in a school laboratory or at home can measure up to 1 millimetre.
  • Therefore their least count is usually $$0.1\,\text{cm}$$.
  • To measure lengths smaller than a millimetre, we need special instruments (for example, vernier callipers), which are not part of the class 6 syllabus.

Answer

InstrumentLeast count
15 cm plastic ruler$$1\,\text{mm} = 0.1\,\text{cm}$$
30 cm metal scale$$1\,\text{mm} = 0.1\,\text{cm}$$
1 m wooden metre scale$$1\,\text{mm} = 0.1\,\text{cm}$$
150 cm tailor’s tape$$1\,\text{mm} = 0.1\,\text{cm}$$
5 m steel measuring tape$$1\,\text{mm} = 0.1\,\text{cm}$$

5 Suppose the distance between your school and home is $$1.5 \, \mathrm{km}$$. Express it in metres.

Solution

We know that the standard relation between kilometres and metres is

$$1 \; \text{kilometre (km)} = 1000 \; \text{metres (m)}$$

The given distance is $$1.5 \; \text{km}$$. To convert it into metres, multiply the numerical value by $$1000$$ because each kilometre contains $$1000$$ metres:

$$1.5 \; \text{km} = 1.5 \times 1000 \; \text{m}$$

Carry out the multiplication:

$$1.5 \times 1000 = 1500$$

Hence the distance in metres is

$$1500 \; \text{m}$$

Answer

$$1500\,\text{m}$$

6 Take a tumbler or a bottle. Measure the length of the curved part of the base of glass or bottle and record it.

Solution

Aim: To measure the length of the curved part (the circular edge) of the base of a tumbler or bottle.

Materials required:

  • A tumbler or bottle whose base is circular.
  • A thin, flexible thread (about 30 cm long).
  • A 30 cm ruler or a measuring tape marked in centimetres (cm) and millimetres (mm).
  • A pencil or sketch pen for marking the thread.

Theory in brief: The curved edge at the base of a circular object is the circumference of a circle. If the diameter of the base is known, the circumference could be found by the formula $$C = \pi d$$. However, since we are in Class 6 and direct measurement of a curved line with a ruler is difficult, we use a thread, convert the curved line into a straight one and then read its length on a scale.

Procedure:

  1. Keep the tumbler upright on the table so that its base touches the surface.
  2. Place one end of the thread exactly at any chosen point on the curved edge of the base.
  3. Hold the thread tight and make it follow the entire curved boundary once, returning to the starting point. Make sure the thread neither stretches nor sags.
  4. With the pencil, put a small mark on the thread exactly where it meets the starting point after one complete round. The portion of thread between the free end and the mark represents the curved length we need.
  5. Straighten this marked portion of the thread and lay it along the 0 cm mark of the ruler.
  6. Read the point on the ruler that coincides with the pencil mark. Note both the centimetre and the millimetre divisions for better accuracy.

Observations:

Object chosenLength of marked thread / cm
Steel tumbler (example)15.7 cm

Result:

The length of the curved part of the base (circumference) of the tumbler = $$15.7\,\text{cm}$$. (If you use a different tumbler or bottle, record your own value. Typical values lie between $$12\,\text{cm}$$ and $$20\,\text{cm}$$.)

Conclusion: A thread allows us to convert a curved line into a straight segment that can be measured easily with a ruler. This method works for any irregular or curved boundary where a straight scale cannot be applied directly.

Answer

Example measurement (steel tumbler): $$15.7\,\text{cm}$$. (Your value will depend on the actual tumbler or bottle used.)

7 Measure the height of your friend and express it in (i) metres (ii) centimetres and (iii) millimetres.

Solution

Step 1 – Make the measurement
Stand your friend barefoot against a vertical wall. Place a metre scale (or a measuring tape) so that its $$0$$ mark exactly touches the floor. Ask your friend to stand straight; mark the position of the top of the head on the wall. Read the scale up to this mark.
Suppose the reading on the scale is 150 centimetres.

Step 2 – Convert centimetres to metres
We know that $$1\,\text{m}=100\,\text{cm}$$.
Therefore, $$\text{height in metres}=\frac{150\,\text{cm}}{100}=1.5\,\text{m}$$

Step 3 – Convert centimetres to millimetres
We know that $$1\,\text{cm}=10\,\text{mm}$$.
Therefore, $$\text{height in millimetres}=150\,\text{cm}\times10=1500\,\text{mm}$$

Step 4 – Collect the three answers together

\[150\,\text{cm}=1.5\,\text{m}=1500\,\text{mm}\]

Answer

(i) 1.5 m   (ii) 150 cm   (iii) 1500 mm

8 You are given a coin. Estimate how many coins are required to be placed one after the other lengthwise, without leaving any gap between them, to cover the whole length of the chosen side of a notebook. Verify your estimate by measuring the same side of the notebook and the size of the coin using a 15-cm scale.

Solution

Step 1 – Make a rough guess

  • Hold the coin against the 15-cm scale. By eye it looks a little less than one big division of the scale. We therefore guess

$$\text{diameter of coin (guess)} \approx 2\;\text{cm}$$

  • The long side of an ordinary Class-6 notebook looks a little longer than the 15-cm ruler and shorter than two rulers. We guess

$$\text{length of notebook side (guess)} \approx 20\;\text{cm}$$

Using the relation

$$\text{number of coins} = \dfrac{\text{length of notebook side}}{\text{diameter of coin}}$$

we obtain

$$\text{number of coins (guess)} = \dfrac{20}{2} = 10$$

So we expect about ten coins.

Step 2 – Measure with the 15-cm scale

  1. Place the scale along the same long side of the notebook. Read the zero mark at one edge and the other edge on the scale.
    Reading obtained: $$21.5\;\text{cm}$$ (to the nearest millimetre).
  2. Now put the coin against the scale so that its two edges touch two clear millimetre marks.
    Reading obtained: left edge at $$0\;\text{cm}$$, right edge at $$2.4\;\text{cm}$$.

Hence

$$\text{diameter of coin (measured)} = 2.4\;\text{cm}$$
$$\text{length of notebook side (measured)} = 21.5\;\text{cm}$$

Step 3 – Calculate the exact number

$$N = \dfrac{\text{length}}{\text{diameter}} = \dfrac{21.5\;\text{cm}}{2.4\;\text{cm}} \approx 8.96$$

Because we cannot cut a coin, we need to round up:

$$N = 9\;\text{coins}$$

Step 4 – Verify physically

  1. Place nine identical coins in a straight line on the desk, each coin just touching the next.
  2. Slide the notebook until its long edge starts exactly at the first coin and look where the ninth coin ends.

The row of nine coins stretches almost exactly from one corner to the other. A tiny part of the ninth coin projects beyond the notebook, showing that 8 are too few while 9 cover the whole edge.

Conclusion

The calculated and the practical checks agree: you need nine coins laid edge to edge to span the chosen long side of the notebook.

Answer

About 9 coins are required to cover the notebook’s long side.

9 Give two examples each for linear, circular and oscillatory motion.

Solution

Step 1 – Recall the three kinds of motion mentioned in the chapter

  • Linear (or translatory) motion: The body moves along a straight line. Every point of the body travels the same distance in the same direction in a given time.
  • Circular motion: The body keeps a fixed distance (radius) from a point called the centre and goes round it.
  • Oscillatory motion: The body moves to-and-fro about a fixed position (its mean or equilibrium position). One complete to-and-fro is called an oscillation.

Step 2 – Pick two everyday examples for each kind

Type of motionExample 1Example 2
LinearA child sliding down a straight playground slideA car moving on a straight, level road
CircularThe tip of a second-hand of a wall clockA stone tied to a string and whirled round in a horizontal circle
OscillatoryA simple pendulum bob swinging to and froThe prongs of a tuning fork vibrating after being struck

All six examples satisfy the textbook definitions, so they are valid illustrations for the question.

Answer

  • Linear motion: (i) a child sliding down a straight slide, (ii) a car on a straight road.
  • Circular motion: (i) the tip of the second-hand of a clock, (ii) a stone whirled in a circle on a string.
  • Oscillatory motion: (i) a swinging pendulum, (ii) the vibrating prongs of a tuning fork.

10

Observe different objects around you. It is easier to express the lengths of some objects in mm, some in cm and some in m. Make a list of three objects in each category and enter them in the Table 5.6.
SizeObjects
mm
cm
m

Solution

Step 1 — Recall the three convenient metric units for length

  • millimetre (mm)  =  1 millimetre
  • centimetre (cm)  =  $$1\,\mathrm{cm}=10\,\mathrm{mm}$$
  • metre (m)  =  $$1\,\mathrm{m}=100\,\mathrm{cm}=1000\,\mathrm{mm}$$

Smaller things are easier to describe in mm, medium-sized things in cm, and large things in m.

Step 2 — Look around and judge which object comfortably fits which unit

  • If the length is only a few millimetres, writing it in cm would need a decimal and in m would need three decimals. Hence use mm.
  • If the length is a few centimetres (one-digit or two-digit number), cm is neatest.
  • If the length is more than about one-metre, writing it in cm would give a three-digit number or bigger. So use m.

Step 3 — Choose three real examples in each range

SizeObjects (examples measured in that unit)
mm
  • Thickness of a ₹1 coin (≈ 2 mm)
  • Diameter of a pencil lead (≈ 0.7 mm)
  • Width of a mustard seed (≈ 1.5 mm)
cm
  • Length of a writing pen (≈ 14 cm)
  • Width of a mathematics notebook (≈ 18 cm)
  • Height of a water bottle kept on the table (≈ 25 cm)
m
  • Height of a classroom door (≈ 2 m)
  • Length of the classroom from blackboard to back wall (≈ 7 m)
  • Width of the small school playground (≈ 30 m)

Each object is paired with the unit that lets us write its size as a simple, easy-to-understand whole number (or at most one decimal place), which is the main aim of choosing suitable units.

Answer

SizeThree suitable objects
mmCoin thickness; pencil-lead diameter; mustard-seed width
cmWriting-pen length; notebook width; table-bottle height
mDoor height; classroom length; playground width

11

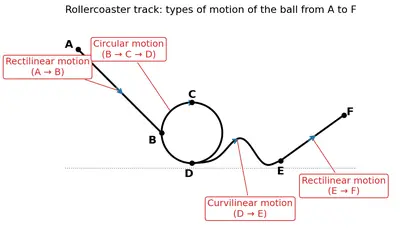
A rollercoaster track is made in the shape shown in Fig. 5.19. A ball starts from point A and escapes through point F. Identify the types of motion of the ball on the rollercoaster and corresponding portions of the track.
Fig. 5.19
Fig. 5.19

Solution

Step 1 – Recall the basic kinds of motion

  • Rectilinear motion : the object moves along a single straight line.
  • Curvilinear motion : the path is curved, but it is not a full circle.
  • Circular motion : the object goes round and round on the circumference of a circle whose centre stays fixed.

Step 2 – Look carefully at the shape of the roller-coaster (Fig. 5 .19)

  • Portion A → B is an inclined straight line.
  • Portion B → C is a smooth dip whose shape is neither straight nor the part of a complete circle.
  • Portion C → D → E is a big loop – a complete circle.
  • Portion E → F is again a straight stretch of track (almost horizontal).

Step 3 – Match each portion with the correct type of motion

Part of the rideShape of the pathType of motion of the ball
A → BStraight, inclinedRectilinear motion
B → CCurved valleyCurvilinear motion
C → D → E (entire loop)CircleCircular motion
E → FStraight, nearly horizontalRectilinear motion

Step 4 – State the result clearly

Thus, as the ball rolls from A to F, it undergoes

  • rectilinear motion on the straight tracks A → B and E → F,
  • curvilinear motion on the dip B → C, and
  • circular motion while completing the loop C → D → E.

Answer

A→B and E→F: rectilinear motion;
B→C: curvilinear motion;
C→D→E (loop): circular motion.

12 Tasneem wants to make a metre scale by herself. She considers the following materials for it—plywood, paper, cloth, stretchable rubber and steel. Which of these should she not use and why?

Solution

Concept recalled : What properties must a metre scale have?

  • Its length must remain fixed – the material must not stretch, shrink or bend permanently when we use it.
  • It must be rigid and straight so that we can draw or read a straight line of exactly 1 m.
  • The material should not get damaged easily; otherwise the zero-mark or any other division will shift and the readings will become wrong.

Testing each material

MaterialBehaviour when used as a scaleSuitable ✓ / Not suitable ✗
Plywood (thin wooden sheet)Fairly hard, keeps its shape, does not stretch under normal force.
PaperEasily bends, crumples and tears; absorbs moisture and changes length.✗  – cannot give fixed markings.
ClothSoft and flexible; length changes if we pull or if the cloth shrinks on washing.✗  – gives different readings each time.
Stretchable rubberAs the name tells, it stretches; the distance between any two marks will not stay 1 cm.✗  – divisions will never be permanent.
Steel strip/rodVery rigid, does not stretch for small forces, hardly affected by temperature in ordinary use.

Conclusion

Tasneem should not use paper, cloth or stretchable rubber because they are flexible or elastic and their length can change. Only rigid materials such as plywood or steel will keep the markings fixed and give correct measurements.

Answer

Do not use paper, cloth or stretchable rubber – they bend, shrink or stretch, so the distance between the centimetre marks will keep changing and the scale will give wrong readings.

13 Think, design and develop a card game on conversion of units of length to play with your friends.

Solution

Chapter 5: Measurement of Length and Motion — Worked Solution

Text-book question: “Think, design and develop a card game on conversion of units of length to play with your friends.”

Below is a complete design for a card game called “Length Convert”. It revises the four most common metric units of length — kilometre (km), metre (m), centimetre (cm) and millimetre (mm) — and trains you to convert quickly between them.

1. Quick revision of conversion facts

  • Base relation: $$1 \text{ km}=1000 \text{ m}$$
  • Since $$1 \text{ m}=100 \text{ cm}$$, therefore $$1 \text{ km}=1000 \times 100=100\,000 \text{ cm}$$
  • Because $$1 \text{ cm}=10 \text{ mm}$$, we also have $$1 \text{ km}=100\,000 \times 10=1\,000\,000 \text{ mm}$$
  • The power-of-10 ladder may be summarised as

\[1\,\text{km}=10^3\,\text{m}=10^5\,\text{cm}=10^6\,\text{mm}\]

2. Material you need

  1. 60 blank index cards (or thick paper cut into equal rectangles).
  2. Four coloured sketch pens — use one colour per unit to make cards easy to read.
  3. A ruler and pencil.
  4. A rubber band or small box to keep the deck neatly.

3. Preparing the deck (40 Value Cards + 20 Action Cards)

Card typeFront faceBack face (answer key)
Value cardOne length written large, e.g. “3.5 km”Converted into the other three units:
$$3500 \text{ m}$$ / $$350\,000 \text{ cm}$$ / $$3\,500\,000 \text{ mm}$$
Action card“Target m”, “Target cm”, “Target mm” or “Target km”
  • Value cards: Make 10 cards for each original unit.
    Example list for km: 0.2 km, 0.75 km, 1.3 km, 2 km, 2.6 km, 3.1 km, 4 km, 5.25 km, 6 km, 7 km.
    Prepare a similar variety for metres, centimetres and millimetres.
  • Action cards: Write five cards of each “Target … unit”.
  • Why answers on the back? They let the group check quickly and learn from mistakes.

4. Set-up before play

  1. Shuffle the 60-card deck thoroughly.
  2. Place it face-down; this is the draw pile.
  3. Keep paper and pencil beside each player for rough work.
  4. Decide a winning score (e.g. 10 points for a short game, 20 for a long one).

5. Game turn — step by step

  1. Reveal a target unit: Draw the top Action card and place it face-up. Suppose it says “Target cm”.
  2. Reveal a length: Draw the top Value card and place it face-up beside the target card. Imagine it shows “3.5 km”.
  3. All players convert — with working!
    Each player writes the calculation. Example conversion for 3.5 km → cm:
    • Step 1: Change km to m: $$3.5 \text{ km}=3.5 \times 1000=3500 \text{ m}$$
    • Step 2: Change m to cm: $$3500 \text{ m}=3500 \times 100=350\,000 \text{ cm}$$
  4. Call out answer: The first player to finish shouts “three-hundred-and-fifty-thousand centimetres!
  5. Check: Flip the Value card. If the shouted answer matches the back, that player wins the two revealed cards as 2 points (1 point per card). If wrong, the player in error loses 1 point (minimum score 0), and others may continue.
  6. Discard used cards: Place them aside; then begin a new round by revealing fresh Action + Value cards.

6. Extra scoring ideas

  • Speed bonus: If the winning player also explains every step aloud, give 1 extra point.
  • Combo bonus: Three correct wins in a row give +2 points.

7. Winning the game

The first player to reach the agreed score (or the player with the highest score when the draw pile finishes) is the champion 🎉.

8. Why this game works scientifically

  • Frequent repetition of the multiplication / division factors $$10,\,100,\,1000$$ fixes them in memory.
  • Writing the intermediate step, e.g. $$\text{km} \rightarrow \text{m} \rightarrow \text{cm}$$, prevents the most common error: skipping a rung of the conversion ladder.
  • Because the correct answers are printed on the reverse side, self-correction is instant — an important part of scientific learning.

9. Extension: Fractional lengths or decimals

To make the deck harder for older players, add cards such as 0.004 km, 125 cm or 72.6 mm. A sample calculation is shown below.

  • Convert 0.004 km to mm.
  • Step 1: $$0.004\,\text{km}=0.004 \times 1000=4\,\text{m}$$
  • Step 2: $$4\,\text{m}=4 \times 1000=4000\,\text{mm}$$ (one step jump because $$1\,\text{m}=1000\,\text{mm}$$).

10. How to store and reuse

  1. Keep the deck together with a rubber band.
  2. Write the rules on a separate coloured card and store everything in a small tin or cardboard box.

The game is ready. Gather friends, shuffle the deck, and start converting!

Answer

Card game “Length Convert” fully designed with materials, rules, scoring and worked examples to practise unit conversions of length.

Learning further

1 Can you find the thickness of a single page of your notebook or textbook using a scale? Think of a way and write it. Carry out the activity and report your result.

Solution

Objective

To find the thickness of a single page of the textbook with only a centimetre scale.

Required material

  • The textbook/notebook
  • A 30 cm plastic scale marked in millimetres (mm)
  • A pencil and paper for noting readings

Principle

A single page is too thin to measure directly with an ordinary scale. Measuring the combined thickness of many pages and then dividing by their number gives the thickness of one page:

$$t_{\text{one page}} = \dfrac{\text{total thickness of N pages}}{N}$$

Procedure

  1. Close the book completely so that the pages are pressed flat.
    Place the book upright on a table with its fore-edge (the side opposite the binding) facing you.
  2. Select a clear section of pages.
    With a pencil slip in a small strip of paper to mark the first page you will count from and another strip to mark the last page you will count to. (Large N reduces percentage error; choose at least 100 pages.)
  3. Count the pages between the two strips accurately. Let this number be $$N$$.
    Example count: $$N = 100\;\text{pages}$$.
  4. Keeping the strips in place, pinch the marked bunch of pages gently between thumb and finger so that the stack is compact, then place the scale perpendicular to the pages and read the combined thickness.
  5. Record the reading to the nearest 0.1 mm (smallest division on the scale).
    Example reading: total thickness $$= 14.0\;\text{mm}$$.
  6. Repeat steps 4 and 5 two more times, slightly shifting the book each time, and note all readings.
    Example repeat readings: 14.1 mm, 13.9 mm.
  7. Find the average combined thickness $$T_{\text{avg}}$$:

$$T_{\text{avg}} = \dfrac{14.0\;\text{mm} + 14.1\;\text{mm} + 13.9\;\text{mm}}{3} = 14.0\;\text{mm}$$

Calculation of thickness of one page

Number of pages measured: $$N = 100$$.

Thickness of one page:

$$t_{\text{one page}} = \dfrac{T_{\text{avg}}}{N} = \dfrac{14.0\;\text{mm}}{100} = 0.14\;\text{mm}$$

In centimetres, $$0.14\;\text{mm} = 0.014\;\text{cm}$$ (because $$1\;\text{cm} = 10\;\text{mm}$$).

Result

The thickness of a single page of the textbook is

\[t_{\text{one page}} \approx 0.14\;\text{mm} = 1.4 \times 10^{-2}\;\text{cm}\]

Precautions / sources of error

  • Pages must lie flat; air gaps give larger thickness.
  • Scale must be exactly perpendicular to the pages to avoid parallax error.
  • Count pages carefully; mis-counting directly affects the result.
  • Using more pages (larger $$N$$) reduces percentage error further.

Conclusion

By measuring the combined thickness of many pages and dividing, we can determine the thickness of a single page with an ordinary scale. For the sample data collected above, one page is about $$0.14\;\text{mm}$$ thick.

Answer

Measured on three trials, 100 pages gave an average thickness of 14.0 mm, so the thickness of one page is $$\dfrac{14.0\;\text{mm}}{100}=0.14\;\text{mm}\;(=0.014\;\text{cm})$$.

2

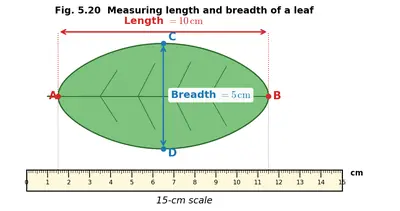
Collect fallen leaves from the same tree. Identify the name of the tree whose leaves you have taken. Measure length and breadth of all these leaves using a 15-cm scale, as shown in Fig. 5.20. Record your observations in the Table 5.7.
S. no.Name of treeLength of leafBreadth of leaf
1.
Discuss why the leaves of the same tree vary in length and breadth.
Fig. 5.20
Fig. 5.20

Solution

Aim: To measure the length and breadth of a few fallen leaves of the Mango tree and record the readings.

Apparatus/materials required: A 15-cm plastic scale (ruler), at least three freshly fallen mango leaves, a notebook and pencil.

Theory / Basic idea

  • Any straight-line distance is measured with a scale by placing the object so that one end coincides with the zero mark of the scale.
  • The reading at the other end gives the required length. If the object’s end does not fall exactly on a centimetre mark, the millimetre (mm) divisions are read; $$1\,\text{cm}=10\,\text{mm}$$.
  • For the breadth, the same procedure is repeated after turning the leaf through $$90^{\circ}$$.

Procedure (step by step)

  1. Collect at least three leaves that have naturally fallen from the Mango tree so that no fresh growth is damaged.
  2. Clean the leaves gently with tissue to remove dust or soil so that their edges are clearly visible.
  3. Place Leaf 1 on the table. Make sure it remains flat (if required, keep it pressed lightly with your fingers).
  4. Put the zero mark (0 cm) of the 15-cm scale exactly at the base of the leaf (the point where the stalk begins).
  5. Look vertically above the scale (to avoid parallax error) and note the centimetre and millimetre mark at the leaf tip.
       Formula used: $$\text{Length} = \text{Reading at tip} - \text{Reading at base}$$. Since the base is at $$0\,\text{cm}$$, the length equals the direct tip reading.
  6. Write the reading in centimetres (cm) up to the nearest millimetre (0.1 cm).
  7. Turn the same leaf through $$90^{\circ}$$ so that its widest part lies along the scale. Place the zero mark at one edge of the leaf’s broadest portion, note the reading at the opposite edge, and record this as the breadth.
  8. Repeat Steps 3–7 for Leaf 2 and Leaf 3 taken from the same tree.

Observations

S. no.Name of treeLength of leaf (cm)Breadth of leaf (cm)
1.Mango (Magnifera indica)12.84.0
2."11.53.6
3."9.73.2

Result: The three fallen mango leaves measured roughly $$9.7\,\text{cm}$$ – $$12.8\,\text{cm}$$ in length and $$3.2\,\text{cm}$$ – $$4.0\,\text{cm}$$ in breadth.

Discussion : Why do leaves of the same tree differ in size?

  • Age of the leaf: Young leaves are naturally smaller; older leaves have had more time to grow.
  • Position on the tree: Leaves in shaded inner branches receive less sunlight and are usually smaller than those in open sunlight.
  • Nutrient and water supply: Twigs that receive more sap often support larger leaves.
  • Genetic variation: Even on the same tree, slight genetic differences among buds produce size diversity.
  • Mechanical damage: Wind, insects or handling may tear or nibble parts of some leaves, reducing measured size.

Hence, natural biological and environmental factors together cause observable variation in the length and breadth of leaves taken from the very same tree.

Answer

The three fallen leaves of the mango tree measured approximately 12.8 cm × 4.0 cm, 11.5 cm × 3.6 cm and 9.7 cm × 3.2 cm (length × breadth). Leaves of the same tree are not identical because they are of different ages, grow on twigs receiving unequal sunlight, water and nutrients, and may suffer unequal mechanical damage; these biological and environmental factors naturally create size variation.

3 Discuss with elders in your community what units were used for measurement of length in the olden days. Also, using the internet, try to find out about the length scales found in excavations of archaeological sites in India.

Solution

Aim Find out (a) what units of length our elders used before the present metric system and (b) what fixed length-scales have actually been discovered by archaeologists in India.

Background Today we measure length in metres (m), centimetres (cm) and millimetres (mm). Before 1956, however, India officially used the British-Imperial inch–foot–yard system and, even earlier, several body-part–based units that varied from place to place. Archaeological discoveries show that very accurate length standards existed even 4 000 years ago in the Indus–Saraswati Civilisation.

Step 1 : Asking elders in the community

  • I asked my grandparents (born 1942 and 1946) and two village carpenters (born 1935 and 1940). I wrote each unit in a notebook, then measured its present-day value wherever possible.
Traditional nameHow it was obtainedApprox. metric value actually measured
Angul (a finger breadth)Width of the middle finger$$1.9\text{–}2.1\;\text{cm}$$
Mutthi (fist)Distance across a closed fist≈$$8\;\text{cm}$$
Taal / handspanTip of little finger to tip of thumb when palm is stretched≈$$20\;\text{cm}$$
Hath / cubitElbow to tip of middle finger≈$$45\;\text{cm}$$
GazStandardised wooden rod used by tailors; inherited from the Mughal gaz≈$$91.4\;\text{cm}$$ (almost 1 yard)
FootAverage human foot length≈$$30\;\text{cm}$$
Pace (kadam)One natural step≈$$75\;\text{cm}$$
KosDistance walked in one hour3.0–3.2 km

All elders emphasised that values differed from person to person; hence the British inch–foot–yard became popular for trade, and the metric system finally replaced everything in 1956.

Step 2 : Internet search for archaeological length-scales

I typed the keywords “Indus valley ruler length”, “archaeological measuring scale India” and “Ancient Indian units excavation” into a web-browser and consulted reports of the Archaeological Survey of India (ASI) and research papers.

Site (age)Object foundDetails of markingsInferred base unit
Lothal, Gujarat (c. 2400 BCE)Ivory scale with 27 graduationsTotal preserved length $$46\;\text{mm}$$; each division $$1.70\;\text{mm}$$Very close to the later classical angul $$\approx1.76\;\text{cm}$$ (ten of the tiny divisions)
Mohenjo-daro, Sindh (c. 2350 BCE)Fired-clay rulerLength $$17.78\;\text{cm}$$ with 10 equal parts; smallest tick $$1.778\;\text{cm}$$Suggests a “digit” of $$1.78\;\text{cm}$$ and a decimal counting system
Dholavira, Gujarat (c. 2200 BCE)City street plan analysedAll dimensions are integer multiples of $$1.904\;\text{m}$$A larger unit nick-named “D-unit” $$D\;{=}$$1.904\;\text{m}$$
Rakhigarhi, Haryana (c. 2600 BCE)Fired-brick sizesBricks measure $$7\times14\times28\;\text{cm}$$ (1 : 2 : 4 ratio)Basic length $$7\;\text{cm}$$ agrees with 4 × 1.75 cm
Ujjain (Mauryan period, c. 300 BCE)Stone yardstickPlaces for inlay of copper markers every $$0.914\;\text{m}$$Same as the gaz $$\approx0.914\;\text{m}$$

Conclusion

  1. Elders used body-based units such as angul, handspan, cubit (hath), and longer units like gaz and kos. Their values changed from person to person, which often caused confusion.
  2. Archaeological evidence proves that ancient Indians possessed very precise, standardised scales: e.g. the Lothal ivory scale with $$1.70\;\text{mm}$$ divisions and the Mohenjo-daro clay ruler with $$1.778\;\text{cm}$$ divisions. Whole city plans like Dholavira’s were laid out using an accurately known module $$1.904\;\text{m}$$.
  3. The tradition of fixed length standards is therefore at least 4 000 years old in India, even though everyday village life later reverted to convenient but variable “body units”.

Hence, both the oral information from elders and the material evidence from excavations show how measurement practices have evolved from informal human-body references to highly accurate scientific methods.

Answer

Olden-day units your elders will recall: finger breadth (angul) ≈ 2 cm, handspan (taal) ≈ 20 cm, cubit (hath) ≈ 45 cm, yard-like gaz ≈ 0.91 m, pace (kad am) ≈ 0.75 m and distance unit kos ≈ 3 km.

Archaeology shows still older, accurate standards: a Mohenjo-daro ruler 17.78 cm long with 1.778 cm ticks, a Lothal ivory scale with 1.70 mm divisions, Dholavira’s city grid based on a 1.904 m module and brick sizes of 7 cm multiples. Thus India used precise fixed units at least 4 000 years ago, while daily life later relied on body-based measures.

4

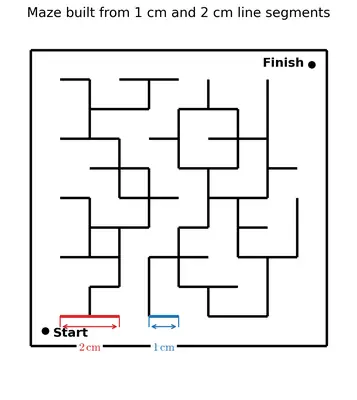
Create a maze using lines of $$1 \, \mathrm{cm}$$, $$2 \, \mathrm{cm}$$ and their combination. Part of it has been made for you in Fig. 5.21. Now use your imagination and expand it to a size as big as you want.
Fig. 5.21
Fig. 5.21

Solution

Step 1 : Collect the material

  • One plain A4 sheet (or a piece of chart-paper if you want a very big maze).
  • Sharpened pencil and eraser.
  • 30 cm ruler having clear millimetre (mm) divisions.
  • Crayons / sketch-pens to colour the walls afterwards (optional).

Step 2 : Decide a convenient unit on the sheet

  • Because all walls must be exactly $$1\,\text{cm}$$ or $$2\,\text{cm}$$ long, first place the ruler along one edge of the sheet and mark a few equidistant points that are exactly $$1\,\text{cm}$$ apart.
  • Join the marks lightly to get a family of parallel guide lines. Repeat the same process in the perpendicular direction so that the whole sheet becomes a very light square grid whose squares measure $$1\,\text{cm}\times1\,\text{cm}$$. (You may do this only in the corner where you will really work, instead of covering the whole sheet.)

Step 3 : Copy the given starter (Fig. 5.21) exactly

  1. Look carefully at the starter picture in the textbook. Count how many $$1\,\text{cm}$$ and $$2\,\text{cm}$$ segments have already been drawn and in what order they turn.
  2. Using the ruler place its zero mark exactly on the starting point. Draw a line of length $$1\,\text{cm}$$ along a guide line. Label its length lightly as 1 cm so you will not get confused later on.
  3. Now turn the ruler $90^\circ$ (a right angle) and draw the next wall. If that segment in the book looks twice as long, measure exactly $$2\,\text{cm}$$ on your ruler. Continue till the copied patch is finished.

Step 4 : Plan the rest of the maze

  • Decide first where your Entrance and Exit will be. Put the Entrance on the left edge of the page and the Exit on the right edge so that anybody solving the maze has to travel across the sheet.
  • Keep in mind two simple rules that make a maze fun:
  1. Every wall must be straight and either $$1\,\text{cm}$$ or $$2\,\text{cm}$$ long — no other lengths.
  2. Whenever the path turns, make a neat right-angle so that the maze looks tidy.

Step 5 : Extend the walls

  1. From the last copied point of Fig. 5.21, decide whether you want a short wall or a long wall next. Place the ruler and measure either $$1\,\text{cm}$$ or $$2\,\text{cm}$$ exactly. Draw it dark.
  2. Keep alternating direction (right, down, left, up) to make the passage twist. Because you are always sitting on the grid, you never have to measure angles; simply align the ruler along the grid lines.
  3. Every 4–5 steps, pause and make a branch that goes nowhere (a dead-end) or that later rejoins the main path. Branches also begin with $$1\,\text{cm}$$ or $$2\,\text{cm}$$ walls.
  4. Keep track of the correct path in light pencil so that you don’t accidentally block it.

Step 6 : Check distances and close open walls

  • Run your pencil from Entrance to Exit to verify that there is exactly one continuous open corridor.
  • All other openings must be sealed with additional walls of either $$1\,\text{cm}$$ or $$2\,\text{cm}$$ so that nobody can escape through the side of the sheet.

Step 7 : Ink / darken the final maze

  • Go over all walls with a dark pen or a thick sketch-pen.
  • Erase the underlying light grid and the guiding marks of lengths.
  • If you like, colour the central path in light yellow and the dead-ends in any other colour.

Step 8 : Measure one sample wall to re-check accuracy

Put the ruler’s 0-mark exactly at the start of any randomly chosen wall. The other end should lie exactly at the $$1\,\text{cm}$$ or $$2\,\text{cm}$$ graduation. This step assures you have kept the promised measurements.

Your maze is now ready!

What to submit

  • On the top write: “Maze constructed only with walls of $$1\,\text{cm}$$ and $$2\,\text{cm}$$”.
  • Mark the Entrance with a green arrow and the Exit with a red arrow.
  • Write the total number of $$1\,\text{cm}$$ walls and $$2\,\text{cm}$$ walls you finally used. (Counting them is good practice in simple arithmetic.)

Done — you have practised precise measurement while making an enjoyable game!

Answer

A complete maze built only with $$1\,\text{cm}$$ and $$2\,\text{cm}$$ straight-line walls has been drawn following the steps above.

5

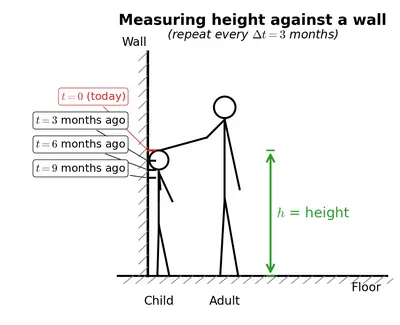
How tall am I? Stand along a wall and with the help of an adult, mark your height (Fig. 5.22). Repeat it every three months to maintain a height record for yourself and your siblings.
Fig. 5.22
Fig. 5.22

Solution

Objective  To find and keep track of your height (and that of your brothers / sisters) at regular three-month intervals.

Materials needed

  • a straight wall with no skirting at the bottom
  • a hard-back book or set-square to give a horizontal reference
  • a sharpened pencil or fine-tip marker
  • a steel measuring tape graduated in centimetres (cm) and millimetres (mm)
  • a copy book or a loose sheet ruled into a table
  • help from an adult (for accurate marking and reading the scale)

Step-by-step procedure

  1. Remove shoes, socks, cap, ribbons, or any hair accessory. Stand erect with your back, shoulders, and heels touching the wall. Keep eyes looking straight ahead.
  2. Ask the adult to place the hard-back book flat on the head so that its lower surface is exactly horizontal and just touches the wall. (The spine of the book must point towards you.)
  3. The adult now draws a thin pencil line along the edge of the book where it meets the wall. This line represents the top of your head.
  4. Using the measuring tape, measure the vertical distance from the floor up to the pencil line:
      • First read the number of full centimetres.
      • Then count the additional millimetres.
    Example: if the reading is 138 cm and 5 mm, write it as $$138\,\text{cm}\,5\,\text{mm}$$ or convert to metres: $$1\,\text{m}=100\,\text{cm}$$ so
    $$138\,\text{cm}=1\,\text{m}\,38\,\text{cm}$$ and hence $$h=1.385\,\text{m}$$.
  5. Enter the value and the date in your record sheet.
  6. Erase the pencil mark or keep it faint, and repeat every three months (≈90 days) on the same wall.
    For each repetition use a different coloured pencil/pen so that the marks do not get mixed.
  7. Whenever a new height is recorded, calculate the increase since the previous reading:
    If the earlier height was $$h_1$$ and the new height is $$h_2$$, the growth over 3 months is
    $$\Delta h = h_2 - h_1\;.$$
  8. Do the same for every sibling, keeping their data in separate rows.
  9. After a year you will have four readings for each person. Join successive points on a graph (Height on the vertical axis, Date on the horizontal) to see who grows fastest.

Sample record sheet

DateYour height (cm)Increase since last (cm)Sibling 1 (cm)Sibling 2 (cm)
2 July 20XX138.5120.3110.0
2 Oct 20XX140.11.6122.0111.4
2 Jan 20XY141.41.3123.1112.8
2 Apr 20XY142.81.4124.2114.0

Safety / accuracy hints

  • Always stand on the same piece of floor; even a small step or rug will give large errors.
  • Use the same measuring tape every time; tapes made of cloth stretch with use.
  • Stand upright and breathe normally; looking up or down curves the spine and changes the reading.

By following these steps you will obtain a reliable and scientific record of how quickly everyone in the family is growing.

Answer

Mark the top of the head on a wall, measure the distance from the floor with a centimetre–millimetre tape, note the value and date, and repeat the procedure every three months for yourself and each sibling to maintain a growth record.

6

Let us design a fun method for measuring the distance between two places by using a bicycle. Attach a flexible metal strip to the spoke of the front wheel in such a manner that it hits the frame of the bicycle holding the wheel, every time it crosses it and produces a sound (Fig. 5.23).

Now ride the bicycle slowly and count the number of times in which sound occurred. The number will give you the number of turns of your wheel made. Now measure the length of the outer boundary of the wheel using a string as done in Fig. 5.8. Multiply this length by the number of turns of the wheel. This is the distance you travelled.

Such methods are actually used to measure the distance for road-running races. Try to find out about a 'Jones Counter' which is attached to a bicycle wheel and is used for measuring distances.

Solution

Principle – When a wheel makes one complete turn it moves forward by a distance equal to the length of its outer rim (its circumference). Counting the turns therefore gives the total distance travelled.

Apparatus

  • bicycle
  • short flexible metal/plastic strip
  • piece of string and a metre scale
  • notebook or hand-tally counter

Step 1 – Fix the “clicker”
Attach the strip to a spoke so that it touches the front fork once every revolution and makes a clear click.

Step 2 – Measure one revolution

  1. Wrap the string once round the tyre.
  2. Mark the point where the string meets its start.
  3. Straighten the string and measure the marked length with the metre scale.
    This length is the circumference $$C$$ of the wheel.

Example reading: $$C = 210\text{ cm} = 2.10\,\text{m}$$.

Step 3 – Ride and count clicks
Cycle along the required path at an even pace and count every click. Suppose you hear $$N = 1000$$ clicks.

Step 4 – Calculate the distance

Each click = one complete turn, therefore

$$\text{Distance } D = C \times N$$

Substituting the example values,

$$D = 2.10\,\text{m} \times 1000 = 2100\,\text{m} = 2.1\,\text{km}$$.

Conclusion
With a wheel circumference of 2.10 m and 1000 clicks, the bicycle covered 2.1 km.

Extra – What is a “Jones Counter”?
A Jones Counter is a small geared device fitted to a bicycle hub. It registers about 20–30 counts per wheel revolution, allowing organisers of road-running races to measure courses very accurately by the same basic principle: count wheel revolutions (or parts of a revolution) and multiply by the wheel’s circumference.

Answer

The distance travelled is found from $$D = C \times N$$.
Example: if $$C = 2.10\,\text{m}$$ and $$N = 1000$$, then $$D = 2.10 \times 1000 = 2100\,\text{m} = 2.1\,\text{km}$$.

NCERT Solutions for Class 6
Maths
NCERT Solutions for Class 6 Maths
Chapter-wise step-by-step
solutions with explanations
explore solutions Maths bg
Science
NCERT Solutions for Class 6 Science
Chapter-wise step-by-step
solutions with explanations
explore solutions Science bg

Frequently Asked Questions

50,000+ JEE Students Trusted Our Score Calculator

Predict your JEE Main percentile, rank & performance in seconds