Join WhatsApp Icon JEE WhatsApp Group
NCERT Solutions for Class 6 Maths

Chapter 8: Playing with Constructions

Download Solutions PDF
Daily JEE Updates, Tips & Important Alerts
Join 30,000+ students and stay updated with JEE notifications and preparation insights.
Join Now!
Free PDF
Complete NCERT Solution PDF for Chapter 8: Playing with Constructions

NCERT Solutions For Class 6 Maths Chapter 8 Playing with Constructions helps students explore the basics of geometric constructions using different mathematical tools and techniques. The page provides detailed NCERT Solutions that explain construction-based questions with proper steps and clear instructions. NCERT Solutions For Class 6 Maths make it easier for students to understand the use of rulers, compasses, and other instruments for creating geometric figures accurately. This chapter develops precision, observation skills, and logical thinking while working with shapes and figures. Students can use these solutions to learn construction methods, solve textbook exercises, and improve their practical geometry skills. The chapter PDF helps students revise important steps and concepts whenever required. The easy explanations make construction activities more engaging and help students gain confidence in solving geometry problems.

Download Solutions PDF

Section 8.1 Artwork — Intext Questions

Think

Mark a point 'P' in your notebook. Then, mark as many points as possible, in different directions, that are $$4 \, \mathrm{cm}$$ away from P.

Think: Imagine marking all the points of $$4 \, \mathrm{cm}$$ distance from the point P. How would they look?

Try to draw it and verify if it is correct by taking some points on the curve and checking if their distances from P are indeed $$4 \, \mathrm{cm}$$.

Solution

Step 1 – Draw the given point
Put a neat dot anywhere on the page and label it $$P$$. This point will be the centre from which we measure all the distances.

Step 2 – Set the compass opening to 4 cm
Place the metal tip of the compass on the zero mark of a ruler. Slide the pencil point along the ruler until the reading against the metal tip becomes exactly $$4\,\text{cm}$$. Tighten the screw so that the opening does not change.

Step 3 – Mark many points that are 4 cm from $$P$$
• Keep the metal tip fixed on $$P$$.
• Without moving the tip, swing the pencil slowly around $$P$$. Every time the pencil touches the paper it is at a distance of exactly $$4\,\text{cm}$$ from $$P$$.
• You may pause at different directions—north, south, east, west, north-east, south-east, south-west, north-west, or any other slanted direction—and put a small dot. You can mark as many such dots as you like; there is no limit in theory.

Step 4 – Join the dots to see the full picture
If you continue the swing without lifting the pencil, the individual dots automatically join to form a smooth closed curve. That curve is a circle. Its mathematical description is “the set of all points in the plane that are at a fixed distance (the radius) from a fixed point (the centre).” Here the radius is $$4\,\text{cm}$$ and the centre is $$P$$.

Step 5 – Verify by measurement
Choose any three or four of the marked points. Place the zero mark of the ruler on $$P$$ and read the length up to the chosen point. Each reading will be $$4\,\text{cm}$$, confirming that every point on the curve is indeed exactly $$4\,\text{cm}$$ away from $$P$$.

Conclusion
All the points that are $$4\,\text{cm}$$ from $$P$$ lie on the same circle with centre $$P$$ and radius $$4\,\text{cm}$$. Since a circle contains infinitely many points, we can keep on marking such points without end; practically, we show only a finite number of them on paper.

Answer

All the required points lie on one circle whose centre is $$P$$ and whose radius is $$4\,\text{cm}$$.

Activity Make other artwork of your choice with a ruler and a compass.

Solution

Construction: A six-petalled flower (one central circle surrounded by six equal circles)

  1. Fix the radius. Open the compass to any convenient width; take $$r = 3\text{ cm}$$ for concreteness. From now on do not change this opening.

  2. Draw the central circle. Choose a point $$O$$ on your sheet. With centre $$O$$ and radius $$r$$ draw a circle. This is the hub of the flower.

  3. Mark the first point on the circumference. Put a short horizontal ray through $$O$$ with the ruler. The ray meets the circle at $$A$$ on the right. $$A$$ will be the first vertex of an implicit regular hexagon.

  4. Step off the radius around the circle. Without altering the compass:

    1. Place the needle at $$A$$; draw a small arc cutting the big circle at $$B$$.
    2. Now place the needle at $$B$$; cut the big circle at $$C$$.
    3. Continue likewise to obtain points $$D,\;E,\;F$$ and finally back to $$A$$. You should get exactly six points because \[360^{\circ}\div60^{\circ}=6\].
      The points $$A,B,C,D,E,F$$ are the consecutive vertices of a regular hexagon inscribed in the central circle.
  5. Locate the centres of the petal-circles. The six vertices $$A,B,C,D,E,F$$ will serve as the centres of the outer circles (petals).

  6. Draw the six petals. Keeping the compass still at radius $$r$$, draw a circle with centre $$A$$. Repeat with centres $$B,C,D,E,F$$. Each new circle passes through $$O$$ and through its two neighbouring centres, so the petals overlap neatly, meeting pairwise at exactly two points.

  7. Optional finishing touches. You may darken the outline of the flower, erase construction arcs that are no longer needed, or shade alternate petals to enhance the artwork.

Why the construction works

  • The distance between any two adjacent centres (say $$A$$ and $$B$$) is exactly $$r$$ because each lies on the other’s circle. Hence the six outer circles all have the same radius as the central circle.
  • From basic geometry, stepping a chord equal to the radius around a circle subtends an angle of $$60^{\circ}$$ at the centre. Six such steps complete the full $$360^{\circ}$$, so only six points occur. This gives a perfect regular hexagon, ensuring the six petals are symmetrically placed.

Thus, with nothing more than an unmarked ruler and a compass, you obtain a pleasing six-petalled floral pattern — an example of mathematical artwork created entirely by classical Euclidean constructions.

Answer

A symmetrical six-petalled flower formed by one central circle of radius $$r$$ and six congruent circles whose centres are the vertices of a regular hexagon on that circle.

Section 8.1 Artwork — Construct

1

A Person

How will you draw this?

This figure has two components. You might have figured out a way of drawing the first part. For drawing the second part, the challenge here is to find out where to place the tip of the compass and the radius to be taken for drawing this curve. You can fix a radius in the compass and try placing the tip of the compass in different locations to see which point works for getting the curve. Use your estimate where to keep the tip.

Solution

Construction of the picture titled “A Person”

  1. The trunk
    Draw a vertical line $$\overline{PQ}$$ = 8 cm with P at the top and Q at the bottom. This is the centre-line (the body).
  2. The head
    With P as centre take radius 1.5 cm and draw a circle. This circle is the head.
  3. The shoulder–line
    On $$\overline{PQ}$$ mark the point M so that $$PM = 2\text{ cm}$$. Through M draw a line at right angles to $$\overline{PQ}$$. Mark points R and S on it so that $$MR = MS = 2.5\text{ cm}$$. Segment $$\overline{RS}$$ is the shoulder-line and its ends are the tips of the two arms.
  4. Locating the centre of the big arm-arc
    (a) Join R to S; $$\overline{RS}$$ is the chord of the required arc.
    (b) With the compass draw the perpendicular bisector of $$\overline{RS}$$ and extend it above the shoulder-line.
    (c) On this bisector choose a point O such that $$OR = OS = 3\text{ cm}$$ (any radius a little larger than $$\tfrac{1}{2}RS$$ works; 3 cm matches the textbook picture).
    (d) Keeping the same radius 3 cm and O as centre draw the arc through R and S. This single arc produces both curved arms simultaneously.
  5. The legs
    From Q draw two equal segments $$\overline{QA}$$ and $$\overline{QB}$$, each 4 cm long, making $$\angle AQB = 60^{\circ}$$ (use the compass-construction for an equilateral triangle to obtain the 60° angle). These two segments represent the legs.
  6. Feet
    At A and B draw tiny horizontal segments, about 0.8 cm each, to show the feet.

All six steps need nothing beyond a ruler and a compass, so the figure is drawn strictly by classical construction methods.

Answer

Required ruler-and-compass steps listed above construct the complete picture of the person.

2

Wavy Wave

Construct this.

As the length of the central line is not specified, we can take it to be of any length. Let us take AB to be the central line such that the length of AB is $$8 \, \mathrm{cm}$$. We write this as $$\mathrm{AB} = 8 \, \mathrm{cm}$$.

Here, the first wave is drawn as a half circle.

Solution

Objective
To draw a wave made of equal semicircles on a straight base line of length $$8\,\mathrm{cm}$$.

Materials : ruler, compasses, sharp pencil.

Construction steps

  1. Draw the central line.
    With the ruler draw $$\mathrm{AB}=8\,\mathrm{cm}$$.
  2. Split AB into four equal parts.
    • Open the compasses to $$2\,\mathrm{cm}$$.
    • With centre A cut an arc on AB to mark P so that $$\mathrm{AP}=2\,\mathrm{cm}$$.
    • Without changing the opening, centre at P to mark Q, and centre at Q to mark R.
    • The next point is B; thus
      $$\mathrm{AP}=\mathrm{PQ}=\mathrm{QR}=\mathrm{RB}=2\,\mathrm{cm}.$$
  3. Locate the four centres.
    The midpoint of each $$2\,\mathrm{cm}$$ part is its centre.
    Mark M1 on AP, M2 on PQ, M3 on QR, M4 on RB. All give a common radius
    $$r=\dfrac{2\,\mathrm{cm}}{2}=1\,\mathrm{cm}.$$
  4. Draw alternate semicircles.
    • Centre M1, radius $$1\,\mathrm{cm}$$, draw a semicircle above AB from A to P.
    • Centre M2, same radius, draw a semicircle below AB from P to Q.
    • Centre M3, draw a semicircle above AB from Q to R.
    • Centre M4, draw a semicircle below AB from R to B.
  5. Result.
    The chain of four equal half-circles on alternate sides of AB forms the required “wavy wave”.

Verification
All semicircles have radius $$1\,\mathrm{cm}$$ and together cover the whole base: \[\mathrm{AB}=4\times2\,\mathrm{cm}=8\,\mathrm{cm}.\] Hence the construction is correct.

Answer

The wavy wave has been accurately constructed on the $$8\,\mathrm{cm}$$ base line.

3

Eyes

How do you draw these eyes with a compass?

For a hint, go to the end of the chapter.

Solution

Goal : Each eye is the lens-shaped region common to two equal circles. Two such lenses placed next to one another look like a pair of eyes. All of it can be produced with nothing more than a straightedge to mark points on a line and a compass that keeps the same opening when asked.

The construction is described for two eyes of outer width $$8\text{ cm}$$. You may change the numbers – only the idea matters.

  1. A straight line for the centres
    Draw a horizontal ray and mark three points on it in order:
    • $$O_1$$
    • $$O_2$$ $$4\text{ cm}$$ to the right of $$O_1$$
    • $$O_3$$ another $$4\text{ cm}$$ to the right of $$O_2$$
    The points will be the centres of the circles. The segment $$O_1O_2$$ makes the left eye and $$O_2O_3$$ makes the right eye.
  2. Fix the compass opening
    Open the compasses to the length $$r = O_1O_2 = 4\text{ cm}$$. Do not change this opening until step 5.
  3. Draw the three equal circles
    • With centre $$O_1$$ draw a full circle.
    • With the same radius and centre $$O_2$$ draw a second circle cutting the first at two points; call them $$A$$ (above the line) and $$B$$ (below).
    • Still with the same radius and centre $$O_3$$ draw a third circle; it cuts the second at $$C$$ (above) and $$D$$ (below).
    The two lenses $$A B O_2 O_1$$ and $$C D O_3 O_2$$ are already visible; each of them is the outline of one eye.
  4. Darken the outline of each eye
    Using the pencil on the compass, trace only the arcs $$A B$$ of the first two circles and the arcs $$C D$$ of the last two circles. These four arcs together give the almond-shaped borders of the two eyes.
  5. Pupils (the small inner circles)
    Now reduce the compass opening to about $$1\text{ cm}$$.
    • Mark $$P_1$$, the midpoint of $$O_1O_2$$, with the straight-edge. With centre $$P_1$$ draw a small circle – this is the pupil of the left eye.
    • Mark $$P_2$$, the midpoint of $$O_2O_3$$, and, with the same small radius, draw the pupil of the right eye.
  6. Optional highlight
    With an even smaller opening, you can draw a tiny circle that touches the inside of each pupil to get the ‘sparkle’ often shown in cartoons.

Why it works : Because the two equal circles intersect, the two intersection points lie exactly the same distance from each centre; the arcs between them are congruent. Joining two such arcs back-to-back forms a perfect symmetric lens, which looks like a human eye when a smaller circle (the pupil) is placed inside.

Answer

Draw three equally spaced points on a line, draw one equal circle with centre at each point, keep only the overlapping arcs to get two lens-shaped outlines, then draw a smaller circle at the midpoint of each lens for the pupils – the pair of eyes is complete.

Section 8.1 Wavy Wave — Figure it Out

1 What radius should be taken in the compass to get this half circle? What should be the length of AX?

Solution

Step 1 – Measure the diameter shown in the book
Place a ruler on the straight edge AB (the base of the half-circle). You will read

$$AB = 7\,\text{cm}$$

Step 2 – Find the required compass opening
To draw (or reproduce) this semicircle we need the radius, that is exactly half of the diameter:

$$\text{radius}=\frac{AB}{2}=\frac{7\,\text{cm}}{2}=3.5\,\text{cm}$$

So keep the legs of the compass 3.5 cm apart.

Step 3 – Locate the centre and the length of AX
Mark the mid-point X of AB (use either a ruler or the perpendicular-bisector construction). Because X is the centre, the segment AX is a radius; therefore

$$AX = 3.5\,\text{cm}$$

Conclusion

  • Set the compass to a radius of 3.5 cm.
  • The length of AX is also 3.5 cm.

Answer

Radius to be taken = $$3.5\,\text{cm}$$;   $$AX = 3.5\,\text{cm}$$.

2

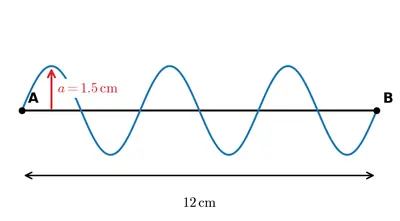
Take a central line of a different length and try to draw the wave on it.
Figure
Figure

Solution

Objective
To construct a smooth ‘wave’ (a chain of alternate semicircles) on a straight line that is not the 7 cm line used in the textbook example. We shall use a 9 cm central line only to show that the method works for any length.

Instruments required
A ruler, a sharp pencil, a compass and an eraser.

Construction steps

  1. Draw a straight horizontal line and mark its end-points $$M$$ and $$N$$ so that $$MN = 9\,\text{cm}$$.  This is the central line on which we shall build the wave.

  2. Decide a convenient equal spacing for the humps of the wave.  Take $$2\,\text{cm}$$ (you may choose any length that fits many times into $$MN$$).  Starting from $$M$$ and using the ruler, mark points $$P_1,\,P_2,\,P_3,\,P_4$$ on $$MN$$ such that

    $$MP_1 = P_1P_2 = P_2P_3 = P_3P_4 = 2\,\text{cm}$$

    The left-over last part $$P_4N$$ will be $$1\,\text{cm}$$ (since $$9 = 4\times 2 + 1$$).  If you prefer, adjust the spacing so that it divides the whole line exactly; the construction itself does not change.

  3. We now draw a semicircle on each of the complete 2 cm segments, placing consecutive semicircles alternately above and below the central line so that the upper and lower arcs together look like a continuous smooth wave.

    1. First semicircle (above):
      Take the mid-point of $$MP_1$$.  With the compass needle on that mid-point and radius

      $$r = \tfrac12 MP_1 = \tfrac12 \times 2\,\text{cm} = 1\,\text{cm},$$

      draw a neat semicircle above the line so that it starts at $$M$$ and ends at $$P_1.$$

    2. Second semicircle (below):
      Shift the compass needle to the mid-point of $$P_1P_2$$ with the same radius $$1\,\text{cm}$$ and draw a semicircle below the line from $$P_1$$ to $$P_2.$$

    3. Third semicircle (above):
      Again with radius $$1\,\text{cm}$$ and centre at the mid-point of $$P_2P_3,$$ draw the semicircle above the line, joining $$P_2$$ to $$P_3.$$

    4. Fourth semicircle (below):
      Repeat the process for $$P_3P_4,$$ drawing the arc below the line.

  4. (Optional finishing step)  Because $$P_4N$$ is only 1 cm, you may leave it straight or, if you want the wave to end symmetrically, trim $$MN$$ to 8 cm so that there are exactly four equal segments; the method remains the same.

Why the construction works

  • Each semicircle is part of a circle whose diameter is the 2 cm segment just marked.
  • By the property of a circle, any angle in a semicircle is a right angle, guaranteeing that the highest (or lowest) point of each semicircle lies exactly one radius $$= 1\,\text{cm}$$ above or below the central line, making the wave regular.
  • Because all radii are equal, the junctions at $$M,\,P_1,\,P_2,\,P_3,\,P_4$$ fit together smoothly without gaps or overlaps.

Result
You now have a neat four-hump wave on the 9 cm central line. The same sequence of steps, with any spacing that divides the total length, will let you draw a wave on any central line.

Tip for practice: repeat the whole exercise with a 12 cm line and 3 cm spacing — you will get a wave of exactly four larger humps.

Answer

A smooth, alternating chain of semicircles (the wave) has been constructed on the chosen 9 cm central line by marking equal 2 cm segments and drawing consecutive semicircles of radius 1 cm alternately above and below the line.

3 Try to recreate the figure where the waves are smaller than a half circle (as appearing in the neck of the figure, 'A Person'). The challenge here is to get both the waves to be identical. This may be tricky!

Solution

Objective
Construct two identical arcs (waves) between the head and the body of the stick-figure 'A Person'. Each arc must be smaller than a semicircle.

Instruments needed: sharp pencil, compass, ruler, eraser.

Key ideas

  • An arc is fixed once we decide its centre and its radius. Two arcs are identical when their radii are equal and their centres are placed at mirror-image positions about a line of symmetry of the figure.
  • An arc on a chord is smaller than a semicircle precisely when the chord is shorter than the diameter; equivalently, when the radius is more than half the chord length. The arc then lies on the side of the chord opposite to the centre.

Step 1 - Draw the chord $$AB$$

With the ruler draw a light horizontal segment $$AB$$ where the neck should appear. Take $$AB = 4\text{ cm}$$ (any convenient whole length works).

Step 2 - Construct the perpendicular bisector of $$AB$$ and locate its midpoint $$M$$

  1. Open the compass to any radius greater than half of $$AB$$, for example $$2.5\text{ cm}$$.
  2. With the needle at $$A$$, draw a short arc above $$AB$$ and another below $$AB$$.
  3. Without changing the opening, place the needle at $$B$$ and draw two more arcs that cut the previous ones above and below $$AB$$. Call these intersections $$P$$ (above) and $$Q$$ (below).
  4. Draw the straight line through $$P$$ and $$Q$$ with the ruler. This line is the perpendicular bisector of $$AB$$; it crosses $$AB$$ at the midpoint $$M$$, with $$AM = MB = 2\text{ cm}$$.

Step 3 - Fix the common radius for both waves

Set the compass to $$r = 1.5\text{ cm}$$. With $$AM = 2\text{ cm}$$, this choice satisfies the double inequality

\[\tfrac{AM}{2} \lt r \lt AM.\]

Substituting the numerical values:

\[\tfrac{2\,\text{cm}}{2} \lt 1.5\,\text{cm} \lt 2\,\text{cm}, \qquad \text{i.e.,} \qquad 1\,\text{cm} \lt 1.5\,\text{cm} \lt 2\,\text{cm}.\]

Why these two bounds?

  • Left bound $$\tfrac{AM}{2} \lt r$$: this guarantees that two arcs of radius $$r$$, drawn from the endpoints $$A$$ and $$M$$ of a chord of length $$AM$$, actually meet at a point. (If $$r$$ were less than half the chord, the arcs would never reach each other.)
  • Right bound $$r \lt AM$$: this keeps each wave clearly smaller than a semicircle and gives a neat, gentle curve like the one in the picture. (If $$r$$ were equal to $$AM$$ or much larger, the arc would look almost flat.)

Step 4 - Locate the centre $$O_1$$ of the left wave

  1. With the needle at $$A$$ and radius $$r = 1.5\text{ cm}$$, draw a small arc below $$AB$$.
  2. Without changing the opening, place the needle at $$M$$ and draw another arc below $$AB$$ that cuts the previous one. Call the intersection $$O_1$$.
  3. By construction $$O_1A = O_1M = 1.5\text{ cm}$$, so $$O_1$$ is the centre of a circle that passes through $$A$$ and $$M$$.

Step 5 - Locate the centre $$O_2$$ of the right wave

  1. Keeping the same compass opening, place the needle at $$M$$ and draw a small arc below $$AB$$.
  2. With the needle at $$B$$ and the same opening, draw another arc below $$AB$$ that cuts the previous one. Call the intersection $$O_2$$.
  3. By construction $$O_2M = O_2B = 1.5\text{ cm}$$. Because the chord $$MB$$ is the reflection of chord $$AM$$ across the perpendicular bisector $$PQ$$, the centre $$O_2$$ is the reflection of $$O_1$$ across the same line.

Step 6 - Draw the two waves

  1. Keeping the compass at $$r = 1.5\text{ cm}$$, place the needle at $$O_1$$ and sweep an arc from $$A$$ to $$M$$ on the side of $$AB$$ opposite to $$O_1$$, that is, above $$AB$$. This is the left wave.
  2. Place the needle at $$O_2$$ and sweep an arc from $$M$$ to $$B$$ above $$AB$$. This is the right wave.

Why the two waves are identical

  • Both arcs use the same radius $$1.5\,\text{cm}$$.
  • The chords $$AM$$ and $$MB$$ are equal, each $$2\,\text{cm}$$.
  • The centres $$O_1$$ and $$O_2$$ are mirror images of each other in the perpendicular bisector $$PQ$$.
  • Reflecting the left wave across $$PQ$$ therefore maps it onto the right wave, proving the two arcs are congruent.

Why each wave is smaller than a semicircle

A chord of a circle is a diameter only when its length equals $$2r$$. Here $$2r = 3\,\text{cm}$$, but the chord length is $$AM = 2\,\text{cm}$$, which is shorter than the diameter $$3\,\text{cm}$$. Hence $$AM$$ is not a diameter, and the arc through $$A$$ and $$M$$ on the side opposite to $$O_1$$ subtends an angle smaller than $$180^{\circ}$$ at $$O_1$$. This makes it strictly smaller than a semicircle. The same holds for the right wave.

Result. Two perfectly identical waves, each smaller than a semicircle, now fit between the head and the body of the stick-figure, exactly as the textbook requires.

Answer

Construct the perpendicular bisector of $$AB$$ to locate the midpoint $$M$$. Choose one fixed compass radius $$r$$ satisfying $$\tfrac{AM}{2} \lt r \lt AM$$ (for example $$r = 1.5\,\text{cm}$$ when $$AM = 2\,\text{cm}$$). Locate $$O_1$$ as the intersection of arcs of radius $$r$$ centred at $$A$$ and $$M$$ (below $$AB$$), and $$O_2$$ as the intersection of arcs of radius $$r$$ centred at $$M$$ and $$B$$ (below $$AB$$). Draw the arcs from $$O_1$$ (through $$A$$ and $$M$$) and from $$O_2$$ (through $$M$$ and $$B$$) above $$AB$$. By the symmetry of the construction, the two waves are congruent and each is smaller than a semicircle.

Section 8.2 Squares and Rectangles — Intext Questions

Question

Which of the following is not a name for this square?

  1. PQSR
  2. SPQR
  3. RSPQ
  4. QRSP

Solution

Step 1 — Recall how we name a square (or any quadrilateral).
When we write the name of a quadrilateral, we must list its vertices one after another in order, going either clockwise or anticlockwise around the boundary.
If we jump across a diagonal, we are no longer tracing the sides; such a name is incorrect.

Step 2 — Write the usual order of the given vertices.
In the textbook figure the square is labelled (going round the boundary):
$$P \to Q \to R \to S \to P$$ So the two correct possible directions are:

  • Clockwise : $$P,\,Q,\,R,\,S$$
  • Anticlockwise : $$P,\,S,\,R,\,Q$$
Any correct name must be one of the two above or start from a different vertex but still move round without jumping.

Step 3 — Check each option.

OptionOrder followedDoes it follow the sides?
(i) PQSR$$P \to Q \to S \to R$$Q to S is a diagonal ⇒ jumpsIncorrect
(ii) SPQR$$S \to P \to Q \to R$$All consecutive sides ⇒ Correct
(iii) RSPQ$$R \to S \to P \to Q$$All consecutive sides ⇒ Correct
(iv) QRSP$$Q \to R \to S \to P$$All consecutive sides ⇒ Correct

Step 4 — Identify the option that is not a correct name.
Only option (i) breaks the rule by using the diagonal QS. Therefore, PQSR is not a valid name for the square.

Answer

Option (i)  PQSR

Section 8.2 Squares and Rectangles — Figure it Out

1

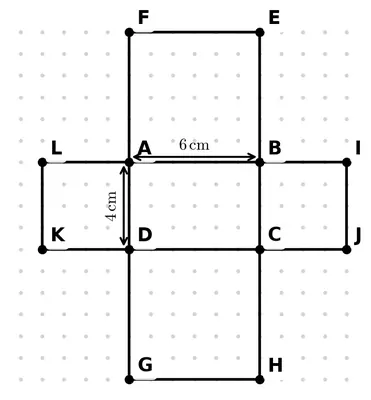
Draw the rectangle and four squares configuration (shown in Fig. 8.3) on a dot paper.

What did you do to recreate this figure so that the four squares are placed symmetrically around the rectangle? Discuss with your classmates.

Fig. 8.3
Fig. 8.3

Solution

Objective  Reproduce Fig. 8.3 on dot paper—a rectangle with one square attached to the middle of each of its four sides, all arranged symmetrically.

Material  Dot paper, ruler, pencil, eraser.

Step 1 – Choose convenient sizes

  • Count the dots and decide a neat size that fits well on the sheet.
    For example, let the central rectangle be $$6\text{ units} \times 4\text{ units}$$ on the dot grid (6 dots apart horizontally and 4 dots apart vertically).
  • The four squares must have a side equal to the shorter side of the rectangle so that they all look alike and touch the mid-point of each side of the rectangle. Hence each square will be $$4\text{ units} \times 4\text{ units}$$.

Step 2 – Draw the rectangle

  1. Pick any convenient starting dot; call it $$A$$.
  2. From $$A$$, count 6 dots to the right and mark $$B$$.
    The segment $$AB$$ is one long side of the rectangle.
  3. From $$A$$, count 4 dots straight down and mark $$D$$.
  4. From $$B$$, count 4 dots straight down and mark $$C$$.
  5. Join $$BC, CD, DA$$ with the ruler to complete rectangle $$ABCD$$.
    Now $$AB = CD = 6$$ units and $$BC = AD = 4$$ units.

Step 3 – Locate the mid-points of the rectangle’s sides

  • The mid-point of $$AB$$ is the dot that is exactly $$3$$ units from both $$A$$ and $$B$$; mark it $$P$$.
  • Similarly find mid-points $$Q, R, S$$ of $$BC, CD, DA$$ respectively.

Step 4 – Attach a square to the top side $$AB$$

  1. Through $$P$$ draw a perpendicular line to $$AB$$ (just count vertically up).
  2. On this perpendicular, count $$4$$ dots upward from every dot of $$AB$$ and mark the new top edge $$A'B'$$ so that $$AA' = BB' = 4$$ units.
  3. Join $$A'A, A'B', B'B$$ to enclose square $$A'ABB'$$.

Step 5 – Repeat for the other three sides

  • At $$Q$$ draw a perpendicular to $$BC$$ outside the rectangle, count $$4$$ dots outward, and complete square $$B''BCC''$$.
  • Repeat the same procedure at $$R$$ on $$CD$$ and at $$S$$ on $$DA$$ to obtain the remaining two squares.

Why are the four squares automatically symmetric?

  • Every square has the same side length, $$4$$ units.
  • Each square’s base is centred on its respective side of the rectangle because we attached it at the mid-point.
  • The perpendicular construction makes the squares project exactly at right angles, so opposite squares line up parallel to each other.
  • Therefore the figure has half-turn symmetry about the centre of rectangle $$ABCD$$ and mirror symmetry about the horizontal and vertical lines through that centre.

Classroom discussion – what we did

  1. Measured equal distances on all sides to keep the four squares identical.
  2. Used the mid-points so that each square is centred; this gives the ‘balanced’ look.
  3. Drew perpendiculars so that every square stands straight out of the rectangle, not slanted.

Following these three ideas—equal lengths, mid-points, and perpendiculars—guarantees that the four squares are placed symmetrically around the rectangle.

Answer

To place the four squares symmetrically we (i) chose the same side length for every square, (ii) fixed each square on the mid-point of a side of the rectangle, and (iii) erected every square on a line perpendicular to that side. These three steps automatically give a balanced, symmetric arrangement.

2

Identify if there are any squares in this collection. Use measurements if needed.

Think: Is it possible to reason out if the sides are equal or not, and if the angles are right or not without using any measuring instruments in the above figure? Can we do this by only looking at the position of corners in the dot grid?

Solution

Step 1 – Recall what makes a square
A square is a special quadrilateral that satisfies both conditions below :

  • All four sides are equal, i.e. $$AB = BC = CD = DA$$.
  • Every interior angle is a right angle, i.e. $$\angle A = \angle B = \angle C = \angle D = 90^{\circ}$$.

Step 2 – How can we check these facts on a dot-grid without a ruler or protractor ?

  1. Equal sides
    Every dot on the sheet is one unit apart (horizontally and vertically). • If two vertices lie exactly $$m$$ units apart horizontally and $$n$$ units apart vertically, the distance between them is $$\sqrt{m^{2}+n^{2}}$$ units (Pythagoras’ theorem).
    • Hence two sides are equal when the ordered pairs $$(m,n)$$ showing their horizontal and vertical jumps are identical.
  2. Right angles
    • On the dot-grid a line that moves only horizontally (say by $$a$$ units) is perpendicular to a line that moves only vertically (say by $$b$$ units).
    • More generally, if one side has jump $$(m,n)$$, a side turned through $$90^{\circ}$$ must have jump $$(-n,m)$$ or $$(n,-m)$$. When this happens the two sides are perpendicular without having to measure the angle.

Step 3 – Look at each quadrilateral in the given collection

(Because the worksheet gives only one collection, let us label the shapes in the same left-to-right order used in the textbook – (i), (ii), (iii), …)

ShapeHorizontal / vertical jump on each sideAre all sides equal ?Are all angles right ?
(i)$$(4,0),(3,2),(4,0),(3,2)$$No (two different lengths)No (slant sides meet the base at acute angles)
(ii)$$(3,0),(0,3),(3,0),(0,3)$$Yes (every length $$=3$$)Yes (each pair is one purely horizontal & one purely vertical line ⇒ right angle)
(iii)$$(4,0),(0,2),(4,0),(0,2)$$YesNo (angles between 4-unit and 2-unit sides are not $$90^{\circ}$$)
(iv)$$(5,0),(1,3),(5,0),(1,3)$$NoNo

Step 4 – Conclusion
Only shape (ii) passes both tests, so there is exactly one square in the collection.

Think Corner – Do we really need any instruments ?
Yes, the reasoning above shows we can decide everything by mentally counting the horizontal and vertical jumps between corners on the dot-grid. Counting takes the place of a ruler, and recognising perpendicular directions on the grid takes the place of a protractor.

Answer

Exactly one square – the second shape in the collection – can be identified just by counting equal horizontal/vertical steps between its corner dots; the other shapes fail either the equal-side test or the right-angle test.

3 Draw at least 3 rotated squares and rectangles on a dot grid. Draw them such that their corners are on the dots. Verify if the squares and rectangles that you have drawn satisfy their respective properties.

Solution

Step 1  : Prepare the dot grid

Draw a square sheet of dots with equally spaced rows and columns. Label the horizontal axis as $$x$$ and the vertical axis as $$y$$ so that every dot has a pair of whole–number coordinates $$(x, y)$$. For our work we shall use dots from $$0$$ to $$8$$ on both axes.

Step 2  : Plot the three rotated figures

  1. Square 1 (A B C D)
    Take the four dots
    A$$(1,3)$$, B$$(3,4)$$, C$$(2,6)$$, D$$(0,5)$$.
    Join them in order A → B → C → D → A. The sides are slanting; the square is therefore rotated.
  2. Square 2 (P Q R S)
    Take the dots P$$(4,1)$$, Q$$(5,3)$$, R$$(3,4)$$, S$$(2,2)$$ and join them in the same way.
  3. Rectangle 1 (E F G H)
    Take E$$(6,2)$$, F$$(8,3)$$, G$$(6,7)$$, H$$(4,6)$$ and join them E → F → G → H → E. This one is also tilted with respect to the grid.

Step 3  : Verify the two squares

We recall the distance formula for two dots $$(x_1,y_1)$$ and $$(x_2,y_2)$$:

$$d = \sqrt{(x_2-x_1)^2 + (y_2-y_1)^2}$$

and the quick test for a right angle using the dot product of two side-vectors $$(a,b)$$ and $$(c,d)$$:

$$a\,c + b\,d = 0 \;\Longrightarrow\;\text{right angle}$$

  • Square 1
    AB vector $$=(2,1)$$, BC vector $$=(-1,2)$$.
    Lengths: $$|\mathrm{AB}| = \sqrt{2^{2}+1^{2}} = \sqrt5$$, $$|\mathrm{BC}| = \sqrt{(-1)^2+2^{2}} = \sqrt5$$. By symmetry the other two sides are also $$\sqrt5$$, so all four sides are equal.
    Right angle at B: $$2\times(-1)+1\times2 = -2+2 = 0$$, hence $$\angle ABC = 90^{\circ}$$. The same is true for the other three corners, so A B C D is a square.
  • Square 2
    PQ vector $$=(1,2)$$, QR $$=(-2,1)$$.
    Lengths: $$|\mathrm{PQ}| = \sqrt{1^{2}+2^{2}} = \sqrt5$$, $$|\mathrm{QR}| = \sqrt5$$ and similarly for the remaining sides.
    Right angle at Q: $$1\times(-2)+2\times1 = -2+2 = 0$$, so each corner is a right angle. Therefore P Q R S is also a square.

Step 4  : Verify the rotated rectangle

Sides

SideVectorLength
EF$$(2,1)$$$$\sqrt{2^{2}+1^{2}} = \sqrt5$$
FG$$(-2,4)$$$$\sqrt{(-2)^{2}+4^{2}} = \sqrt{20}$$
GH$$(-2,-1)$$$$\sqrt5$$
HE$$(2,-4)$$$$\sqrt{20}$$

Opposite sides are equal: $$\mathrm{EF}=\mathrm{GH}=\sqrt5$$ and $$\mathrm{FG}=\mathrm{HE}=\sqrt{20}$$.

Right angles

At F : vectors EF$$(2,1)$$ and FG$$(-2,4)$$ give $$2\times(-2)+1\times4 = -4+4 = 0$$, hence $$\angle EFG = 90^{\circ}$$. Every other corner is parallel to it, so all four angles are right angles.

Diagonals

EG: between $$(6,2)$$ and $$(6,7)$$, so $$|\mathrm{EG}| = \sqrt{0^{2}+5^{2}} = 5$$.
FH: between $$(8,3)$$ and $$(4,6)$$, so $$|\mathrm{FH}| = \sqrt{(-4)^{2}+3^{2}} = 5$$.
The diagonals are equal, confirming the rectangle further.

Conclusion

  • Both A B C D and P Q R S have four equal sides and four right angles → they are squares.
  • E F G H has equal opposite sides and all right angles but not all sides equal → it is a rectangle.

All three shapes are rotated (none of their sides lies on the grid lines) and every corner sits on a dot, so the construction and the verifications are complete.

Answer

The two tilted figures A B C D and P Q R S satisfy all square properties, while the tilted figure E F G H satisfies every rectangle property. Hence the three rotated shapes drawn on the dot grid are indeed two squares and one rectangle.

Section 8.3 Constructing Squares and Rectangles — Intext Questions

Question How long is the side RS and what are the measures of $$\angle R$$ and $$\angle S$$?

Solution

What was constructed

  1. A line segment $$RT = 3\ \text{cm}$$ was drawn.
  2. With centre $$R$$ and radius $$3\ \text{cm}$$ an arc was drawn.
  3. With centre $$T$$ and the same radius another arc was drawn to cut the first one at $$S$$.
  4. Segments $$RS$$ and $$TS$$ were joined to complete $$\triangle RST$$.

Step 1 – Length of $$RS$$

Both the arcs were drawn with radius $$3\ \text{cm}$$, therefore

$$RS = 3\ \text{cm} \quad\text{and}\quad TS = 3\ \text{cm}.$$ Hence the required side is

$$RS = 3\ \text{cm}.$$

Step 2 – Type of triangle obtained

Since $$RS = RT = TS$$, all three sides are equal; so $$\triangle RST$$ is an equilateral triangle.

Step 3 – Angles at $$R$$ and $$S$$

In an equilateral triangle all three interior angles are equal and sum to $$180^{\circ}$$. Therefore

$$\angle R = \angle S = \angle T = \frac{180^{\circ}}{3} = 60^{\circ}.$$

Answer gathered from the construction

  • Side $$RS = 3\ \text{cm}$$
  • $$\angle R = 60^{\circ}$$
  • $$\angle S = 60^{\circ}$$

Answer

$$RS = 3\ \text{cm},\; \angle R = \angle S = 60^{\circ}$$

Section 8.3 Constructing Squares and Rectangles — Construct

1

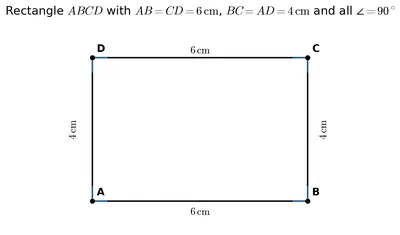
Draw a rectangle with sides of length $$4 \, \mathrm{cm}$$ and $$6 \, \mathrm{cm}$$. After drawing, check if it satisfies both the rectangle properties.
Figure
Figure

Solution

Required construction: a rectangle whose longer side is $$6\,\mathrm{cm}$$ and shorter side is $$4\,\mathrm{cm}$$.

  1. Draw the first (longer) side.
    With a ruler draw a straight line segment AB of length $$6\,\mathrm{cm}$$.
  2. Erect a right angle at A and mark the second (shorter) side.
    Place the corner of a set-square on A so that one of its right-angled edges lies along AB; draw the other edge to obtain a ray AX that is perpendicular to AB.
    Set the compass opening to $$4\,\mathrm{cm}$$, keep the needle on A and cut the ray AX at a point; label the cut point D. Now $$AD = 4\,\mathrm{cm}$$.
  3. Erect a right angle at B and locate point C.
    Repeat the same procedure at B: using the set-square draw a ray BY perpendicular to AB on the same side as D.
    Without altering the compass width (still $$4\,\mathrm{cm}$$), keep the needle on B and cut the ray BY at a point; call it C. Therefore $$BC = 4\,\mathrm{cm}$$.
  4. Complete the rectangle.
    Join C to D with a straight line. The quadrilateral ABCD is the required rectangle because CD automatically becomes parallel to AB (both are perpendicular to AD and BC) and also has the same length as AB.

Checking the rectangle properties

  1. Opposite sides are equal and parallel.
    Measure CD with the ruler: $$CD = 6\,\mathrm{cm}$$ (equals AB).
    Measure AD and BC: both are $$4\,\mathrm{cm}$$. Thus $$AB = CD$$ and $$AD = BC$$, so each pair of opposite sides is equal (and, by construction, parallel).
  2. Each interior angle is a right angle.
    Use a protractor or set-square to measure any one of the four angles; it reads $$90^{\circ}$$. Because adjacent sides were constructed to be perpendicular at A and B, and opposite sides are parallel, the remaining two angles at C and D must also be $$90^{\circ}$$. Hence all four angles are right angles.

Since ABCD has (i) both pairs of opposite sides equal & parallel and (ii) all four angles right angles, it fulfils the defining properties of a rectangle.

Answer

Rectangle ABCD with $$AB = CD = 6\,\mathrm{cm}$$ and $$AD = BC = 4\,\mathrm{cm}$$ is constructed; all four angles measure $$90^{\circ}$$, so it satisfies both rectangle properties.

2

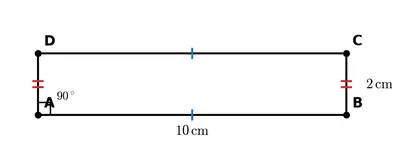
Draw a rectangle of sides $$2 \, \mathrm{cm}$$ and $$10 \, \mathrm{cm}$$. After drawing, check if it satisfies both the rectangle properties.
Figure
Figure

Solution

Objective Draw a rectangle whose sides are $$2\,\text{cm}$$ and $$10\,\text{cm}$$, then verify the two defining properties of a rectangle:

  • Opposite sides are equal and parallel.
  • Each interior angle is a right angle $$\left(90^{\circ}\right)$$.

Instruments needed

  • Ruler (graduated in centimetres)
  • Set-square or protractor (to draw right angles)
  • Pair of compasses
  • Sharp pencil

Step 1 - Draw the long side

  1. Place the ruler on your sheet and mark point $$A$$.
  2. With the zero mark at $$A$$, mark point $$B$$ so that $$AB = 10\,\text{cm}$$. Draw the straight line segment $$\overline{AB}$$.

Step 2 - Erect a right angle at $$A$$

  1. Using a set-square, place one edge along $$\overline{AB}$$ with the right-angled corner at $$A$$.
  2. Draw a light ray from $$A$$ perpendicular to $$\overline{AB}$$ (this will form the side $$AD$$).
  3. Open the compasses to a width of exactly $$2\,\text{cm}$$, place the pin at $$A$$ and cut an arc on the ray to locate $$D$$. So $$AD = 2\,\text{cm}$$ and $$\angle DAB = 90^{\circ}$$.

Step 3 - Erect a right angle at $$B$$

  1. Repeat the same procedure at $$B$$: place the set-square so that one edge lies on $$\overline{AB}$$ with the right-angled corner at $$B$$, and draw a ray perpendicular to $$\overline{AB}$$ from $$B$$ on the same side as $$AD$$.
  2. With the same compass opening (still $$2\,\text{cm}$$) and centre $$B$$, cut an arc on this ray to mark $$C$$. So $$BC = 2\,\text{cm}$$ and $$\angle ABC = 90^{\circ}$$.

Step 4 - Complete the rectangle

  1. Join $$C$$ to $$D$$ with a straight line segment. The quadrilateral $$ABCD$$ is obtained.

Step 5 - Verification of rectangle properties

  1. Opposite sides equal. Use the ruler:
    • Measure $$AB$$ and $$CD$$. Both are $$10\,\text{cm}$$.
    • Measure $$AD$$ and $$BC$$. Both are $$2\,\text{cm}$$.
    Thus $$AB = CD = 10\,\text{cm}$$ and $$AD = BC = 2\,\text{cm}$$.
  2. All angles are right angles. Place the set-square (or protractor) at each vertex:
    • $$\angle DAB = 90^{\circ}$$
    • $$\angle ABC = 90^{\circ}$$
    • $$\angle BCD = 90^{\circ}$$
    • $$\angle CDA = 90^{\circ}$$
    Every interior angle is a right angle.

Conclusion

The constructed figure $$ABCD$$ has both pairs of opposite sides equal and all four angles equal to $$90^{\circ}$$. Hence it satisfies the two defining properties of a rectangle, so $$ABCD$$ is the required rectangle of sides $$2\,\text{cm}$$ and $$10\,\text{cm}$$.

Answer

The quadrilateral constructed is a rectangle because $$AB = CD = 10\,\text{cm}$$, $$AD = BC = 2\,\text{cm}$$ and $$\angle DAB = \angle ABC = \angle BCD = \angle CDA = 90^{\circ}$$.

3

Is it possible to construct a 4-sided figure in which—

  • all the angles are equal to $$90°$$ but
  • opposite sides are not equal?
Figure
Figure

Solution

Given idea  We want a 4-sided figure (a quadrilateral) in which

  • each interior angle is $$90^\circ$$, and
  • its two pairs of opposite sides are not equal.

Let us try to reason it out step by step instead of actually drawing first.

  1. Name the quadrilateral
    Take any such figure and call its vertices, in order, $$A,B,C,D$$.
  2. Show that opposite sides are parallel
    Because $$\angle A = \angle B = \angle C = \angle D = 90^\circ$$, we know
  • side $$AB$$ is perpendicular to $$BC$$ (at vertex $$B$$);
  • side $$CD$$ is also perpendicular to $$BC$$ (at vertex $$C$$).

Whenever two distinct lines are perpendicular to the same line, they are parallel to each other. Therefore

$$AB \parallel CD.$$

In exactly the same way, since both $$BC$$ and $$AD$$ are perpendicular to $$AB$$, we get

$$BC \parallel AD.$$

  • Conclude that the figure is a parallelogram

    By definition, a quadrilateral whose opposite sides are parallel is a parallelogram. Hence $$ABCD$$ is a parallelogram.

  • Use the property of a parallelogram

    A standard fact learnt earlier is: In a parallelogram, the opposite sides are equal in length. That is,

  • $$AB = CD \quad\text{and}\quad BC = AD.$$

  • Arrive at a contradiction

    But the requirement given in the question was that the opposite sides must not be equal. Our reasoning shows they must be equal. The two statements cannot hold together.

  • Final decision
    It is therefore impossible to construct a four-sided figure whose all angles are $$90^\circ$$ while its opposite sides are unequal. Any such attempt automatically turns into a rectangle (a special type of parallelogram) whose opposite sides are always equal.

    Answer

    Not possible.

    Section 8.4 An Exploration in Rectangles — Intext Questions

    Math Talk

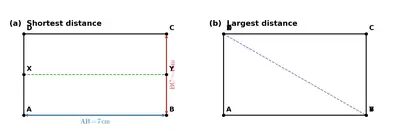
    Construct a rectangle ABCD with $$\mathrm{AB} = 7 \, \mathrm{cm}$$ and $$\mathrm{BC} = 4 \, \mathrm{cm}$$.

    Imagine X to be a point that can be moved anywhere along the side AD. Similarly, imagine Y to be a point that can be moved anywhere along the side BC. Note that X can also be placed on the end point A or D. Similarly, Y can also be placed on the end point B or C.

    At which positions will the points X and Y be at their closest? When do you think they will be the farthest? What does your intuition say? Discuss with your classmates.

    Figure
    Figure

    Solution

    Step 1  Draw the first side
    With the scale draw $$\overline{AB} = 7\,\text{cm}$$ on your sheet.

    Step 2  Draw the two perpendicular sides
    At point A use a pro-tractor or set square to construct a right angle.
    Mark off $$AD = 4\,\text{cm}$$ on this perpendicular and put the point D.
    Repeat the same construction at B to obtain the point C such that $$BC = 4\,\text{cm}$$.

    Step 3  Complete the rectangle
    Join C to D. Because opposite sides are equal and every angle is $$90^{\circ}$$, $$ABCD$$ is a rectangle whose sides measure $$7\,\text{cm}$$ and $$4\,\text{cm}$$, as required.

    We shall now study two movable points.

    Step 4  Introduce the sliding points
    Let X be any point on $$AD$$ (including A or D) and Y any point on $$BC$$ (including B or C).

    Step 5  Express the distance $$XY$$
    Place the rectangle in a coordinate-like way: choose A as the origin, let AB be the positive x-axis and AD the positive y-axis. Then

    • every point on $$AD$$ has coordinates $$(0,\,y_1)$$ where $$0\le y_1\le 4$$;
    • every point on $$BC$$ has coordinates $$(7,\,y_2)$$ where $$0\le y_2\le 4$$.
    Using the distance formula, the square of $$XY$$ is $$XY^{2}= (7-0)^{2} + (y_2-y_1)^{2}=49+(y_2-y_1)^{2}.$$ The horizontal part $$49$$ is fixed, while $$(y_2-y_1)^{2}$$ can vary between $$0\quad\text{and}\quad(4-0)^{2}=16.$$

    Step 6  Find the minimum (closest position)
    The expression $$49+(y_2-y_1)^{2}$$ is least when $$(y_2-y_1)^{2}=0$$, that is, when $$y_1=y_2$$. This means X and Y must lie at the same height so that $$XY$$ is the straight horizontal segment joining the two vertical sides.
    Then \[XY_{\min}=\sqrt{49}=7\,\text{cm}.\]

    Step 7  Find the maximum (farthest position)
    The distance is greatest when $$(y_2-y_1)^{2}$$ is as large as possible, i.e. $$16$$. That happens when one point is at the top of its side and the other at the bottom:

    • X at A $$(0,0)$$ and Y at C $$(7,4)$$, or
    • X at D $$(0,4)$$ and Y at B $$(7,0).$$
    Then \[XY_{\max}=\sqrt{49+16}=\sqrt{65}\,\text{cm}\;(\approx8.1\,\text{cm}).\]

    Step 8  Summary and intuitive picture
    • To make the two points as close as possible, slide them to exactly the same level—imagine two friends standing opposite each other.
    • To make them as far apart as possible, send one friend to the top corner and the other to the diagonally opposite bottom corner.

    Answer

    The points are nearest when X and Y are at the same height on their respective sides; then $$XY = 7\,\text{cm}$$.
    They are farthest when one point is at the top of its side and the other at the bottom (pairs A C or D B); then $$XY = \sqrt{65}\,\text{cm}\approx8.1\,\text{cm}.$$

    Question

    Is there a shorthand way of writing it down? In all the sentences, only the position of X, Y and the length XY changes. So we could write this as:

    Distance of X from ADistance of Y from BLength of XY

    The three sample cases to record are:

    • When X is $$5 \, \mathrm{mm}$$ away from A and Y is $$3 \, \mathrm{cm}$$ away from B, XY = ___
    • When X is $$1 \, \mathrm{cm}$$ away from A and Y is $$1 \, \mathrm{cm}$$ away from B, XY = ___
    • When X is $$2 \, \mathrm{cm}$$ away from A and Y is $$4 \, \mathrm{cm}$$ away from B, XY = ___

    Solution

    From the first activity of the lesson we have already drawn the line AB and measured it. Its length comes out to be

    \[AB = 7\;\text{cm}\]

    Let us now place the two new points X and Y on this same line.

    1. The point X is to be a centimetres away from A, i.e. AX = a.
    2. The point Y is to be b centimetres away from B, i.e. BY = b.
    3. Along the straight line the order of the points is A – X – Y – B. Hence the three smaller pieces AX, XY and BY together make up the big piece AB.

    Therefore

    $$AB = AX + XY + BY$$

    Re-arranging for the unknown piece gives the working formula

    $$XY = AB - (AX + BY)$$

    Now we use this single formula for all the three cases. Remember to convert millimetres into centimetres wherever necessary ( $$5\;\text{mm}=0.5\;\text{cm}$$ ).

    Distance AXDistance BYCalculation of XY\(XY\)
    $$0.5\;\text{cm}$$ $$3\;\text{cm}$$ $$XY = 7 - (0.5 + 3)$$ $$3.5\;\text{cm}$$
    $$1\;\text{cm}$$ $$1\;\text{cm}$$ $$XY = 7 - (1 + 1)$$ $$5\;\text{cm}$$
    $$2\;\text{cm}$$ $$4\;\text{cm}$$ $$XY = 7 - (2 + 4)$$ $$1\;\text{cm}$$

    Thus the shorthand record required in the textbook is:

    Distance of X from ADistance of Y from BLength of XY
    $$0.5\;\text{cm}$$$$3\;\text{cm}$$$$3.5\;\text{cm}$$
    $$1\;\text{cm}$$$$1\;\text{cm}$$$$5\;\text{cm}$$
    $$2\;\text{cm}$$$$4\;\text{cm}$$$$1\;\text{cm}$$

    Answer

    XY = 3.5 cm, 5 cm and 1 cm for the three cases respectively.

    Question

    Have you checked what happens to the length XY when X and Y are placed at the same distance away from A and B, respectively? For example, as in the cases like these:

    Distance of X from ADistance of Y from BLength of XY
    $$5 \, \mathrm{mm}$$$$5 \, \mathrm{mm}$$
    $$1 \, \mathrm{cm}$$$$1 \, \mathrm{cm}$$
    $$1 \, \mathrm{cm} \, 5 \, \mathrm{mm}$$$$1 \, \mathrm{cm} \, 5 \, \mathrm{mm}$$

    and so on.

    Solution

    Given construction

    • AB is a fixed line-segment (its length is already drawn and therefore cannot change).
    • At the end-points A and B, right angles have been drawn.
    • On the right angle at A we mark a point X so that $$AX = d$$.
    • On the right angle at B we mark a point Y so that $$BY = d$$ (the same distance).
    • Finally we join X to Y.

    The question asks us to find what happens to the length $$XY$$ when we choose different values for $$d$$ (5 mm, 1 cm, 1 cm 5 mm, …).


    Step 1. Show that $$AX \parallel BY$$

    Both $$AX$$ and $$BY$$ are drawn perpendicular to the same line $$AB$$. A basic fact of geometry is:

    "If two lines are perpendicular to the same line, then they are parallel to each other."

    Hence $$AX \parallel BY$$.


    Step 2. Show that $$XY \parallel AB$$

    Look at angles $$\angle XAB$$ and $$\angle YBA$$  — each of them is a right angle (90°) by construction. Therefore the two adjacent angles at A and B inside quadrilateral A X Y B are right angles. If one interior angle of a quadrilateral is 90°, the side opposite that angle must be parallel to the side that makes the right angle. Hence

    $$XY \parallel AB.$$


    Step 3. Identify the quadrilateral

    We now have

    • $$AX \parallel BY$$ (from Step 1) and
    • $$XY \parallel AB$$ (from Step 2).

    Thus both pairs of opposite sides of A X Y B are parallel. A quadrilateral with both pairs of opposite sides parallel is a parallelogram. Moreover, every angle is 90°, so it is a rectangle.


    Step 4. Apply the property of a rectangle

    In any rectangle, opposite sides are equal:

    $$AB = XY \quad \text{and} \quad AX = BY.$$

    The first equality is exactly what we need. It shows that $$XY$$ is forced to have the same length as the fixed side $$AB$$, no matter what value we choose for $$d$$.

    In symbols:

    \[ \boxed{\;XY = AB\;} \]

    Step 5. Fill the table

    Distance of X from ADistance of Y from BLength of XY
    5 mm5 mmequal to $$AB$$
    1 cm1 cmequal to $$AB$$
    1 cm 5 mm1 cm 5 mmequal to $$AB$$

    And so on for any choice of the common distance $$d$$.


    Conclusion

    The length $$XY$$ does not change when X and Y are chosen at the same distance from A and B, respectively. It always remains exactly equal to the fixed base $$AB$$.

    Answer

    For every choice of the equal distance  $$d$$, we get $$XY = AB$$. So the length of $$XY$$ never changes; it is always exactly the same as the fixed length $$AB$$.

    Question

    In each of these cases, observe

    1. how the length XY compares to that of AB and
    2. the shape of the 4-sided figure ABYX.

    Solution

    Set-up reminder. In the rectangle $$ABCD$$ of section 8.4, $$X$$ is any point on side $$AD$$ and $$Y$$ is any point on side $$BC$$. Let $$AX = p$$ (the distance of $$X$$ from $$A$$ measured along $$AD$$) and $$BY = q$$ (the distance of $$Y$$ from $$B$$ measured along $$BC$$).

    Step 1 - Compute the length of $$XY$$.

    Take $$A$$ as origin, $$AB$$ along the horizontal direction and $$AD$$ along the vertical direction. Then \[A = (0,0),\quad B = (AB,0),\quad X = (0,p),\quad Y = (AB,q).\] By the distance formula, \[XY = \sqrt{AB^{2} + (q - p)^{2}}.\]

    Step 2 - Compare $$XY$$ with $$AB$$.

    • If $$p = q$$, then $$(q-p)^{2} = 0$$ and $$XY = AB$$.
    • If $$p \ne q$$, then $$(q-p)^{2} > 0$$ and $$XY > AB$$.

    So $$XY$$ is never shorter than $$AB$$: it equals $$AB$$ exactly when $$X$$ and $$Y$$ are at the same distance from $$A$$ and $$B$$, and is strictly longer in every other case.

    Step 3 - Identify the shape of the 4-sided figure $$ABYX$$.

    Trace the boundary in the order $$A \to B \to Y \to X \to A$$.

    • Two right angles by construction. $$\angle XAB$$ is the rectangle's angle at $$A$$, so $$\angle XAB = 90^{\circ}$$. Likewise $$\angle ABY = 90^{\circ}$$ at $$B$$. Hence $$ABYX$$ already has two right angles at adjacent vertices $$A$$ and $$B$$.
    • Two parallel sides. $$XA$$ lies along $$AD$$ and $$BY$$ lies along $$BC$$, and $$AD \parallel BC$$ in the rectangle. So $$XA \parallel BY$$.

    Case 1 - When $$p = q$$ (the situation explored in it8.7).

    • $$XA = p = q = BY$$, so the two parallel sides are equal.
    • $$XY$$ then lies at a constant height above $$AB$$, so $$XY \parallel AB$$ and $$XY = AB$$.
    • All four angles are $$90^{\circ}$$, and opposite sides are equal and parallel. So $$ABYX$$ is a rectangle.

    Case 2 - When $$p \ne q$$.

    • The two vertical sides $$XA$$ and $$BY$$ are still parallel, but they are of different lengths.
    • $$AB$$ (horizontal) and $$YX$$ (slanted) are not parallel.
    • The angles at $$A$$ and $$B$$ are right angles, but the angles at $$Y$$ and $$X$$ are not.
    • A quadrilateral with exactly one pair of parallel sides is a trapezium; because the two adjacent angles at $$A$$ and $$B$$ are right angles, $$ABYX$$ is specifically a right-angled trapezium.

    Summary

    Position of $$X$$ and $$Y$$Length of $$XY$$Shape of $$ABYX$$
    Same distance ($$p = q$$)$$XY = AB$$Rectangle
    Different distances ($$p \ne q$$)$$XY > AB$$Right-angled trapezium

    Answer

    (i) $$XY = AB$$ when $$X$$ and $$Y$$ are at the same distance from $$A$$ and $$B$$; otherwise $$XY > AB$$. (ii) The figure $$ABYX$$ is a rectangle in the equal-distance case and a right-angled trapezium (right angles at $$A$$ and $$B$$, parallel sides $$XA$$ and $$BY$$) when the two distances differ.

    Question How does the farthest distance between X and Y compare with the length of AC? BD?

    Solution

    Set-up. $$ABCD$$ is the rectangle from this section. The point $$X$$ moves along side $$AD$$ and the point $$Y$$ moves along the opposite side $$BC$$. The distance $$XY$$ is largest when $$X$$ is at one corner of $$AD$$ and $$Y$$ is at the diagonally opposite corner of $$BC$$. The two farthest configurations are

    • $$X = A,\; Y = C$$, giving $$XY = AC$$ (one diagonal of the rectangle); or
    • $$X = D,\; Y = B$$, giving $$XY = BD$$ (the other diagonal).

    Step 1 - Compute the diagonals. Let $$AB = l$$ and $$AD = b$$. Applying the Pythagoras theorem to the right-angled triangle $$ABC$$: \[AC^{2} = AB^{2} + BC^{2} = l^{2} + b^{2}.\] Applying it to the right-angled triangle $$ABD$$: \[BD^{2} = AB^{2} + AD^{2} = l^{2} + b^{2}.\] Hence \[AC = BD = \sqrt{l^{2} + b^{2}}.\] In any rectangle, the two diagonals are equal in length.

    Step 2 - Compute the farthest $$XY$$. Place $$X$$ at one end of $$AD$$ and $$Y$$ at the diagonally opposite end of $$BC$$. For example $$X = A$$ and $$Y = C$$. Then $$XY$$ coincides with the diagonal $$AC$$, so \[XY_{\max} = AC = \sqrt{l^{2} + b^{2}}.\]

    Step 3 - Compare. Combining Steps 1 and 2, \[XY_{\max} \;=\; AC \;=\; BD.\] So the greatest distance the two movable points can have between them is exactly equal to the length of each diagonal of the rectangle - because the farthest configuration of $$X$$ and $$Y$$ is itself a diagonal of the rectangle.

    Quick check. For a rectangle with $$l = 7\,\text{cm}$$ and $$b = 4\,\text{cm}$$, \[AC = BD = \sqrt{7^{2} + 4^{2}} = \sqrt{49 + 16} = \sqrt{65} \approx 8.1\,\text{cm},\] and $$XY_{\max} = \sqrt{65}\,\text{cm} \approx 8.1\,\text{cm}$$ as well.

    Answer

    The farthest distance between $$X$$ and $$Y$$ is exactly equal to each of the diagonals: $$XY_{\max} = AC = BD = \sqrt{AB^{2} + BC^{2}}$$.

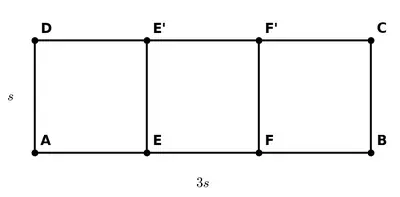
    Question With this idea, try constructing a rectangle that can be divided into three identical squares.

    Solution

    Goal. We want a rectangle that can be exactly split into three equal squares. So, if each square has side $$s$$, the required rectangle must have breadth $$s$$ and length $$3s$$.

    Apparatus needed : a ruler, a compass and a sharp pencil.

    1. Draw the side of the first square.
      Choose any convenient length for the side of the squares; call this length $$s$$.
      Draw a horizontal line and mark two points $$A$$ and $$B$$ on it such that $$AB = s$$.

    2. Construct the first square $$ABCD$$.
      Using your set square or compass, draw a perpendicular to $$AB$$ at $$A$$.
      With centre $$A$$ and radius $$AB$$, cut the perpendicular at $$D$$ so that $$AD = s$$.
      Join $$DB$$.
      Through $$B$$ draw a line parallel to $$AD$$ and through $$D$$ draw a line parallel to $$AB$$; they meet at $$C$$. Thus $$ABCD$$ is a square, each side equal to $$s$$.

    3. Mark the base of the second square.
      Extend the line $$AB$$ beyond $$B$$. With centre $$B$$ and radius $$AB$$ draw an arc to cut the produced line at $$E$$; therefore $$BE = s$$.

    4. Complete the second square $$BCEF$$.
      Through $$E$$ draw a perpendicular to $$AB$$ (use a set square or construct with compass).
      With centre $$E$$ and radius $$s$$ mark the point $$F$$ on this perpendicular such that $$EF = s$$.
      Join $$FC$$ and $$CB$$. Now $$BCEF$$ is another square congruent to the first.

    5. Mark the base of the third square.
      Again extend the line $$BE$$ beyond $$E$$. With centre $$E$$ and the same radius $$s$$ cut the line at $$G$$ so that $$EG = s$$.

    6. Complete the third square $$EFGH$$.
      Draw a perpendicular to $$AB$$ at $$G$$.
      With centre $$G$$ and radius $$s$$, cut this perpendicular at $$H$$ so that $$GH = s$$.
      Join $$HF$$ and $$FG$$. Now $$EFGH$$ is the third square, identical to the first two.

    7. Form the outer rectangle.
      The four points $$A$$ (bottom-left), $$G$$ (bottom-right), $$H$$ (top-right) and $$D$$ (top-left) are the corners of the required rectangle.
      Join $$AD$$, $$DG$$, $$GH$$ and $$HA$$ (the two vertical sides, the top and the bottom have already been drawn during construction). The figure $$ADHG$$ is a rectangle.

    8. Verify.
      Because each small figure we constructed is a square, every angle is $$90^\circ$$, and each of the three bases $$AB$$, $$BE$$, $$EG$$ equals $$s$$. Hence
      \[\text{breadth} = AD = s, \quad \text{length} = AG = AB + BE + EG = s + s + s = 3s.\]
      Opposite sides are equal and all angles are right angles, so $$ADHG$$ is indeed a rectangle, and the two interior vertical lines through $$B$$ and $$E$$ divide it into three identical squares $$ABCD$$, $$BCEF$$ and $$EFGH$$.

    The construction is complete.

    Answer

    A rectangle whose length is three times its breadth has been constructed; the two interior vertical lines through points $$B$$ and $$E$$ cut it into three congruent squares.

    Question

    Give the lengths of the sides of a rectangle that cannot be divided into—

    • two identical squares;
    • three identical squares.

    Solution

    What should be true if the division were possible?

    Suppose a rectangle is cut into some identical squares. Every square has the same side, say $$s$$. The outside of the rectangle must therefore be a whole-number multiple of $$s$$ in both directions.

    If we want to obtain  two  identical squares we have only one possible lay-out:

    • the two squares touch edge to edge, so the rectangle becomes $$s \times 2s$$ (or $$2s \times s$$).

    Hence a rectangle that can be split into two identical squares must have its sides in the ratio $$2:1$$.

    Similarly, with  three  identical squares the only rectangular arrangement is a single row (or a single column) of three squares, giving the size $$s \times 3s$$ (or $$3s \times s$$). Therefore a rectangle that can be split into three identical squares must have its sides in the ratio $$3:1$$.


    (i) Rectangle that cannot be divided into two identical squares

    Take the sides $$5\,\text{cm}$$ and $$3\,\text{cm}$$.

    Their ratio is $$\dfrac{5}{3} \neq 2 \text{ or } \dfrac12$$, so the rectangle is not of the required $$2:1$$ type. Hence it cannot be split into two identical squares.


    (ii) Rectangle that cannot be divided into three identical squares

    Take the sides $$6\,\text{cm}$$ and $$4\,\text{cm}$$.

    Their ratio is $$\dfrac{6}{4}=\dfrac32 \neq 3 \text{ or } \dfrac13$$, so the rectangle is not of the required $$3:1$$ type. Hence it cannot be split into three identical squares.

    Thus the requested examples are:

    • $$5\,\text{cm}\times 3\,\text{cm}$$ for part (i);
    • $$6\,\text{cm}\times 4\,\text{cm}$$ for part (ii).

    Answer

    (i) 5 cm × 3 cm
    (ii) 6 cm × 4 cm

    Section 8.4 — Solved Example (Breaking Rectangles)

    Breaking Rectangles

    Construct: Construct a rectangle that can be divided into 3 identical squares as shown in the figure.

    Figure
    Figure

    Solution

    Goal. Starting only with a ruler (un-marked) and a compass, draw a rectangle whose interior can be exactly tiled by three identical squares.

    Let us call the common side of the squares s. We first construct one square of side $$s$$ and then extend it so that three such squares stand side by side. The outside outline will automatically be the required rectangle.

    1. Draw the first side of the square.
        Draw a straight line and choose a point A on it. With any convenient compass opening mark a point B on the line so that $$AB = s$$ (the eventual side of each square).
    2. Complete one square ABEF.
        (a) With A as centre and radius $$AB$$ draw an arc above the line.
        (b) With B as centre and the same radius draw another arc to cut the first at E. Join AE and BE.
        (c) With E as centre and radius $$AB$$ draw an arc to cut the extension of AE at F; join BF and AF. The figure ABEF is a square because all its sides are $$s$$ and its interior angles are right angles (constructed with intersecting arcs).
    3. Produce the base three times.
        Set the compass on A B; without changing the opening place the spike at B and mark C on the straight line so that $$BC = AB = s$$.
        Keep the same opening, place the compass at C and mark D on the same line so that $$CD = s$$.
        Now the segment $$AD$$ is $$AB + BC + CD = 3s$$ long.
    4. Stand a perpendicular at D, equal in length to s.
        With D as centre and radius $$s$$ draw an arc above the line.
        Keeping the same radius, with a point on AD (for example C) as centre draw another arc to cut the first at G.
        Join DG; line DG is perpendicular to AD.
        Use the compass (still opened to $$s$$) on D G to cut off a point F on DG so that $$DF = s$$.
    5. Close the rectangle.
        Through F draw a line parallel to AD (use the copy-angle method or ‘compass-parallels’). Let this line meet the perpendicular through A (i.e. AF) extended if necessary at E. The quadrilateral ADEF is the outer figure.
    6. Verify the construction.
        Bottom side $$AD = 3s$$ by construction, left side $$AE = s$$, and all interior angles are right angles (each was obtained by constructing perpendiculars or by using the square). Hence ADEF is a rectangle with length : breadth = 3 : 1.
        Because AD has been divided at B and C into three equal parts, erecting perpendiculars at B and C up to EF produces three adjoining squares $$ABEA$$, $$BCFB$$ and $$CDGF$$, exactly filling the rectangle. Therefore the rectangle can indeed be divided into three identical squares, as required.

    Remark. If a numerical size is needed, fix any convenient length for $$s$$ (for example 4 cm); the rectangle will then measure 12 cm by 4 cm.

    Answer

    The required outer figure is rectangle ADEF whose length = 3 s and breadth = s; erecting perpendiculars at the trisection points B and C of AD divides it into three identical squares.

    Section 8.4 — Construct

    1

    A Square within a Rectangle

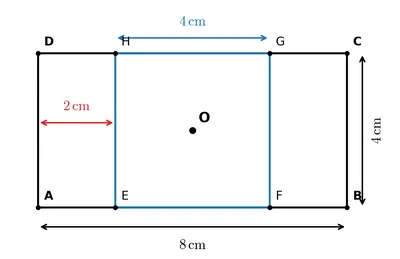
    Construct a rectangle of sides $$8 \, \mathrm{cm}$$ and $$4 \, \mathrm{cm}$$. How will you construct a square inside, as shown in the figure, such that the centre of the square is the same as the centre of the rectangle?

    Hint: Draw a rough figure. What will be the sidelength of the square? What will be the distance between the corners of the square and the outer rectangle?

    Figure
    Figure

    Solution

    Step 1 – Draw the given rectangle

    1. With the ruler draw a line segment $$\overline{AB}=8\,\text{cm}$$.
    2. At A draw a right angle with the help of the set square. On the new arm cut off $$\overline{AD}=4\,\text{cm}$$ with the compasses.
    3. Through B draw a line parallel to AD. (Use the set square.)
    4. Through D draw a line parallel to AB. The two lines meet at C.
      Thus $$ABCD$$ is a rectangle with AB = 8 cm and AD = 4 cm.

    Step 2 – Locate the centre of the rectangle

    1. Draw the two diagonals $$\overline{AC}$$ and $$\overline{BD}$$. They intersect at O.
        Point O is the centre of the rectangle.

    Rough-work check
    The square has to share the same centre O. Its sides must be parallel to the rectangle so that the figure looks like the one in the textbook. Since the height of the rectangle is $$4\,\text{cm}$$, the largest square we can fit is also $$4\,\text{cm}$$ on each side. This leaves a gap of \[\dfrac{8-4}{2}=2\,\text{cm}\] between every vertical side of the rectangle and the nearest vertical side of the square.

    Step 3 – Mark the vertical sides of the square

    1. Through O draw the line $$\ell_1$$ parallel to AB (use a set square). This is the line that will carry the mid-points of the left and right sides of the square.
    2. Set the compasses to a radius of $$2\,\text{cm}$$ (the gap just found).
    3. With centre O cut off points P and Q on $$\ell_1$$ such that $$OP=OQ=2\,\text{cm}$$.
      Point P lies to the left of O, Q to the right of O.
    4. Through P draw a line $$\ell_2$$ perpendicular to $$\ell_1$$ (that is, parallel to AD).
        Through Q draw a line $$\ell_3$$ perpendicular to $$\ell_1$$ in the same way.

    Step 4 – Complete the square

    1. The line $$\ell_2$$ meets the top side AB at E and the bottom side CD at H.
    2. The line $$\ell_3$$ meets AB at F and CD at G.
    3. Join the points in order E → F → G → H → E.
        The figure $$EFGH$$ is a square because
      • EF and HG are both parts of AB and CD, so they are equal and parallel.
      • EH and FG are parts of the two constructed parallel lines, so they are equal and parallel.
      • Each angle of a rectangle is $$90^\circ$$, hence each angle of EFGH is $$90^\circ$$.
      • All four sides are $$4\,\text{cm}$$ long (distance between AB and CD).

    Result

    • Side-length of the square  =  $$4\,\text{cm}$$.
    • Distance between every corner of the square and the nearest vertical side of the rectangle  =  $$2\,\text{cm}$$.
    • Point O is the common centre of both the rectangle and the square as required.

    Answer

    The inscribed square has side-length $$4\,\text{cm}$$ and each of its corners is $$2\,\text{cm}$$ away from the nearest vertical side of the $$8\,\text{cm}\times4\,\text{cm}$$ rectangle.

    2

    Falling Squares

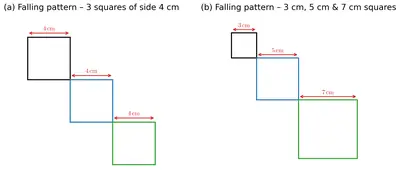
    Construct the figure shown in the textbook where three squares, each of side $$4 \, \mathrm{cm}$$, are arranged in a falling/stair pattern. Make sure that the squares are aligned the way they are shown.

    Now, try this — construct a similar falling pattern with a square of side $$3 \, \mathrm{cm}$$, a square of side $$5 \, \mathrm{cm}$$ and a square of side $$7 \, \mathrm{cm}$$.

    Figure
    Figure

    Solution

    Part A — Three equal squares (side $$4\,\mathrm{cm}$$) in a stair pattern

    1. First square
      1. Draw a horizontal ray and mark $$A$$ on it.
      2. With the ruler mark $$B$$ on the ray so that $$AB = 4\,\mathrm{cm}$$.
      3. Using a set-square (or the compass method) draw a perpendicular through $$A$$ to the first ray. On this perpendicular cut $$AD = 4\,\mathrm{cm}$$.
      4. With centre $$D$$ and radius $$4\,\mathrm{cm}$$ draw an arc.
      5. With centre $$B$$ and the same radius draw another arc to meet the previous one at $$C$$.
      6. Join $$BC$$ and $$CD$$. Quadrilateral $$ABCD$$ is a square of side $$4\,\mathrm{cm}$$ (this is the top-most square).
    2. Second square (falls one step down and to the right)
      1. The common vertex for the next square is the bottom-right corner of the first square, that is the point $$C$$.
      2. Through $$C$$ draw a horizontal ray to the right. Mark $$E$$ on it so that $$CE = 4\,\mathrm{cm}$$.
      3. Draw a perpendicular through $$C$$ downwards. Mark $$F$$ on it so that $$CF = 4\,\mathrm{cm}$$.
      4. With centres $$E$$ and $$F$$ and radius $$4\,\mathrm{cm}$$ draw intersecting arcs. Their point of intersection is $$G$$.
      5. Join $$EG$$ and $$GF$$. Square $$CEGF$$ is the second square. It touches the first square only at the single corner $$C$$, so it appears one step lower.
    3. Third square
      1. The next (lowest) square will start from the bottom-right corner $$G$$ of the second square.
      2. Repeat exactly the same construction with $$G$$ as the new reference corner and side $$4\,\mathrm{cm}$$. Name the square $$GHIJ$$.

    Squares $$ABCD$$, $$CEGF$$ and $$GHIJ$$ now form the required falling (stair) pattern.


    Part B — Squares of sides $$3\,\mathrm{cm},\;5\,\mathrm{cm},\;7\,\mathrm{cm}$$ in the same pattern

    The idea is identical: every new square begins at the bottom-right corner of the previous square.

    1. First square : side $$7\,\mathrm{cm}$$
      1. Draw $$PQ = 7\,\mathrm{cm}$$ horizontally.
      2. Perpendicular at $$P$$, mark $$R$$ such that $$PR = 7\,\mathrm{cm}$$.
      3. With centres $$Q$$ and $$R$$ and radius $$7\,\mathrm{cm}$$ obtain $$S$$. Join the sides to finish square $$PQRS$$.
    2. Second square : side $$5\,\mathrm{cm}$$
      1. Take the bottom-right corner $$S$$ of the first square as the fresh starting point.
      2. Draw a horizontal ray through $$S$$ to the right and mark $$T$$ on it so that $$ST = 5\,\mathrm{cm}$$.
      3. Draw a downward perpendicular through $$S$$ and mark $$U$$ so that $$SU = 5\,\mathrm{cm}$$.
      4. With centres $$T$$ and $$U$$, radius $$5\,\mathrm{cm}$$ locate $$V$$. Join to obtain square $$STUV$$.
    3. Third square : side $$3\,\mathrm{cm}$$
      1. Start from $$V$$ (the bottom-right corner of the second square).
      2. In exactly the same way draw square $$VWXY$$ of side $$3\,\mathrm{cm}$$.

    You will now have three squares of sides $$7\,5\text{ and }3\,\mathrm{cm}$$ neatly stepping down to the right, reproducing the "falling squares" pattern with the new sizes.

    Check — Measure every side with the ruler; each must match its given length, and neighbouring squares must touch only at their intended single vertices. If so, the construction is correct.


    Answer

    The three $$4\,\mathrm{cm}$$ squares (and, similarly, the $$7\,\mathrm{cm},\;5\,\mathrm{cm},\;3\,\mathrm{cm}$$ squares) have been constructed following the steps above; they form the required falling-stair pattern.

    3

    Shadings

    Construct this. Choose measurements of your choice. Note that the larger 4-sided figure is a square and so are the smaller ones.

    Solution

    Objective
    We have to draw one large square and, inside it, several smaller exact squares that match the pattern shown in the textbook’s shaded picture. The book allows us to choose our own lengths; here we make the big square 8 cm on each side and every small square 2 cm on each side so that they fit exactly (8 cm ÷ 2 cm = 4).

    Instruments needed
    A ruler graduated in centimetres, a compasses, a sharp pencil and an eraser.

    Step 1 Draw the large square ABCD (side 8 cm)

    1. Draw a horizontal segment $$AB = 8\text{ cm}$$ with the ruler.
    2. With centre $$A$$ and radius $$8\text{ cm}$$ draw an arc above $$AB$$.
    3. With centre $$B$$ and radius $$8\text{ cm}$$ cut the previous arc at $$C$$.
    4. Join $$AC$$ and $$BC$$ to get two equal sides $$AC$$ and $$BC$$.
    5. Join $$C$$ to $$A$$ with a light line and locate the point $$D$$ on this line such that $$AD = 8\text{ cm}$$ (use the compasses again). Finally join $$CD$$ to close the square.
      We now have square $$ABCD$$ with each side $$8\text{ cm}$$.

    Step 2 Mark off the positions of the grid lines

    1. Along $$AB$$ mark off three points $$P_1, P_2, P_3$$ so that $$AP_1 = P_1P_2 = P_2P_3 = P_3B = 2\text{ cm}.$$ These divide $$AB$$ into four equal parts.
    2. Repeat the same process on the left-hand side $$AD$$: mark points $$Q_1, Q_2, Q_3$$ so that $$AQ_1 = Q_1Q_2 = Q_2Q_3 = Q_3D = 2\text{ cm}.$$

    Step 3 Draw the vertical grid lines

    1. Using a set-square or the ruler–compasses method, draw straight lines through $$P_1, P_2, P_3$$ parallel to $$AD$$ (i.e. vertical). Each of these runs all the way from $$AB$$ down to the opposite side $$CD$$.

    Step 4 Draw the horizontal grid lines

    1. Similarly, through $$Q_1, Q_2, Q_3$$ draw lines parallel to $$AB$$ (i.e. horizontal). These run completely between the left side $$AD$$ and the right side $$BC$$.

    After Steps 3 and 4 the large square is perfectly divided into \[4\times4 = 16\] congruent smaller squares, each of side $$2\text{ cm}$$. All interior four-sided figures are therefore squares, as the question demands.

    Step 5 Do the shading

    1. Starting with the small square in the bottom-left corner, shade alternate squares exactly like a chessboard. This gives the model shading shown in the book.

    Why the construction works

    • Because we used equal radii $$8\text{ cm}$$ from $$A$$ and $$B$$, the triangle $$ABC$$ is isosceles with $$AC = CB = 8\text{ cm}$$ and $$AB = 8\text{ cm}$$, guaranteeing square $$ABCD$$ (all sides equal and each angle right-angled by construction).
    • By laying off equal segments of $$2\text{ cm}$$ and drawing parallels, we created rectangles that are simultaneously squares because adjacent sides are equal:$$2\text{ cm} = 2\text{ cm}$$.

    Result
    A big square of side $$8\text{ cm}$$ containing sixteen small congruent squares of side $$2\text{ cm}$$ has been drawn, and alternate small squares have been shaded exactly as required.

    Answer

    Construction completed: one 8 cm × 8 cm square subdivided into sixteen 2 cm × 2 cm squares, with alternate squares shaded.

    4

    Square with a Hole

    Observe that the circular hole is the same as the centre of the square.

    Hint: Think where the centre of the circle should be.

    Solution

    Goal: Construct a square and then draw a circular “hole” exactly at its centre.

    1. Draw any one side of the square.
      Take a straight line segment $$\overline{AB}$$ of the desired length of the square’s side.
    2. Construct a right angle at each end.
      Using the compass–arc method (Chapter 8, Construction 3):
      1. With centre $$A$$ draw an arc that cuts $$\overline{AB}$$ at $$P$$.
      2. Keeping the same radius, put the compass at $$P$$ and cut the first arc at $$Q$$.
      3. Without changing the radius, set the compass at $$Q$$ to obtain point $$R$$ on the first arc.
      4. Join $$A$$ to $$R$$. $$\angle BAR = 90^{\circ}$$.
      5. Repeat the same steps at $$B$$ to get $$\angle ABT = 90^{\circ}$$.
      6. Draw long rays $$AR$$ and $$BT$$; these will soon meet the next two sides.
    3. Complete the square.
      Set the compass opening to $$AB$$. With centres $$R$$ and $$T$$ draw two arcs that cut the rays $$AR$$ and $$BT$$ at $$C$$ and $$D$$ respectively. Join $$C$$ to $$D$$. The figure $$ABCD$$ is a square because all its sides are equal and every angle is $$90^{\circ}$$.
    4. Locate the exact centre of the square.
      Draw both diagonals $$\overline{AC}$$ and $$\overline{BD}$$. They intersect at a single point. Mark this point as $$O$$.
        • In a square, the diagonals are perpendicular bisectors of one another, so their intersection point $$O$$ is equidistant from all four vertices. Therefore $$O$$ is the square’s centre.
    5. Decide the size of the hole.
      Any radius less than $$\dfrac{AB}{2}$$ will keep the circle completely inside the square. (One convenient choice is the distance from $$O$$ to the midpoint of any side; that radius makes the circle just touch the four sides.)
    6. Draw the circular hole.
      With centre $$O$$ and the chosen radius, draw a full circle using the compass. This circle is the required “hole” situated exactly at the centre of the square.

    Why the construction works

    • The diagonals of any square bisect each other at right angles; hence their intersection $$O$$ is the unique point that is equidistant from all four vertices, i.e. it is the centre of the square.
    • Placing the compass needle at $$O$$ therefore makes the circle concentric with the square.

    The task is complete: we have a square $$ABCD$$ with a perfectly centred circular hole.

    Answer

    The centre of the required circle is the point where the two diagonals of the square intersect. Draw the circle with that point as centre and any convenient radius < $$\dfrac{\text{side}}{2}$$.

    5

    Square with more Holes

    Construct the figure shown in the textbook — a square divided into 4 equal smaller squares, each containing a circular hole at its centre.

    Figure
    Figure

    Solution

    Objective  To construct a square, divide it into four equal smaller squares and inscribe one same-sized circle ("hole") at the centre of each small square.

    We shall take the side of the big square to be $$8\ \text{cm}$$ so that each small square will be $$4\ \text{cm}\times4\ \text{cm}$$. Any convenient length can be used – only the order of steps matters.

    Required instruments

    • Ruler graduated in centimetres
    • Pair of compasses
    • Sharp pencil
    • Set-square (or a protractor to draw right angles)

    Step-by-step construction

    1. Draw the base of the big square.
      With the ruler draw a straight line segment $$AB$$ of length $$8\ \text{cm}$$.
    2. Construct a right angle at each end.
      Using a set-square place its right-angle corner on point $$A$$ so that one side of the right angle coincides with $$AB$$. Draw the perpendicular ray at $$A$$. Repeat at point $$B$$. (Each makes a $$90^{\circ}$$ angle with $$AB$$.)
    3. Mark off the other two sides.
      Open the compasses to exactly $$8\ \text{cm}$$ (same as $$AB$$).
      • With centre $$A$$ cut an arc on its perpendicular ray; label the cut point $$D$$.
      • With centre $$B$$ cut an arc on its perpendicular ray; label that point $$C$$.
    4. Complete the square.
      Join $$C$$ to $$D$$ with a straight line. $$ABCD$$ is now a square because all sides are $$8\ \text{cm}$$ and each angle is $$90^{\circ}$$.
    5. Find the mid-points of the opposite sides.
      (a) Place the compasses on $$A$$, open it a little more than half of $$AB$$, and draw arcs above and below $$AB$$.
      (b) With the same opening, repeat from $$B$$ to cut the arcs. Join the intersection points – the line meets $$AB$$ at its mid-point $$M$$.
      (c) In exactly the same manner bisect $$CD$$ to get its mid-point $$N$$.
    6. Draw the first dividing line.
      Join $$M$$ and $$N$$. Because $$M$$ and $$N$$ are mid-points of opposite sides, line $$MN$$ is parallel to $$AD$$ and $$BC$$ and cuts the square into two equal rectangles.
    7. Repeat for the other pair of opposite sides.
      Bisect $$AD$$ exactly as above to get its mid-point $$P$$, and bisect $$BC$$ to get $$Q$$. Join $$P$$ and $$Q$$.
      Now both $$MN$$ and $$PQ$$ intersect at point $$O$$ – the centre of the big square – and the square is split into four equal smaller squares. Each small square has side $$4\ \text{cm}$$ because $$8\div2=4$$.
    8. Locate the centre of every small square.
      The intersection point $$O$$ is already the centre of the lower-right small square. For the other three: note that $$MN$$ and $$PQ$$ themselves are the lines of symmetry, so the rectangles they form meet at right angles. Thus their intersection with the other right-angled corners automatically marks the exact centre of every small square. Name them $$O_1,\,O_2,\,O_3,\,O_4$$ (any convenient order).
    9. Decide a radius for the circular holes.
      Because each little square is $$4\ \text{cm}$$ wide, any radius less than $$2\ \text{cm}$$ keeps the circle completely inside. We take $$r=1.5\ \text{cm}$$ (chosen only for neatness; other radii <$$2\ \text{cm}$$ are equally correct).
    10. Draw the four circles.
      Keeping the compasses at radius $$1.5\ \text{cm}$$:
      • With centre $$O_1$$ draw a complete circle.
      • Without changing the opening repeat for $$O_2,\,O_3,\,O_4$$.
      These are the four identical "holes".
    11. Clean-up.
      Darken the final required lines of the square, the two dividing lines and the four circles. Light construction arcs may be erased.

    Why the construction works

    • Steps 2 and 3 give all sides equal and angles $$90^{\circ}$$, hence $$ABCD$$ is a square by definition.
    • Mid-point theorem tells us that the segment joining mid-points of two sides of a triangle is parallel to the third side; by applying it twice (upper and lower triangles) we see $$MN\parallel AD,BC$$ and similarly $$PQ\parallel AB,CD$$, ensuring that the interior is divided into four equal squares.
    • Any point equidistant from the four sides of a square must be its centre, so where $$MN$$ and $$PQ$$ cross is the common centre of symmetry for the whole square and the obvious centre for the lower-right small square. Translating this point by $$4\ \text{cm}$$ left/right/up gives the centres of the other three small squares.
    • The radius $$1.5\ \text{cm}<2\ \text{cm}$$ guarantees each circle stays inside its square because the distance from any centre to a side is exactly $$2\ \text{cm}$$.

    The required figure – a square with four equal circular holes – is now complete.

    Answer

    Construction finished – the big square (side 8 cm) is divided into four equal 4 cm squares, each containing a circle of radius 1.5 cm centred at its middle.

    6

    Square with Curves

    This is a square with $$8 \, \mathrm{cm}$$ sidelengths.

    Hint: Think where the tip of the compass can be placed to get all the 4 arcs to bulge uniformly from each of the sides. Try it out!

    Solution

    Objective
    To draw a square of side $$8\;\text{cm}$$ in which each straight side is replaced by an identical smooth arc – a “square with curves”.

    Instruments needed
    Scale (ruler), compass, pencil, eraser.

    Step 1 – Draw one side of the square

    • With the scale draw $$\overline{AB}=8\;\text{cm}$$ on your paper.

    Step 2 – Construct the right angle at A

    • Place the ruler edge along $$\overline{AB}$$.
    • Using a set–square (or the compass method for a perpendicular), draw a line through A at $$90^{\circ}$$ to $$\overline{AB}$$.

    Step 3 – Mark the second side

    • Open the compass to $$8\;\text{cm}$$ (the same opening as $$\overline{AB}$$).
    • With centre A and this radius mark a point D on the perpendicular drawn in Step 2, so that $$AD=8\;\text{cm}$$.

    Step 4 – Finish the square

    • With centre B and radius $$8\;\text{cm}$$ draw an arc.
    • With centre D and radius $$8\;\text{cm}$$ draw another arc to cut the first at C.
    • Join $$\overline{BC}$$ and $$\overline{CD}$$. ABCD is now a square of side $$8\;\text{cm}$$.

    Step 5 – Locate the single centre for all the arcs

    • Draw the two diagonals $$\overline{AC}$$ and $$\overline{BD}$$. They meet at O.
    • Point O is the centre of the square; it is equally distant from all four vertices.
      Using Pythagoras: the diagonal $$AC=8\sqrt{2}\;\text{cm}$$, so
      $$OA=\dfrac{AC}{2}=\dfrac{8\sqrt{2}}{2}=4\sqrt{2}\;\text{cm}\;\;(\approx5.66\,\text{cm}).$$

    Step 6 – Fix the compass opening

    • Keep the needle on O and open the compass exactly up to A (that is, radius $$OA=4\sqrt{2}\;\text{cm}$$). Do not change this opening again; all four arcs will be drawn with the same radius.

    Step 7 – Draw the four equal arcs

    1. Still keeping the needle at O, place the pencil on A and move it carefully to B; the small part of the circle traced between A and B is the first curved side.
    2. Without changing the position of the needle, repeat the motion from B to C – this gives the second arc.
    3. Do the same from C to D for the third arc.
    4. Finally move from D back to A to complete the fourth arc.

    Result

    The square now has its four straight edges replaced by four identical circular arcs, all drawn from the single centre O with radius $$4\sqrt{2}\;\text{cm}$$, so each side “bulges” equally. You have obtained the required square with curves.

    Why it works

    • O lies on the perpendicular bisector of every side of the square, hence $$OA=OB=OC=OD$$.
    • Because the same radius is used, every arc is a congruent piece of the same circle – that is why all four bulges are uniform.

    Tip: If you want the curves to bulge outside the square instead of inside, keep the needle on the perpendicular bisector of a side but on the outer side of the square at the same distance $$4\sqrt{2}\;\text{cm}$$ from its two ends, and repeat the construction separately for each side.

    Answer

    Keep the compass needle at the point where the two diagonals meet (the centre of the square) and, with radius equal to the half-diagonal $$OA=4\sqrt{2}\;\text{cm}$$, draw successive arcs joining A to B, B to C, C to D and D to A. These four equal arcs replace the straight sides, giving a square whose edges all bulge uniformly.

    Section 8.5 Exploring Diagonals of Rectangles and Squares — Intext Questions

    Explore

    Consider a rectangle PQRS. Join PR and QS. These two lines are called the diagonals of the rectangle. Compare the lengths of the diagonals. The diagonal PR divides angle R into two smaller angles g and h. The diagonal also divides angle P into c and d. Are g and h equal? Are c and d equal?

    First predict the answers, and then measure the angles. What do you observe? Identify pairs of angles that are equal.

    Explore: How should the rectangle be constructed so that the diagonal divides the opposite angles into equal parts?

    Solution

    Step 1 – Draw and label

    1. Draw rectangle $$PQRS$$ so that $$PQ\parallel RS$$ (horizontal) and $$PS\parallel RQ$$ (vertical).
    2. Join the opposite vertices to obtain the two diagonals $$PR$$ and $$QS$$.
    3. At vertex $$P$$ the diagonal $$PR$$ splits the right angle into two parts, name them $$\angle c$$ (touching side $$PQ$$) and $$\angle d$$ (touching side $$PS$$).
      At vertex $$R$$ the same diagonal splits the right angle into $$\angle g$$ (touching $$RS$$) and $$\angle h$$ (touching $$RQ$$).

    Step 2 – Compare the lengths of the diagonals

    • Measure $$PR$$ and $$QS$$ with a ruler – both give the same reading.
    • Reason: each diagonal is the hypotenuse of a right triangle whose perpendicular sides are $$PQ$$ and $$PS$$. Hence \[PR = \sqrt{PQ^2 + PS^2} = QS\] Therefore the diagonals of every rectangle are equal.

    Step 3 – Predict and measure the four small angles

    A quick guess may be “they look equal”, but a protractor shows a different story. For one particular rectangle the readings may be

    AngleMeasured value
    $$\angle c$$$$32^{\circ}$$
    $$\angle d$$$$58^{\circ}$$
    $$\angle g$$$$32^{\circ}$$
    $$\angle h$$$$58^{\circ}$$

    Thus, in an ordinary rectangle

    • $$g \neq h$$  and  $$c \neq d$$ (the diagonal does not bisect either right angle).

    Step 4 – Which angles turn out to be equal?

    • Because $$PQ \parallel RS$$ and $$PR$$ is a transversal, the alternate–interior angles are equal:   $$\boxed{c = g}$$.
    • Because $$PS \parallel RQ$$ and $$PR$$ is a transversal, another pair of alternate–interior angles are equal:   $$\boxed{d = h}$$.

    So the two angles made with the horizontal sides are equal and the two made with the vertical sides are equal.

    Step 5 – When will the diagonal bisect the right angles?

    For bisection we need $$c = d = 45^{\circ}$$ (and automatically $$g = h = 45^{\circ}$$).
    That happens only when the adjacent sides of the rectangle are equal, that is \[PQ = PS\] So the figure must be a square. A diagonal bisects the opposite right angles only in a square.

    Summary

    • Diagonals of a rectangle are equal: $$PR = QS$$.
    • Generally $$g \neq h$$ and $$c \neq d$$, yet $$c = g$$ and $$d = h$$.
    • The diagonal bisects the angles of the rectangle iff the rectangle is a square.

    Answer

    In a rectangle

    • $$PR = QS$$ (diagonals are equal).
    • At each end of the diagonal we have two unequal angles, so $$g \neq h$$ and $$c \neq d$$, but
    • $$c = g$$ and $$d = h$$ (each pair lies between the diagonal and a pair of parallel sides).
    • The diagonal will bisect the right angles (that is, make all four of them $$45^{\circ}$$) only when the rectangle is a square.

    Section 8.5 — Solved Examples

    Construct 1

    Construct a rectangle in which one of the diagonals divides the opposite angles into $$60°$$ and $$30°$$.
    Figure
    Figure

    Solution

    Given. We have to construct a rectangle whose diagonal cuts the two opposite right angles into parts of 60° and 30°.

    Idea. In a rectangle the sides through one vertex are perpendicular. If the diagonal through this same vertex makes an angle of 60° with one side, the remaining part of the right angle is 30°. Because opposite sides of a rectangle are parallel, the same division (60°, 30°) appears in the opposite right angle as well. Hence it is enough to construct

    • a right angle at A (to obtain a rectangle), and
    • a ray AC making 60° with AB inside that right angle (to become the required diagonal).

    Take each step slowly and use only ruler and compasses.

    1. Draw the first side.
      Draw a convenient straight line and mark two points on it; name them A and B.
      The segment $$AB$$ will be the first side of the rectangle.
    2. Construct the 60° ray at A.
      (i) With A as centre and any radius, draw an arc meeting $$AB$$ at P.
      (ii) With P as centre and the same radius, cut the arc at Q.
      (iii) Join $$AQ$$. The ray $$AQ$$ makes an angle of $$60^{\circ}$$ with $$AB$$ (angle-in-an-equilateral-triangle construction). Call this ray $$AX$$; later the point C will lie on it.
    3. Construct the perpendicular at A.
      (i) With A as centre and a convenient radius, draw an arc that cuts $$AB$$ at R and S.
      (ii) With R and S as centres and the same radius, draw two arcs that meet at T.
      (iii) Join $$AT$$. The line $$AT$$ is perpendicular to $$AB$$; call it $$AD$$. Thus $$\angle DAB = 90^{\circ}$$.
    4. Through B draw a line parallel to AD.
      Place the compasses on A and then on B, mark equal arcs on $$AD$$ and on the line through B, and complete the usual parallel-line construction. The new line through B is perpendicular to $$AB$$; name it $$BC$$.
    5. Locate vertex C.
      The perpendicular through B (step 4) intersects the 60° ray $$AX$$ (step 2) at a unique point. Mark that point C.
      Now we already have the diagonal $$AC$$.
    6. Draw the fourth side.
      Through C draw a line parallel to $$AB$$ (use any standard parallel-line construction). This line meets $$AD$$ (or its extension) at D.
    7. Rectangle obtained.
      Join D to C and D to A if necessary. The quadrilateral $$ABCD$$ has $$AB \parallel CD,\ AD \parallel BC$$ and all four angles are right angles; hence it is a rectangle.

    Verification of the required property.

    • By construction $$\angle BAC = 60^{\circ}$$, hence the remaining part of the right angle is $$\angle CAD = 30^{\circ}$$.
    • Because $$AB \parallel CD$$, alternate-interior angles give $$\angle DCA = \angle BAC = 60^{\circ}$$ and therefore $$\angle ACB = 30^{\circ}$$.

    Thus diagonal $$AC$$ divides the two opposite right angles (at A and C) of rectangle $$ABCD$$ into 60° and 30° exactly as required.

    Answer

    Rectangle $$ABCD$$ constructed as above has diagonal $$AC$$; at vertices $$A$$ and $$C$$ the diagonal forms 60° with one side and 30° with the other, so the requirement is satisfied.

    Construct 2

    Construct a rectangle where one of its sides is $$5 \, \mathrm{cm}$$ and the length of a diagonal is $$7 \, \mathrm{cm}$$.
    Figure
    Figure

    Solution

    Given data

    We must draw a rectangle whose one side is $$5\,\text{cm}$$ and whose diagonal is $$7\,\text{cm}$$.

    Idea

    In a rectangle all the angles are right angles, so a diagonal forms the hypotenuse of a right-angled triangle whose legs are the length and the breadth of the rectangle. If we call the unknown breadth $$b\,\text{cm}$$, then

    $$5^{2}+b^{2}=7^{2}$$

    $$\Rightarrow\;25+b^{2}=49$$

    $$\Rightarrow\;b^{2}=49-25=24$$

    $$\Rightarrow\;b=\sqrt{24}\approx4.9\,\text{cm}$$

    Instead of actually computing the breadth, we can let the compasses pick it up automatically from the condition $$BD=7\,\text{cm}$$ while we are constructing.

    Construction steps

    1. Draw a straight line and mark its end-points $$A$$ and $$B$$ such that $$AB=5\,\text{cm}$$ (use ruler).

    2. At $$A$$ construct a right angle. (For example, put the edge of a set-square on $$AB$$ so that the right-angle corner touches $$A$$; draw the ray $$AX$$ that is perpendicular to $$AB$$.)

    3. Set the compass opening to $$7\,\text{cm}$$. With centre $$B$$ draw an arc cutting the ray $$AX$$ at a point; call this intersection $$D$$. Now $$BD=7\,\text{cm}$$ by construction.

    4. Through $$D$$ draw a line parallel to $$AB$$ (slide a set-square or use the compass–parallel method). This will be the top side of the rectangle.

    5. Through $$B$$ draw a line perpendicular to $$AB$$ (equivalently, parallel to $$AD$$). The two new lines meet at $$C$$.

    6. Join $$C$$ to $$D$$ and $$C$$ to $$B$$. The figure $$ABCD$$ is now complete.

    Why it works

    • $$AB\perp AD$$ by Step 2, and $$AD\parallel BC$$, $$AB\parallel DC$$ by Steps 4 and 5. Hence every interior angle is $$90^\circ$$, so $$ABCD$$ is a rectangle.
    • Side $$AB=5\,\text{cm}$$ by Step 1.
    • The diagonal $$BD=7\,\text{cm}$$ by Step 3. (The other diagonal $$AC$$ is automatically also $$7\,\text{cm}$$, a property of rectangles.)

    Check  Measure $$AD$$ or $$BC$$; it should read about $$4.9\,\text{cm}$$, agreeing with $$\sqrt{24}\,\text{cm}$$ calculated earlier.

    Answer

    Rectangle $$ABCD$$ with $$AB=5\,\text{cm}$$ and diagonal $$BD=AC=7\,\text{cm}$$ has been constructed.

    Section 8.5 — Construct

    1

    Construct a rectangle in which one of the diagonals divides the opposite angles into $$50°$$ and $$40°$$.
    Figure
    Figure

    Solution

    Required construction  : A rectangle $$ABCD$$ in which the diagonal $$AC$$ divides the right angle at $$A$$ into $$50^\circ$$ and $$40^\circ$$.

    1. Draw a convenient base.
      Draw a straight line and mark two points $$A$$ and $$B$$ on it so that $$AB = 5\;\text{cm}$$ (any handy length will do).

    2. Construct the right angle at $$A$$.
      Place a set-square with its right angle at $$A$$ so that one arm lies on $$AB$$. Draw the other arm; this ray is $$AD$$. Now $$\angle DAB = 90^\circ$$.

    3. Mark the diagonal that cuts the right angle into $$40^\circ$$ and $$50^\circ$$.
      Keep the protractor on $$AB$$ with its centre at $$A$$ and zero on $$AB$$. Mark a point $$P$$ on the inside of $$\angle DAB$$ so that $$\angle PAB = 40^\circ$$. Join $$A$$ to $$P$$. Extend $$AP$$; this ray will be the required diagonal $$AC$$ because
      $$\angle CAB = 40^\circ$$ and, since $$\angle DAB = 90^\circ$$, the remaining part $$\angle DAC = 90^\circ-40^\circ = 50^\circ$$.

    4. Complete the adjacent right angle at $$B$$.
      Through $$B$$ draw a ray perpendicular to $$AB$$ (again with the set-square). This ray is $$BC$$. Produce it till it meets the diagonal$$\;AC$$ at a point; name the point of intersection $$C$$.

    5. Obtain the fourth vertex.
      Through $$C$$ draw a line parallel to $$AB$$ (use the other edge of the set-square held against $$AB$$). This line meets the ray $$AD$$ at a point; call this point $$D$$.

    Justification

    • By construction, $$AB \perp BC$$ and $$AB \parallel CD$$, so $$\angle ABC = \angle BCD = 90^\circ$$.
    • Likewise, $$BC \parallel AD$$, hence $$\angle BAD = \angle ADC = 90^\circ$$.
    • Therefore every interior angle of $$ABCD$$ is a right angle and opposite sides are parallel; thus $$ABCD$$ is a rectangle.
    • At $$A$$ we deliberately placed $$AC$$ so that $$\angle CAB = 40^\circ$$. Because the whole angle at $$A$$ is $$90^\circ$$, the other part is $$\angle DAC = 50^\circ$$. Hence the diagonal $$AC$$ splits the right angle exactly as required.

    Hence a rectangle whose diagonal divides one of the opposite angles into $$50^\circ$$ and $$40^\circ$$ has been successfully constructed.

    Answer

    The required rectangle $$ABCD$$ with diagonal $$AC$$ such that $$\angle DAC = 50^\circ$$ and $$\angle CAB = 40^\circ$$ has been constructed.

    2

    Construct a rectangle in which one of the diagonals divides the opposite angles into $$45°$$ and $$45°$$. What do you observe about the sides?
    Figure
    Figure

    Solution

    Goal. Construct a rectangle in which one diagonal splits the two opposite right angles into $$45^{\circ}$$ and $$45^{\circ}$$, and then study what that forces on the sides.

    Construction

    1. Draw any convenient line segment $$AC$$. This will finally become the diagonal that does the bisecting.
    2. At point $$A$$ construct an angle of $$90^{\circ}$$ whose two arms are exactly $$45^{\circ}$$ away from $$AC$$:
      • With a protractor mark a point on each side of $$AC$$ at $$45^{\circ}$$ from $$AC$$.
      • Draw the two rays $$AB$$ (going one way) and $$AD$$ (going the other way) through those marks.
      By construction $$\angle CAB = 45^{\circ}$$ and $$\angle CAD = 45^{\circ}$$, so $$\angle DAB = 90^{\circ}$$ and the diagonal $$AC$$ is its angle bisector.
    3. Choose any radius (say $$5\,\text{cm}$$). With centre $$A$$ and this radius, cut $$AB$$ at $$B$$ and $$AD$$ at $$D$$. Hence $$AB = AD$$.
    4. Through $$B$$ draw a line parallel to $$AD$$ (use a set-square or the standard ruler-compass parallel construction). Through $$D$$ draw a line parallel to $$AB$$. The two parallels meet at a point on segment $$AC$$ extended; call that point $$C$$. The quadrilateral $$ABCD$$ is now a rectangle, because adjacent sides are perpendicular and opposite sides are parallel by construction.
    5. The diagonal $$AC$$ was already drawn in Step 1. By construction $$\angle CAB = \angle CAD = 45^{\circ}$$, and by the symmetry of the figure $$\angle BCA = \angle DCA = 45^{\circ}$$ as well, so the diagonal indeed bisects the two opposite right angles at $$A$$ and at $$C$$.

    What do we observe about the sides?

    Look at $$\triangle ABC$$: $$\angle CAB = \angle ACB = 45^{\circ}$$. In a triangle, equal angles stand on equal sides, so $$BC = AB$$.

    Look at $$\triangle ACD$$: $$\angle DAC = \angle DCA = 45^{\circ}$$, hence $$AD = DC$$.

    A rectangle already has $$AB = DC$$ and $$AD = BC$$ (opposite sides equal). Combining all four equalities gives

    $$AB = BC = CD = DA.$$

    So every side has the same length: the "rectangle" turns out to be a square.

    Answer

    The construction produces a square, i.e. $$AB = BC = CD = DA$$.

    3

    Construct a rectangle one of whose sides is $$4 \, \mathrm{cm}$$ and the diagonal is of length $$8 \, \mathrm{cm}$$.
    Figure
    Figure

    Solution

    Goal. Construct a rectangle whose one side is $$4\,\text{cm}$$ and whose diagonal measures $$8\,\text{cm}$$.

    Idea behind the construction. In a rectangle, a diagonal together with the two adjacent sides forms a right-angled triangle, with the diagonal as the hypotenuse. Let the known side be the breadth $$b = 4\,\text{cm}$$, the unknown adjacent side be the length $$L$$, and the diagonal be $$d = 8\,\text{cm}$$. By Pythagoras' theorem,

    \[d^{2} = L^{2} + b^{2},\]

    so

    \[L^{2} = 8^{2} - 4^{2} = 64 - 16 = 48, \qquad L = \sqrt{48} = 4\sqrt{3} \approx 6.9\,\text{cm}.\]

    This numerical value of $$L$$ is not actually needed for the construction; it only confirms that $$L$$ is shorter than $$8\,\text{cm}$$, so the arc of radius $$8\,\text{cm}$$ drawn from $$A$$ really does meet the perpendicular erected at $$B$$.

    Construction steps (use a sharp pencil, a ruler with centimetre marks, and a compass).

    1. Draw the first side. Draw a horizontal line segment $$AB$$ of length $$4\,\text{cm}$$.
    2. Prepare the diagonal arc. With centre $$A$$ and radius $$8\,\text{cm}$$, draw a long arc above the segment. This arc contains every point that is $$8\,\text{cm}$$ from $$A$$.
    3. Erect a perpendicular at $$B$$.
      • With centre $$B$$ and any convenient radius, cut the line $$AB$$ on either side of $$B$$ at two points $$P$$ (between $$A$$ and $$B$$) and $$Q$$ (on the extension of $$AB$$ beyond $$B$$).
      • With centres $$P$$ and $$Q$$ and the same radius (greater than half of $$PQ$$), draw two arcs that meet above $$AB$$ at a point $$R$$.
      • Join $$B$$ to $$R$$. The line $$BR$$ is perpendicular to $$AB$$ at $$B$$. Keep this line quite long.
    4. Locate the third vertex $$C$$. Mark the point where the perpendicular $$BR$$ meets the arc drawn from $$A$$ in Step 2. Call this point $$C$$. Then $$AC = 8\,\text{cm}$$ and $$\angle ABC = 90^{\circ}$$, so $$\triangle ABC$$ is right-angled with the required measurements.
    5. Construct the side through $$C$$ that is parallel to $$AB$$. Repeat the perpendicular construction at $$C$$ on the side $$BC$$ to obtain a line through $$C$$ perpendicular to $$BC$$.
    6. Mark the fourth vertex $$D$$ so that $$CD = AB = 4\,\text{cm}$$. Set the compass to $$4\,\text{cm}$$, place the compass tip at $$C$$, and cut the perpendicular line from Step 5 (on the same side of $$BC$$ as $$A$$). Label the point of intersection $$D$$.
    7. Complete the rectangle. Join $$D$$ to $$A$$. The figure $$ABCD$$ is closed: $$AB \parallel CD$$ and $$BC \parallel AD$$, so it is a rectangle.

    Verification (optional but recommended)

    • Measure $$BC$$; it should be about $$6.9\,\text{cm}$$, matching $$4\sqrt{3}\,\text{cm}$$ predicted by Pythagoras.
    • Confirm that the opposite sides are equal: $$AB = CD = 4\,\text{cm}$$ and $$BC = AD \approx 6.9\,\text{cm}$$.
    • Check one angle with a protractor; each should be $$90^{\circ}$$.

    The required rectangle with one side $$4\,\text{cm}$$ and diagonal $$8\,\text{cm}$$ has been successfully constructed.

    Answer

    A rectangle whose one side is $$4\,\text{cm}$$ and whose diagonal is $$8\,\text{cm}$$ is constructed by first drawing the $$4\,\text{cm}$$ side $$AB$$, erecting a perpendicular at $$B$$, locating $$C$$ where an arc of radius $$8\,\text{cm}$$ from $$A$$ meets that perpendicular, and finally drawing the side through $$C$$ parallel to $$AB$$ at distance $$4\,\text{cm}$$ from $$BC$$ to fix $$D$$. The longer side comes out to $$BC = 4\sqrt{3}\,\text{cm} \approx 6.9\,\text{cm}$$.

    4

    Construct a rectangle one of whose sides is $$3 \, \mathrm{cm}$$ and the diagonal is of length $$7 \, \mathrm{cm}$$.
    Figure
    Figure

    Solution

    Data to be used

    • Required rectangle $$ABCD$$ with one side $$AB = 3\;\mathrm{cm}$$.
    • Its diagonal $$AC = 7\;\mathrm{cm}$$.
    • Property: in a rectangle the diagonal joins two opposite vertices and the angle subtended by a diagonal at any other vertex is a right angle. Hence, if we manage to construct a right–angled triangle $$\triangle ABC$$ with $$AB = 3\;\mathrm{cm}$$ and hypotenuse $$AC = 7\;\mathrm{cm}$$, then $$\angle ABC = 90^{\circ}$$ and the fourth vertex $$D$$ obtained by drawing parallels will give the desired rectangle.

    Construction

    1. Draw a straight segment $$AC = 7\;\mathrm{cm}$$.
    2. Construct the perpendicular bisector of $$AC$$ to locate its midpoint $$O$$. (Use equal radii arcs from $$A$$ and $$C$$ to meet on either side of $$AC$$ and join their intersections.)
    3. With centre $$O$$ and radius $$OA = OC = 3.5\;\mathrm{cm}$$ draw a complete circle. Because $$O$$ is the midpoint, $$AC$$ is a diameter of this circle.
    4. With centre $$A$$ and radius $$3\;\mathrm{cm}$$ draw an arc to cut the circle at $$B$$ (take the point on the side of the circle where you wish the rectangle to lie). Now $$AB = 3\;\mathrm{cm}$$ by construction.
    5. Join $$B$$ to $$C$$. Since $$B$$ lies on the circle with diameter $$AC$$, $$\angle ABC = 90^{\circ}$$ (Theorem of the semicircle – Thales).
    6. Through $$A$$ draw a line $$\ell$$ parallel to $$BC$$. (Construct an angle equal to $$\angle ABC$$ or use the compass–parallel method.)
    7. Through $$C$$ draw a line $$m$$ parallel to $$AB$$.
    8. Let $$\ell$$ and $$m$$ meet at $$D$$. The quadrilateral $$ABCD$$ is obtained.

    Justification

    • Opposite sides are parallel by construction: $$AB \parallel m$$ and $$BC \parallel \ell$$. Hence $$ABCD$$ is a parallelogram.
    • Because $$\angle ABC = 90^{\circ}$$, one angle of the parallelogram is right; therefore all four angles are right. So $$ABCD$$ is a rectangle.
    • Given lengths are satisfied: $$AB = 3\;\mathrm{cm}$$ (step 4) and the diagonal $$AC = 7\;\mathrm{cm}$$ (step 1).

    Therefore the required rectangle is successfully constructed.

    Answer

    The rectangle ABCD with side AB = 3 cm and diagonal AC = 7 cm is constructed by first forming right–angled triangle ABC (using Thales’ theorem) and then drawing through A and C lines parallel to BC and AB respectively to locate the fourth vertex D.

    Section 8.6 Points Equidistant from Two Given Points — Solved Example (House)

    House Recreate this figure. Note that all the lines forming the border of the house are of length $$5 \, \mathrm{cm}$$.

    Solution

    The question asks you to reproduce a small “house-shaped” outline whose every outside edge is $$5\,\mathrm{cm}$$ long. The outline really consists of a square of side $$5\,\mathrm{cm}$$ (the walls) and an isosceles triangle of equal sides $$5\,\mathrm{cm}$$ (the roof) built on its top. Follow the straight-edge-and-compass steps below; do not use a protractor.

    1. Draw the base.
      With the ruler draw a horizontal segment $$\overline{AB}=5\,\mathrm{cm}$$. This will be the bottom of the house.
    2. Construct a perpendicular at A.
      1. Put the compasses on A with any convenient radius (say $$3\,\mathrm{cm}$$) and cut the line $$\overline{AB}$$ at a point P on its interior.
      2. Without changing the opening, draw an arc above $$\overline{AB}$$ with centre P.
      3. With the same radius draw another arc above $$\overline{AB}$$ with centre B; let the two arcs meet at Q.
      4. Join $$A\;Q$$. The line $$AQ$$ is perpendicular to $$AB$$ at A.
      On this perpendicular, set off $$AD=5\,\mathrm{cm}$$ with the compasses and mark the point D.
    3. Construct a perpendicular at B and mark C.
      Repeat the same perpendicular construction at B to get the perpendicular line through B. On it mark the point C so that $$BC=5\,\mathrm{cm}$$.
    4. Complete the square.
      Join D to C. Since opposite sides of a square are equal and parallel, $$CD$$ will automatically be $$5\,\mathrm{cm}$$. You now have square $$ABCD$$ – the walls of the house.
    5. Locate the roof apex E.
      1. Put the compasses on C, take radius $$5\,\mathrm{cm}$$, and draw a large arc above the square.
      2. Without altering the radius, put the compasses on D and draw another arc to meet the first one at E.
      Because both arcs were drawn with radius $$5\,\mathrm{cm}$$, we have $$CE=DE=5\,\mathrm{cm}$$.
    6. Draw the roof edges.
      Join $$C\,E$$ and $$D\,E$$. These are the two equal sloping sides of the roof.

    Segment by segment we now have

    • Walls: $$AB=BC=CD=DA=5\,\mathrm{cm}$$
    • Roof: $$CE=DE=5\,\mathrm{cm}$$

    Thus every line forming the boundary of the figure is exactly $$5\,\mathrm{cm}$$ long, so the required house has been constructed.

    Answer

    The square ABCD of side $$5\,\mathrm{cm}$$ with the isosceles triangle CDE (each of CE and DE also $$5\,\mathrm{cm}$$) has been constructed; every outside edge of the house outline is therefore $$5\,\mathrm{cm}$$ long.

    Section 8.6 Points Equidistant from Two Given Points — Construct

    1

    Construct a bigger house in which all the sides are of length $$7 \, \mathrm{cm}$$.
    Figure
    Figure

    Solution

    Objective : Construct a “house-shaped” outline all of whose sides are $$7\,\mathrm{cm}$$ long.

    Apparatus : ruler, compasses, sharpened pencil, set-square (or protractor).

    1. Base of the house
      Draw a straight line segment $$AB = 7\,\mathrm{cm}$$ with the ruler.

    2. Left wall
      Place the set-square on $$AB$$ and draw the perpendicular at $$A$$.
      With the compasses opened to $$7\,\mathrm{cm}$$, cut this perpendicular at a point $$E$$ so that $$AE = 7\,\mathrm{cm}$$. The segment $$AE$$ will be the left wall.

    3. Right wall
      At $$B$$ draw a perpendicular to $$AB$$ in the same way.
      Keeping the same radius $$7\,\mathrm{cm}$$ on the compasses, mark a point $$C$$ on this perpendicular such that $$BC = 7\,\mathrm{cm}$$. Segment $$BC$$ is the right wall.

    4. Locating the roof apex
      Without altering the compasses’ opening (still $$7\,\mathrm{cm}$$), draw an arc with centre $$E$$ above the two walls.
      With the same radius draw another arc with centre $$C$$ to cut the first one at $$D$$. Point $$D$$ will become the apex of the roof.

    5. Completing the roof
      Join $$C$$ to $$D$$ and join $$D$$ to $$E$$. These two equal segments form the sloping roof.

    The figure obtained is the pentagon $$ABCDE$$.

    Boundary sideMeasured length
    $$AB$$ (base)$$7\,\mathrm{cm}$$
    $$BC$$ (right wall)$$7\,\mathrm{cm}$$
    $$CD$$ (right roof)$$7\,\mathrm{cm}$$
    $$DE$$ (left roof)$$7\,\mathrm{cm}$$
    $$EA$$ (left wall)$$7\,\mathrm{cm}$$

    Thus every side on the boundary measures exactly $$7\,\mathrm{cm}$$, so the required bigger house has been constructed successfully.

    Verification : If the compasses, opened to $$7\,\mathrm{cm}$$, are placed on each of the five sides, the pencil end fits precisely, confirming the equality of all sides.


    (Optionally shade the rectangular part lightly and add windows or a chimney to make the drawing look more like a house.)

    Answer

    The pentagon $$ABCDE$$ produced by the construction has every boundary side equal to $$7\,\mathrm{cm}$$; it is the required “bigger house”.

    2 Try to recreate 'A Person', 'Wavy Wave', and 'Eyes' from the section 'Artwork', using ideas involved in the 'House' construction.

    Solution

    Background - ideas reused from the "House" example

    • Copying a length with a compass: open the compass to a length and step it off without changing the opening.
    • Drawing a perpendicular at a point on a line: mark two equal-distance points on the line on either side of the given point with the compass, then draw two equal arcs from those two points meeting above (or below) the line; the line from the given point to that meeting point is perpendicular.
    • Finding the midpoint of a segment: draw two arcs of the same radius (greater than half the segment) from each end; the line through their intersections is the perpendicular bisector and crosses the segment at its midpoint.
    • Locating a point equidistant from two given points: use two arcs of the same radius from the two points; their intersection is equidistant from both - exactly how the roof apex $$E$$ was located in the House.

    All three pictures will be done with nothing more than an unmarked ruler and a compass - exactly as the square walls and the triangular roof of the "House" were produced.


    I. Construction of "A Person"

    1. Vertical centre line. Draw an $$8\,\text{cm}$$ segment $$OP$$ with $$O$$ at the top. This will be the body's mid-line.
    2. Head. Mark a point $$H$$ on $$OP$$, $$2\,\text{cm}$$ below $$O$$. With centre $$H$$ and radius $$1\,\text{cm}$$ draw the head circle.
    3. Rectangle for the trunk.
      1. From $$H$$ go down $$3\,\text{cm}$$ along $$OP$$ and call this point $$B$$ (the waist).
      2. Construct a perpendicular to $$OP$$ at $$B$$ using the standard equal-arc method:
        • With the compass needle at $$B$$ and any convenient opening, draw two short arcs on $$OP$$, one on each side of $$B$$, to mark points $$U_1$$ and $$U_2$$ with $$BU_1 = BU_2$$.
        • Open the compass wider (any radius greater than $$BU_1$$). With centre $$U_1$$ draw an arc to one side of $$OP$$; with centre $$U_2$$ and the same radius draw another arc that meets the first one at a point $$V$$.
        • Join $$B$$ to $$V$$. The line $$BV$$ is perpendicular to $$OP$$ at $$B$$.
      3. On this perpendicular mark $$L$$ on one side and $$R$$ on the other, with $$BL = BR = 1\,\text{cm}$$. So $$LR$$ is a horizontal segment of length $$2\,\text{cm}$$ whose midpoint is $$B$$.
      4. At $$L$$, erect a perpendicular to $$LR$$ (use the same equal-arc method). On it, on the side below $$LR$$, mark $$L'$$ with $$LL' = 3\,\text{cm}$$. Repeat at $$R$$ to obtain $$R'$$ below $$R$$ with $$RR' = 3\,\text{cm}$$. Both perpendiculars are parallel to $$OP$$.
      5. Join $$L'R'$$ with the ruler. The four vertices $$L,\,R,\,R',\,L'$$ taken in that cyclic order are the corners of the trunk rectangle $$LRR'L'$$: $$LR$$ is the top side, $$RR'$$ the right side, $$R'L'$$ the bottom side, and $$L'L$$ the left side. By construction $$LR = L'R' = 2\,\text{cm}$$ and $$LL' = RR' = 3\,\text{cm}$$, and every angle is a right angle, so $$LRR'L'$$ is indeed a rectangle.
    4. Arms. Find the midpoint $$A$$ of $$HB$$ by drawing the perpendicular bisector of $$HB$$. On the perpendicular line through $$A$$, mark points $$S$$ and $$S'$$ on either side of $$OP$$ with $$AS = AS' = 2\,\text{cm}$$. Segment $$SS'$$ is the shoulder/arm-line. At each end draw a small $$0.4\,\text{cm}$$ circle for a hand (same idea as drawing the head, with a smaller radius).
    5. Legs. The two legs must come out symmetric about $$OP$$, each starting from a bottom corner of the trunk rectangle and finishing the same horizontal distance outward and the same vertical distance downward. Choose the foot offsets once and copy them with the compass.
      1. Extend $$OP$$ downward by another $$3\,\text{cm}$$ past the bottom edge of the trunk and call the new endpoint $$K$$. Through $$K$$ construct a horizontal line $$\ell$$ perpendicular to $$OP$$ (equal-arc method at $$K$$). This line $$\ell$$ will carry the two feet, so that both feet end up at the same height.
      2. Open the compass to $$2\,\text{cm}$$. With centre $$K$$ cut $$\ell$$ to the left at $$F$$ and to the right at $$F'$$. Then $$KF = KF' = 2\,\text{cm}$$, so $$F$$ and $$F'$$ are reflections of each other in $$OP$$.
      3. Join $$L'F$$ and $$R'F'$$ with the ruler. These are the two legs. Since $$L'$$ and $$R'$$ are themselves reflections of each other in $$OP$$ (Step 3d), and so are $$F$$ and $$F'$$, the two legs are mirror images of each other and therefore equal in length.
    6. Feet. At $$F$$ and $$F'$$ draw tiny perpendicular foot segments about $$1\,\text{cm}$$ long, using the same perpendicular-at-a-point construction as in Step 3.

    Equal lengths, midpoints and perpendiculars - exactly the moves used for the walls and roof of the House.


    II. Construction of "Wavy Wave"

    1. Draw a $$12\,\text{cm}$$ horizontal baseline $$AB$$.
    2. Open the compass to $$1.5\,\text{cm}$$. Step this length off along $$AB$$ to mark consecutive equal points: $$A = P_0,\,P_1,\,P_2,\,\ldots,\,P_8 = B$$ (eight equal segments of $$1.5\,\text{cm}$$ each).
    3. Upper semicircles. With diameters $$P_0 P_1,\,P_2 P_3,\,P_4 P_5,\,P_6 P_7$$ draw semicircles above the line. For each diameter the midpoint is the centre and the radius is $$0.75\,\text{cm}$$.
    4. Lower semicircles. With diameters $$P_1 P_2,\,P_3 P_4,\,P_5 P_6,\,P_7 P_8$$ draw semicircles below the line in the same way.

    The repeated copying of one fixed length is the same compass move used to step off the equal sides of the House.


    III. Construction of "Eyes"

    1. Draw a horizontal line. On it mark $$O_1$$ near the left end.
    2. With opening $$1\,\text{cm}$$ draw a circle centred at $$O_1$$ (left eye).
    3. Without changing the compass, step that opening three times along the line to the right of $$O_1$$ to mark $$O_2$$ at distance $$3\,\text{cm}$$. (Repeated copying of a fixed length - the same compass move used in the House.)
    4. With centre $$O_2$$ draw the second circle (right eye), same radius $$1\,\text{cm}$$.
    5. For the pupils reduce the compass opening to $$0.4\,\text{cm}$$ and draw concentric circles at $$O_1$$ and $$O_2$$.
    6. For a sparkle highlight, drop the radius to $$0.2\,\text{cm}$$ and draw a tiny circle inside each pupil touching the pupil's edge.

    Every move used here - "copy a length" and "draw a circle of a given radius" - is one of the two basic compass moves practised in the House diagram.


    Checking. All line segments that were supposed to be equal were copied with one unchanged compass opening, and all perpendiculars were produced by the equal-arc method. Hence the three figures satisfy ruler-and-compass construction rules.

    Your drawing sheet now shows a stick-figure person, an even wavy line and a pair of identical eyes - all constructed strictly with the techniques introduced in the "House" activity.

    Answer

    All three designs - "A Person", "Wavy Wave" and "Eyes" - have been reproduced using only the two basic compass moves ("copy a length", "draw a circle of a given radius") and the standard equal-arc constructions for perpendiculars and midpoints introduced on the House.

    3 Is there a 4-sided figure in which all the sides are equal in length but is not a square? If such a figure exists, can you construct it?

    Solution

    Observation

    A quadrilateral in which all four sides are equal is called a rhombus. A square is only a special kind of rhombus that has every interior angle $$90^\circ$$. Therefore, if we construct a rhombus whose angles are not right angles, we obtain the required 4-sided figure.

    Plan of construction

    • Take any convenient length (say 4 cm) for the side.
    • Choose an angle different from $$90^\circ$$ (say $$60^\circ$$) at one corner.
    • Use the property “both pairs of opposite sides in a parallelogram are parallel” so that once two adjacent equal sides are drawn, the other two sides are forced to be equal and parallel, giving a rhombus.

    Step-by-step construction

    1. Draw one side.
      Draw a line segment $$\overline{AB}=4\text{ cm}$$ with a ruler.
    2. Fix the first angle.
      At point A construct an angle of $$60^\circ$$ with the help of a compass and ruler (standard “compass-only” method for a $$60^\circ$$ angle).
    3. Mark the second vertex.
      Keeping the compass opening equal to $$\overline{AB}$$ (4 cm), cut an arc on the $$60^\circ$$ ray to locate point D so that $$\overline{AD}=4\text{ cm}$$.
    4. Locate the fourth vertex.
      With the same 4 cm opening, draw an arc with centre B. Without changing the radius, draw another arc with centre D. Let the two arcs intersect at C. Then $$\overline{BC}=\overline{DC}=4\text{ cm}$$.
    5. Join the remaining sides.
      Join $$\overline{BC}$$ and $$\overline{CD}$$. The quadrilateral ABCD is now complete.

    Verification

    • By construction $$\overline{AB}=\overline{AD}=\overline{BC}=\overline{CD}=4\text{ cm}$$, so all four sides are equal.
    • At A we deliberately drew $$\angle DAB=60^\circ\neq90^\circ$$, so ABCD is not a square.
    • Opposite sides are equal and parallel (they were constructed with equal radii from B and D), so ABCD is a parallelogram with all sides equal — that is, a rhombus.

    Conclusion

    Yes, a 4-sided figure whose sides are equal but which is not a square does exist; it is called a rhombus. The above ruler-and-compass steps construct one such rhombus of side 4 cm and interior angle $$60^\circ$$.

    Answer

    Yes. A rhombus (all sides equal but angles not right angles) is a 4-sided figure that is not a square. The steps below construct one:

    1. Draw $$AB=4\text{ cm}$$.
    2. At A construct a $$60^\circ$$ ray and mark $$D$$ on it with $$AD=4\text{ cm}$$.
    3. With radius 4 cm draw arcs from B and D; their intersection is C.
    4. Join $$BC$$ and $$CD$$. ABCD is a rhombus, so $$AB=BC=CD=DA$$ but $$\angle A=60^\circ\neq90^\circ$$. Hence the required non-square 4-sided figure exists and is constructed.
    NCERT Solutions for Class 6
    Maths
    NCERT Solutions for Class 6 Maths
    Chapter-wise step-by-step
    solutions with explanations
    explore solutions Maths bg
    Science
    NCERT Solutions for Class 6 Science
    Chapter-wise step-by-step
    solutions with explanations
    explore solutions Science bg

    Frequently Asked Questions

    50,000+ JEE Students Trusted Our Score Calculator

    Predict your JEE Main percentile, rank & performance in seconds